Vacation Nails You Need for Summer 2025: Trendy Designs for a Perfect Beach Getaway
Summer is pretty much at the doorstep – are your nails ready to pack their bags? You know that feeling when you’re planning outfits for your beach getaway, but your nails scream winter? Yeah, we’re not doing that this year. When it comes to vacation nails you need to take on summer 2025, we are going all out: bright hues, fun shapes, and a touch of extra glitter that would declare, I am living my best life. The nail trends this season are not designs but pure moodboards of vacations. Sunrise skies to under the sea fantasies- I have all the inspo you need.
Ready? Let’s find your summer nail vibe.
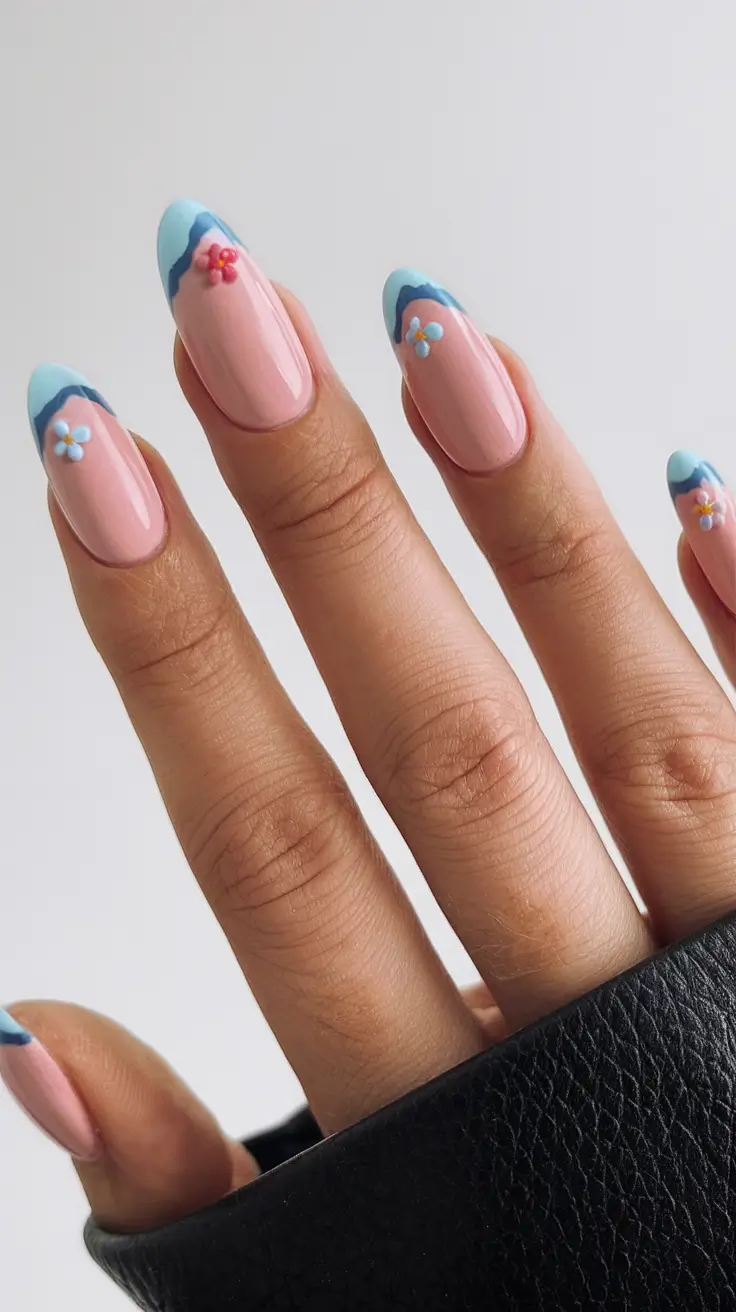
Sunset Swirls: The Mood of Golden Hour
The swirl patterns of this summer are as if they have been literally bottled at a tropical sunset. Baby blue, lemon yellow, and pastel pink colors are intermingled like the waves crashing into each other. The almond-shaped nails give off that sophisticated-but-fun vacation vibe that works whether you’re sipping a piña colada or casually flexing your hands in that perfect sunset selfie (you know the one). This color pairing is subtle but completely attention grabbing – it has that I am on vacation and I know it vibe.
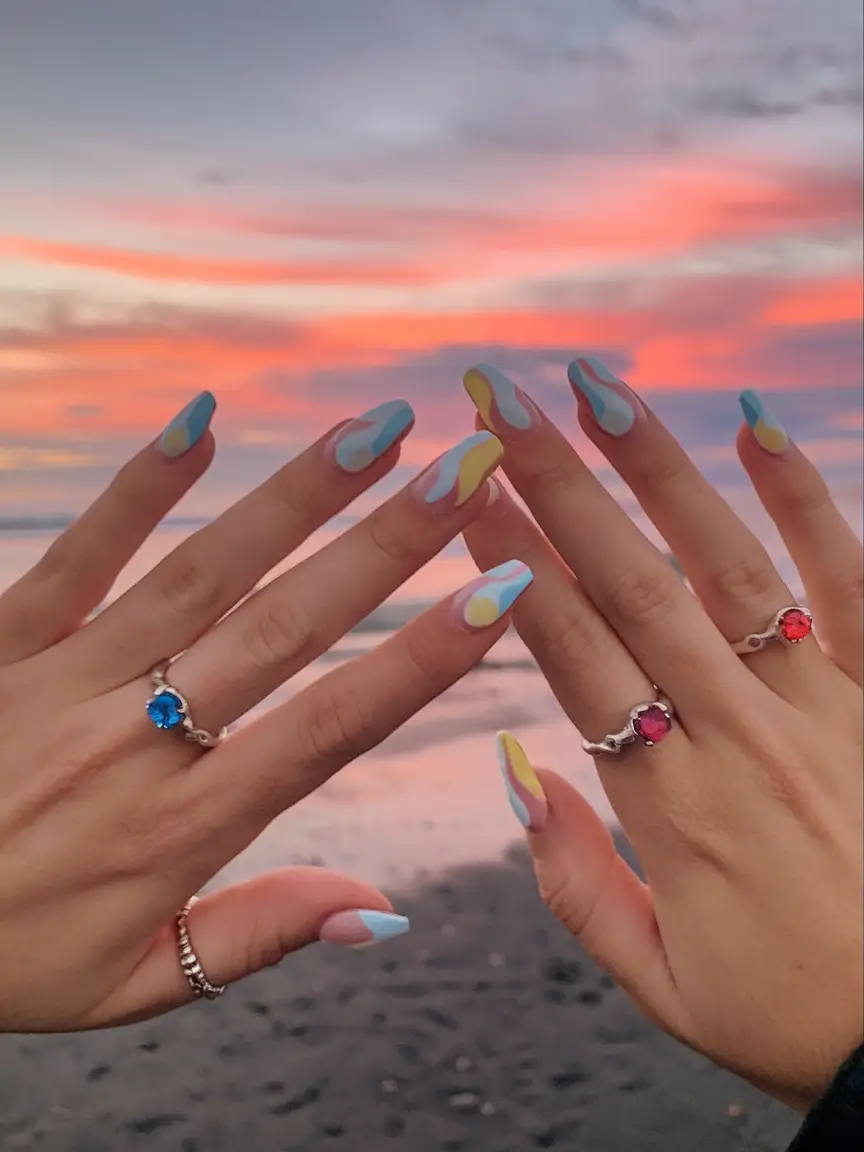
To recreate this design, I’d go for OPI’s “It’s a Boy!” for the soft blue, Essie’s “Sunny Business” for that buttery yellow, and Orly’s “Confetti” for the playful pink accents. A striping brush will also be necessary to create that neat swirl look without going insane.
The most important thing in this process is to apply a nude base to make the colors pop. When your base is dry, using a super fine detail brush, draw free-flowing lines, alternating the colors to resemble those melting sunsets. Celebrity nail artist Betina Goldstein always tells her clients that the trick to the perfect swirls is to allow your brush to glide- don’t think too much about the form. Finish it all off with a gel top coat to give it the high-gloss vacation look.
Personally, this design gives me the feeling that I am standing on the beach without shoes on and the warm air is blowing in the right direction. It’s subtle enough to match your summer outfits but bold enough to be your little moment of joy every time you glance at your hands.
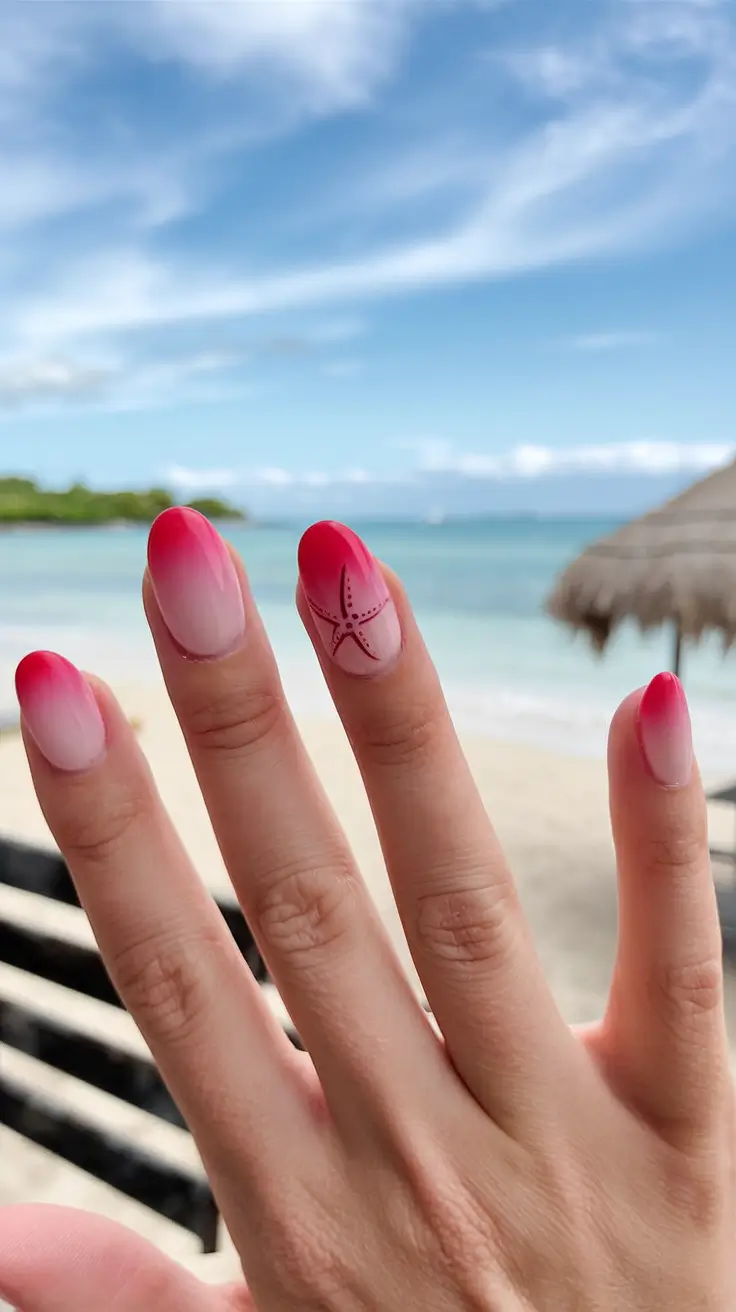
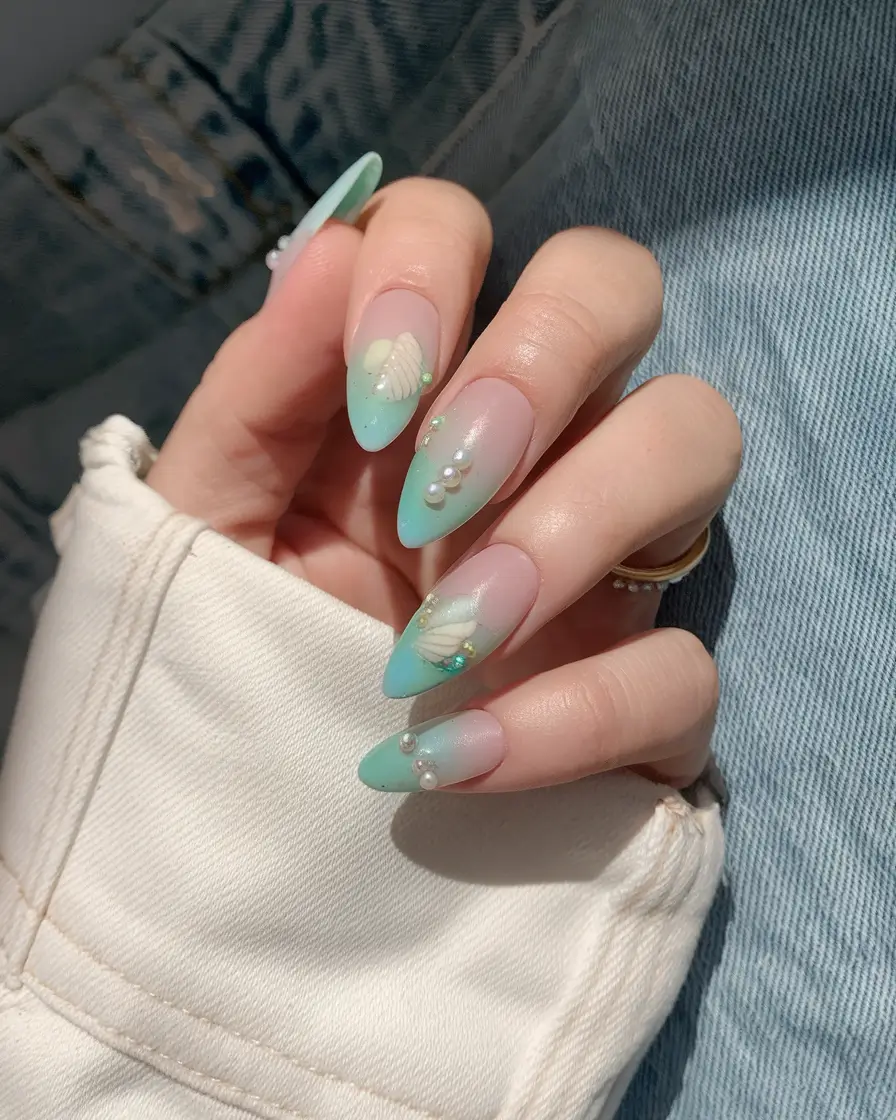
Mermaid Dream: Under the Sea Gradient
So, what about this oceanic gradient that is literally mermaid core in real life? The subtle ombr to goes through sheer pink into ocean blue, providing that just right underwater dream. However, what makes it even better is the textured shell and starfish 3D details – it adds immediate dimension and a touch of luxe to the appearance. The square frame is contemporary, but the oceanic elements tell your friends, I took this trip because of the vibe.
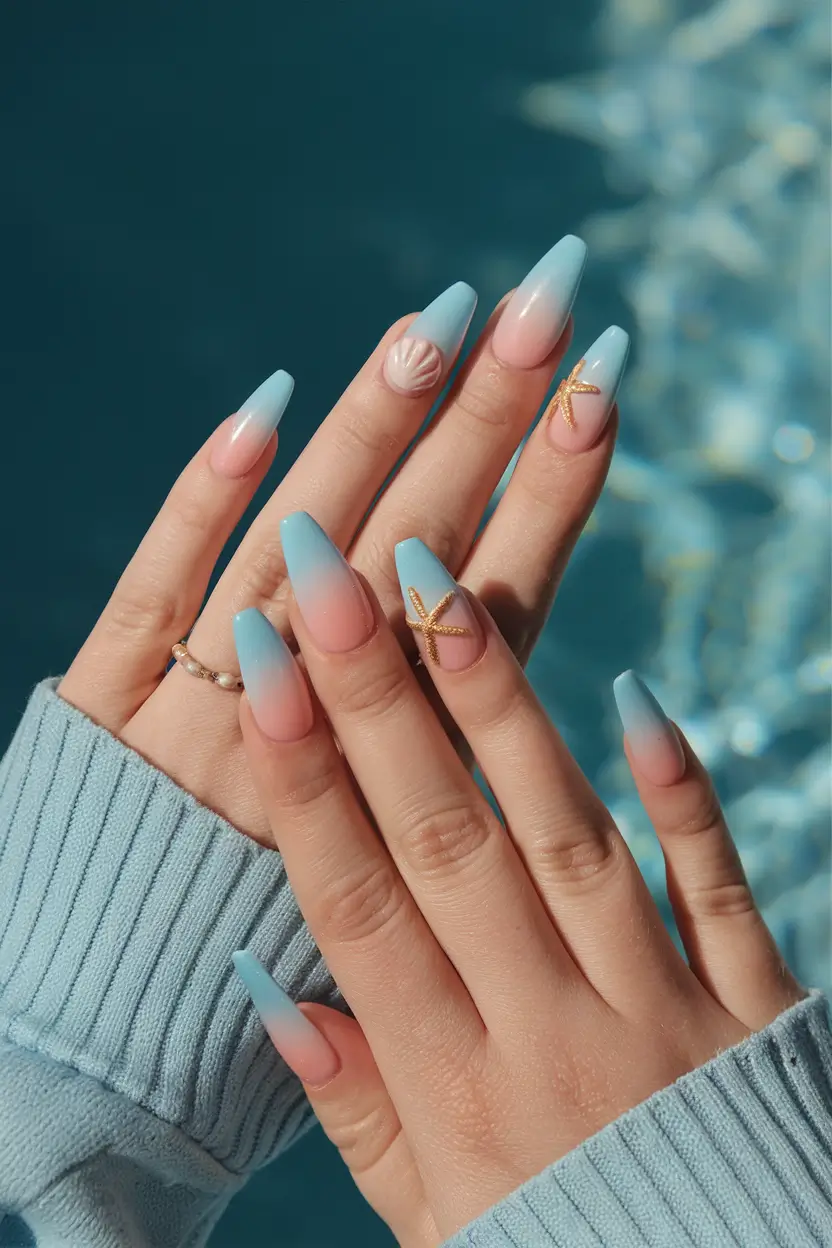
For the gradient, I’d reach for The GelBottle’s “Daisy” for the base pink and “Tiffany Blue” for that ocean fade. The 3D details are readily available as nail decals or charms, Daily Charme has fantastic sea-themed embellishments that make you feel like Ariel on dry land.
To nail the ombré (pun totally intended), you’ll need a sponge applicator. Put the two shades on the sponge and dot lightly, smearing the colors evenly between the cuticle and the tip. When dry, affix the 3D shells and starfish with a spot of builder gel and UV cure. Seal it all up with a crystal-clear topcoat to give it all an ultra-glassy, polished appearance.
Honestly? This is my go-to for beach vacations. It is classy, yet not over-the-top, but these small 3D decorations never fail to receive compliments, even from the strangers at the airport check-in counter.
Tropical Sunrise: Bold Color Melt
If you’re someone who loves a full-on color moment, this one is screaming your name. We have hot pinks fading into sunny yellows and oranges, and then cooling down to lilac and even a touch of purple. The round shape adds to the playful vibe while still being wearable whether you’re at a beach club or just brunching on a terrace. This manicure is literally sunrise in a bottle on ten little canvases.
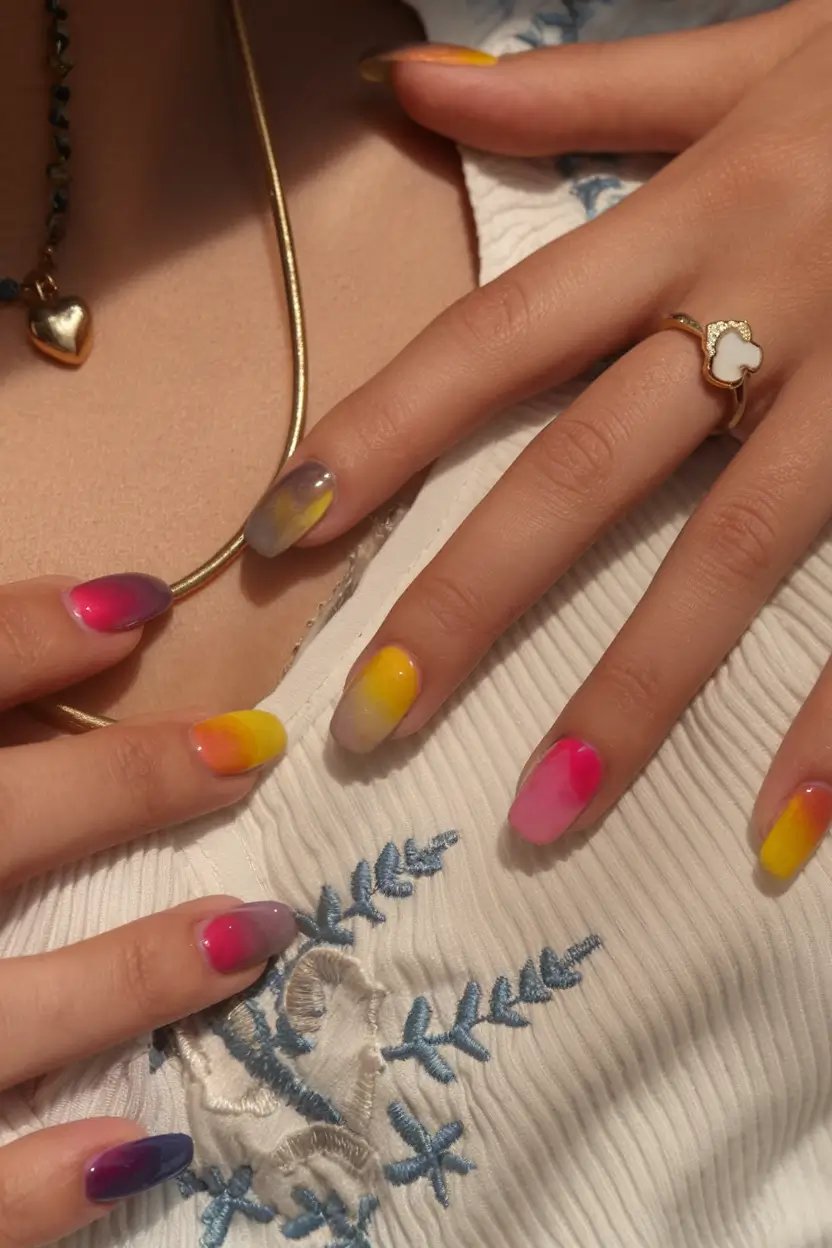
To achieve these vibrant melts, I’d go with Essie’s “Mod Square” for pink, OPI’s “Sun, Sea, and Sand in My Pants” for yellow, and ILNP’s “Lilac Bridges” for the purples. The important item in this is a mini blending sponge in order to achieve that blending color effect.
The secret in mixing bright colors is to go quickly, yet in a controlled manner. Put all the shades on the sponge, overlap a bit, and press on each nail in thin layers. According to celebrity manicurist Mei Kawajiri: “When sponging, do not fear the mess – the magic happens during clean up. Following sponging, clean up the skin, seal with no-wipe top coat and voila, instant summer mood.
I did this sort of thing before I went to Miami last year and, frankly, I felt like a living mood board. The hues were versatile with all the outfits, including bikinis and flowy beach dresses, and completely made me feel like the main character.
Seashell Couture: Neutral Luxe with 3D Art
Now, let us take it down a notch with something a bit more refined yet very much in-theme. This is the design of pure vacation luxury: nude base, 3D seashells, pearls, and small details of starfish. It is the type of manicure that suggests beach resort chic rather than announces. The square-oval silhouette makes it classic with the detailed work stealing the show.
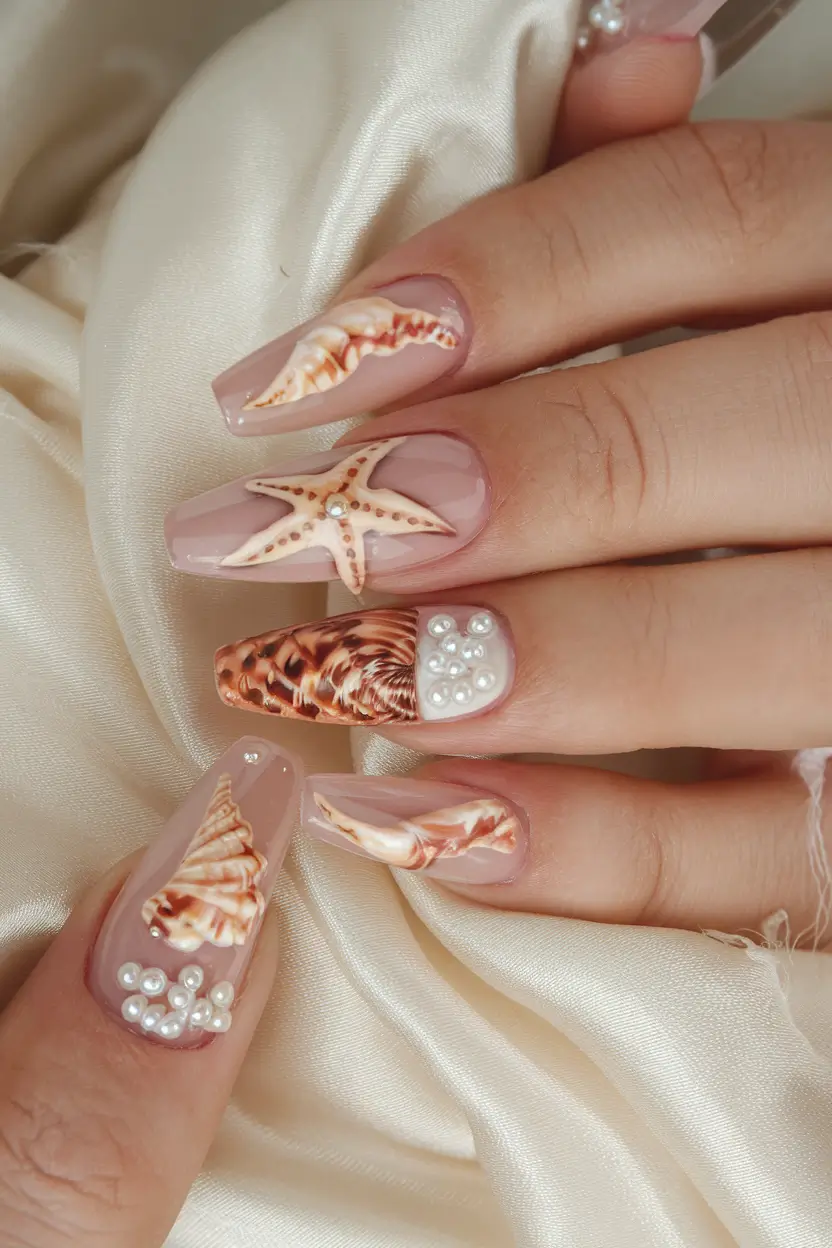
For this look, I’d use OPI’s “Bubble Bath” as the base, which gives that soft milky nude tone. The 3D seashells and pearls can be readily ordered at Amazon or Daily Charme summer collection – they have some very pretty detailed small seashell charms that seem to be handmade.
Creating this at home takes a bit more patience. once you have applied your nude base and cured, you can then place each embellishment with a dotting tool and builder gel. Cure fully after each addition to prevent sliding. Seal everything in with a heavier gel topcoat to seal in the pearls and shells.
I attended a friend destination wedding in Cabo wearing a slightly different version of this – it was fancy yet completely beach-friendly. Whenever I would see my nails tinkling my ros glass, I thought I was in my personal Pinterest board.
Coral Reef Chic: Statement Minimalism
And lastly, for the ladies that are looking to incorporate a touch of minimalism but with some drama- this coral reef inspired set is the one. We have three different textural designs: a coral orange in a scale-like pattern, a glass-clear nude with a starfish and a baby blue wave-texture. It is architectural but not too much, and, frankly speaking, it reminds something Hailey Bieber would absolutely slay on a vacation in St. Barts.
The coral color could be reached by using Essie in tart deco, and the blue waves might be made by using The GelBottle in baby blue. In the case of the starfish, a silicone mold or 3D nail art sticker will be required – Daily Charme once more delivers with great products.
Achieve that textural magic by creating with builder gels and silicone molds on the raised designs. Apply a thin nail art brush on the scales and develop texture gradually. Just as celebrity nail artist Tom Bachik likes to say: “Don 39;t hurry 3D art, luxury is in the waiting. Make sure to cure between layers and top with a thin final coat that keeps the textures.
personally, this is the Instagram vacation flex set. It says you are concerned with the details yet you are not over-trying. Plus, it’ll have your DMs filling with “OMG where did you get your nails done?!” faster than you can say Aperol Spritz.
French Bloom: Soft Florals Meet Classic White
The modern take on the French manicure is so classic and new at the same time. The almond shape is just so elegant, and the crisp white tips introduce that finished beach look. Yet it is the small 3D pink flower perched daintily on one nail that makes this design have an ultra-feminine vacation sheen. They make your nails look like they have tiny flower crowns on them – and really, who does not want that vibe by the pool?
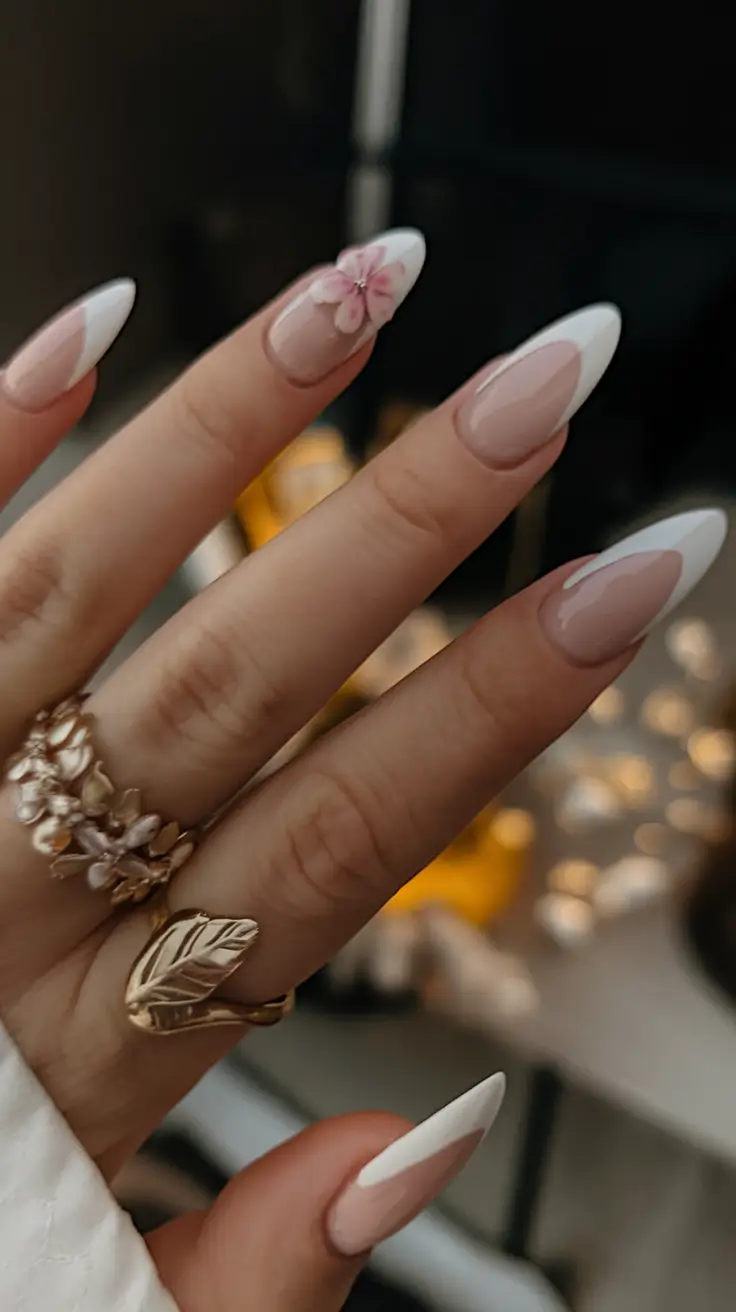
To get this look, I would start with a builder gel in a soft nude like OPI’s “Bare My Soul” for that perfect sheer base. Gelish arctic freeze can be used to do the white tips. The tiny 3D flower? Nail art molds or already made floral charms by Born Pretty or Daily Charme are easy to find.
To apply, once your nails have been filed into that beautiful almond shape, apply your nude base and cure, then take a fine liner brush and draw your sharp French tips. After curing, apply your floral charm with builder gel, then re-cure and finally apply a thick topcoat to hold everything in place. Sarah Bland, the nail artist behind many of those viral bridal and vacation sets, always recommends tweezers to ensure the charms are placed perfectly – no slipping, no sliding.
For me, this design screams honeymoon-ready. It is light, fancy, and so versatile, whether you are in Santorini or simply having ros on your balcony and pretending you are.
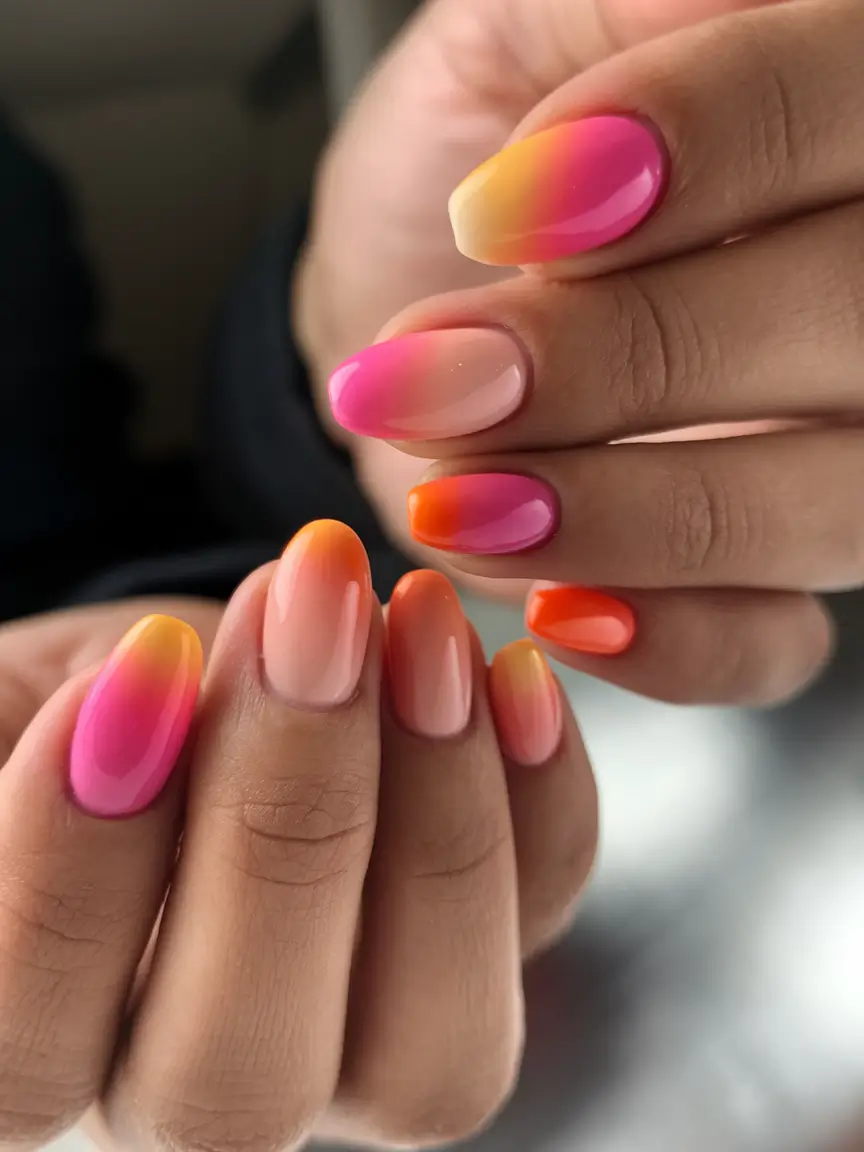
Neon Sorbet: Vacation Vibes in Full Technicolor
Now let’s crank up the color. These neon ombré nails are pure dopamine. We are looking at neon pinks that fade into neon oranges, corals that melt into yellow wines, your favorite sorbet flavors, bottled in nail polish. The almond shape makes it fun yet still sophisticated and would be ideal to wear to pool parties, rooftop cocktails or barefoot dancing on the sand.
For these vibrant shades, I’d mix in Essie’s “Tangerine Tease” with OPI’s “Strawberry Margarita” and top it off with “Yellow Submarine” by Deborah Lippmann. The key here is a high-pigment formula to really nail (pun intended) that rich fade.
In order to achieve the ombr e effect, I apply a small cosmetic sponge and apply colors in layers. Pro manicurist to the stars Julie Kandalec always suggests applying thin layers and building the mix round after round and curing in between rounds to get that salon-perfect look. The payoff? A perfectly smooth gradient that looks like summer bottled.
This one makes me feel so extra AF. When I had something similar on last summer, even people in the resort bar could not pass commenting the colors. It’s vacation confidence, served bright.
Starfish Whisper: Minimal Meets Coastal Charm
If you adore minimalist nail art, yet are not ready to forego a reference to beachside vibes, then this light blush-pink base with white starfish silhouettes is the absolute perfection. It’s clean, it’s chic, and it feels effortlessly coastal without going over the top. That polished softness is provided by the almond shape, which is just right in any sort of summer escape, although it could be only a weekend at the lake.
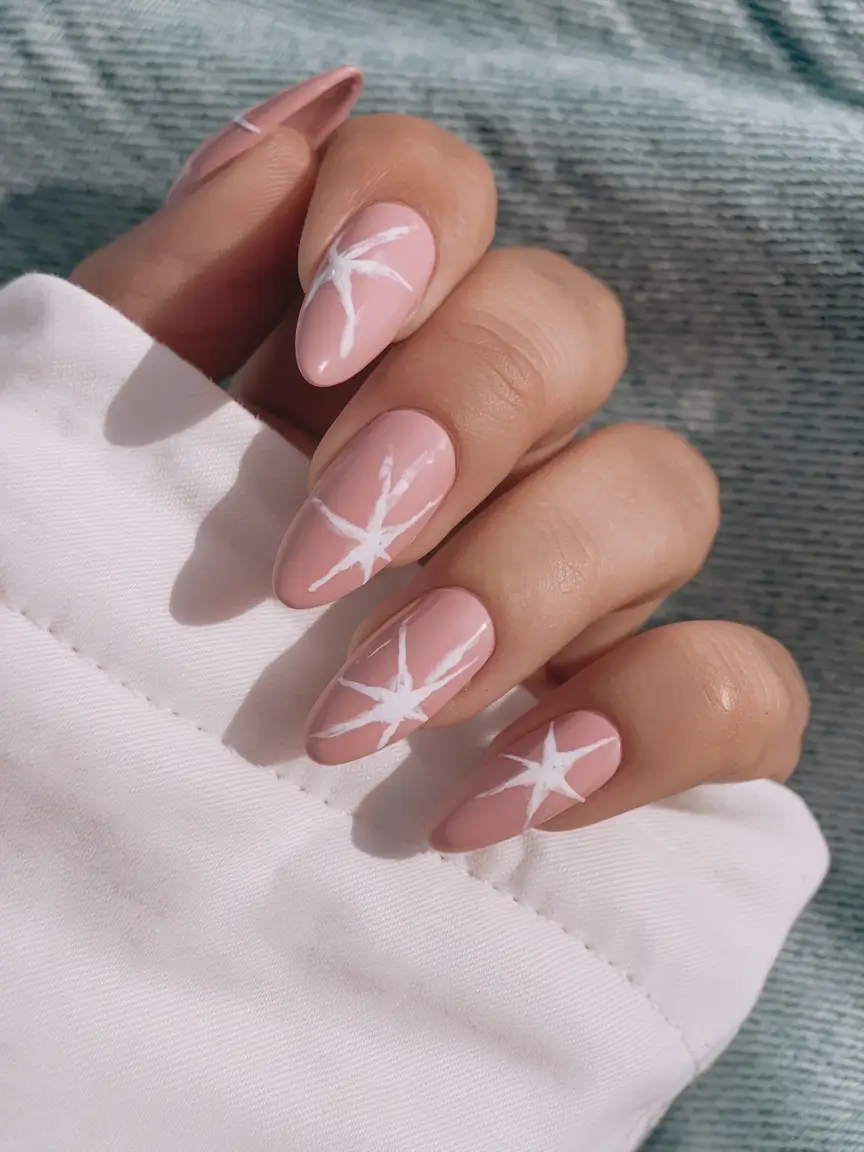
I would begin with the beautiful soft base of Essie, Ballet Slippers. In case of the starfish design, a thin liner brush and white gel polish such as OPI: Alpine Snow are a match made in heaven. Nail art stamping plates can also be used, in case you prefer all of your starfish to be the same — Born Pretty has excellent beach-themed plates.
The last time I did a similar design I freehanded the starfish using a liner brush – a bit shaky hands at first but the final result is so personal. Hang Nguyen, a nail artist behind the minimalist viral designs, always recommends not being perfect – this is what makes hand-painted design so charming.
This is my favorite nail art to use at the beach wedding or a romantic getaway. Soft, subtle, but still totally summer 2025.
Coral Dip: Pink Ombre with Starfish Accent
Then something a bit more sassy, though completely wearable. The ombr e pink-to-white is bright and juicy – as watermelon slices on a hot day at the beach. And that tiny red starfish detail? Chef’s kiss. It provides a touch of coastal style, but does not take away the show. It is the manicure that will have you turning heads on any beach stroll, wherever your holidays may bring you.
To create the gradient, one can use OPI Suzi Nails New Orleans faded into Funny Bunny to create the most subtle white gradient. To recreate the red starfish detail, you will need a very small nail art brush and a bright red gel polish such as Essie, “Forever Yummy”.
It requires some patience to achieve that perfect mix I always begin with my lightest colour and then apply the darker pink using a fine sponge. The secret is curing between each mix to keep colors clean and not to muddy the fade. The gradients depend on the thinner the layers, the smoother the gradient, as celebrity nail artist Tom Bachik likes to say.
I once had this set prior to a Caribbean cruise and frankly speaking, it was the best ice-breaker ever. Basic, statement, and so effortless to pair with all of your bright bikinis in your suitcase.
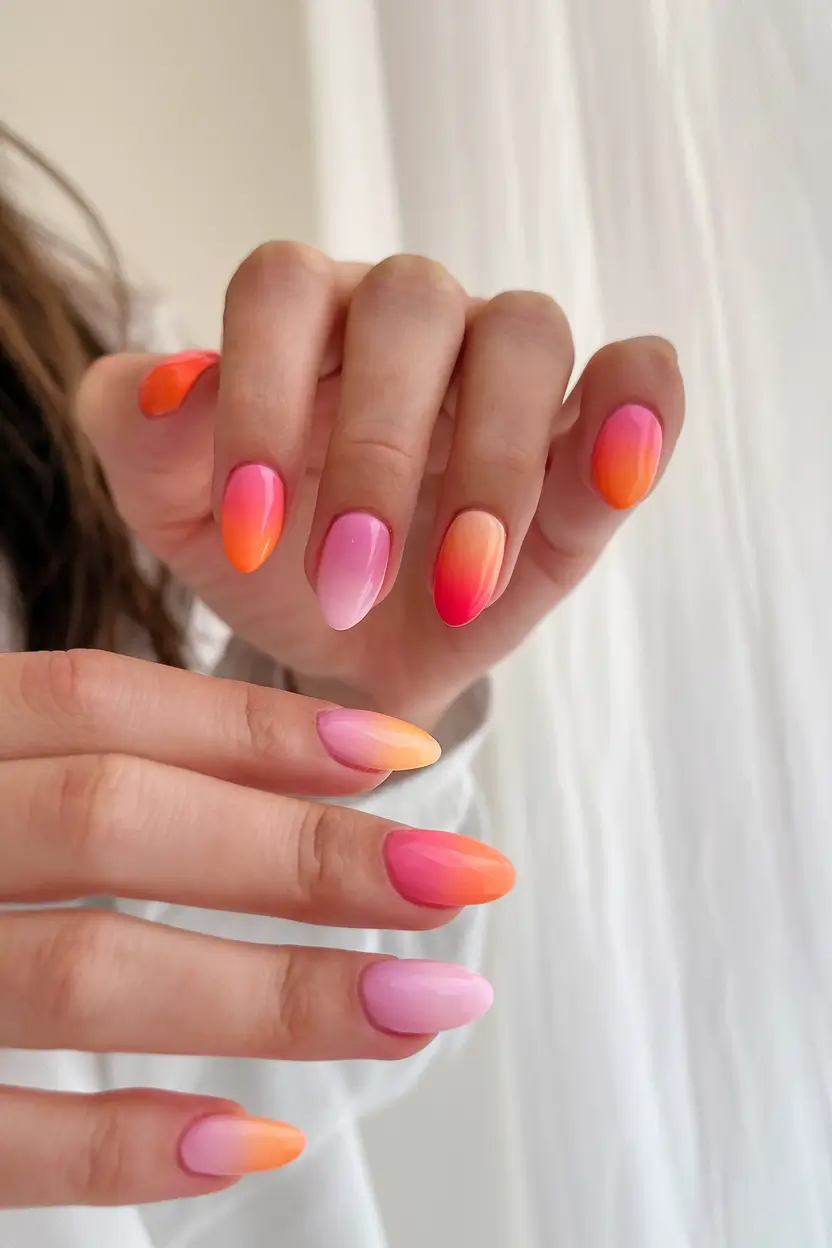
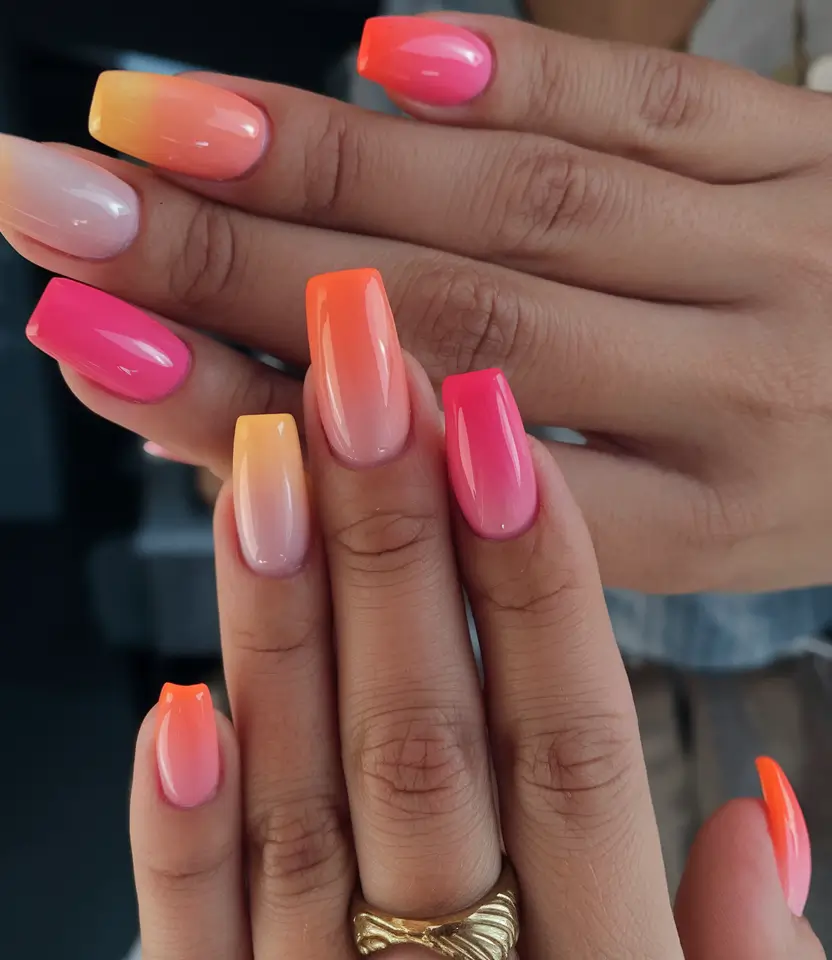
Tropical Smoothie: Multi-Tone Sunset Perfection
The final but certainly not the least in this round – the all-out multicolor ombr e magic. All the nails alternate pink, peach, orange, and even yellow colors, which makes the impression of a sunset in motion. The circular silhouette makes the whole thing feel softer and more wearable, although it does not lack the serious vacation glamour.
To duplicate this, you will need several shades: ORLY Kiss Me, I am Kind, Essie Tangerine Tease, Deborah Lippmann Yellow Brick Road and OPI Hotter Than You Pink. Your best friend to blend these will be a small gradient sponge.
To apply, apply two to three colors on the sponge at a time and work one nail at a time to ensure the colors are wet to blend easily. Use a fine brush dipped in acetone to clean out the cuticles and keep that sharp salon quality finish. Finish off by city with a shiny gel top coat to give it that glassy look that says, vacation, luxury.
A friend took me to a bachelorette trip to Tulum when I wore a similar design, and I can tell you, the nails had their own moment in the limelight when it came to group pictures. You literally can’t have a bad day when your nails look like a tropical smoothie.
Beach Nude: Minimalist Waves
Less is definitely more sometimes, and when you need your nails to speak luxury without having to scream about it. The base of this design is a matte nude color with freehand brown lines that resemble ocean waves. The abstract curves make it artsy and modern, the elongated almond shape is sophisticated enough, and it is a match made in heaven for those who prefer a minimalist but refined vacation aesthetic.
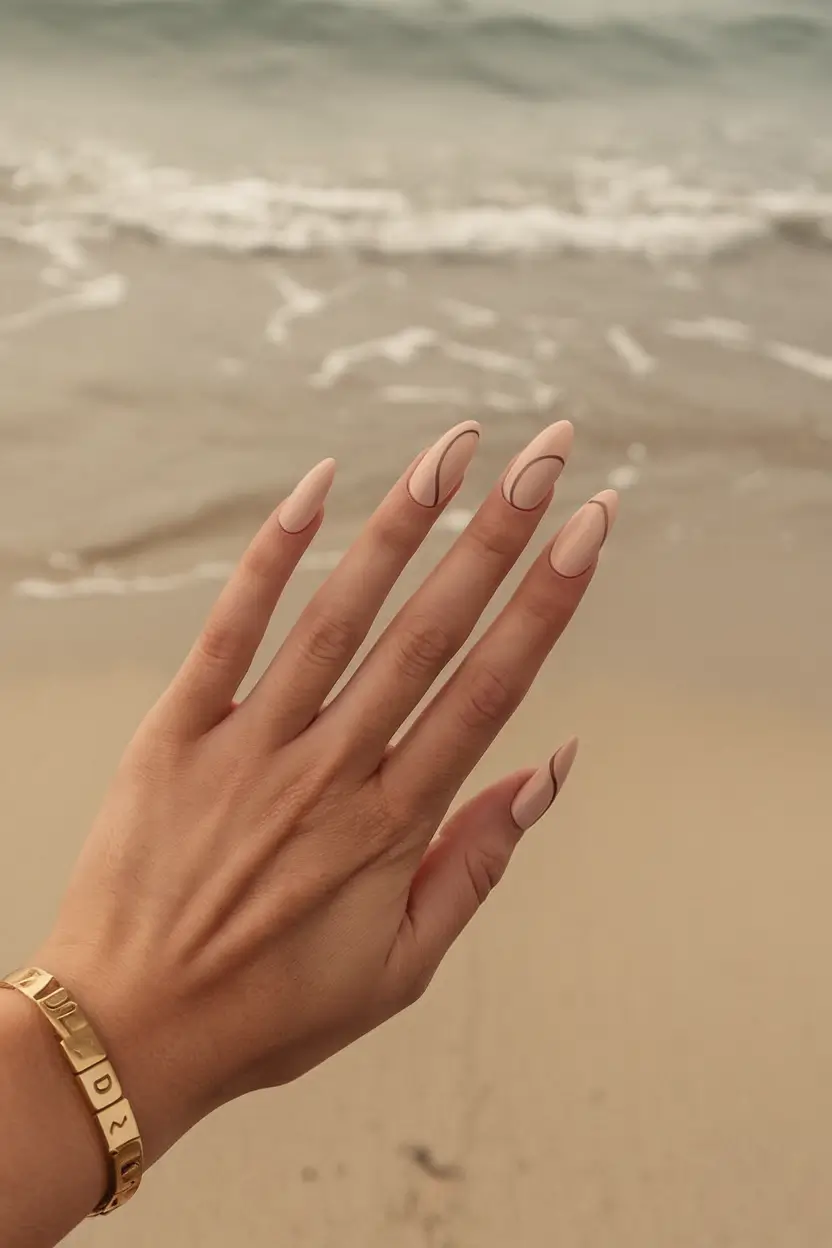
I would begin with OPI, Samoan Sand, which is the best warm nude, to accomplish this understated beauty. With the freehand swirls, a fine liner brush will be used with Essie`s Clothing Optional a deep muted brown that can easily coordinate with the beach inspired palette.
The trick to keeping the lines organic (without driving yourself crazy) is to let your brush glide naturally—don’t force symmetry. The beauty of abstract design is, as nail artist Betina Goldstein likes to say: “Its fluidity.” Seal it with a matte top coat to give it that velvet touch which is so expensive yet not overly glamorous.
I wore something like this for a beach yoga retreat last summer — it paired beautifully with my flowy linens and gold jewelry, giving that effortless “I woke up like this” vibe we all secretly want.
Hot Tropics: Bold Florals & Graphic Vibes
This collection is essentially a moodboard of a vacation unto itself – big flowery prints, bright pinks, whites, and lots of graphic detail. The square is dramatic and the detailed patterns make it playful. They look and feel like you have a tiny slice of tropical resort art on every finger- can you hear the beach club music yet?
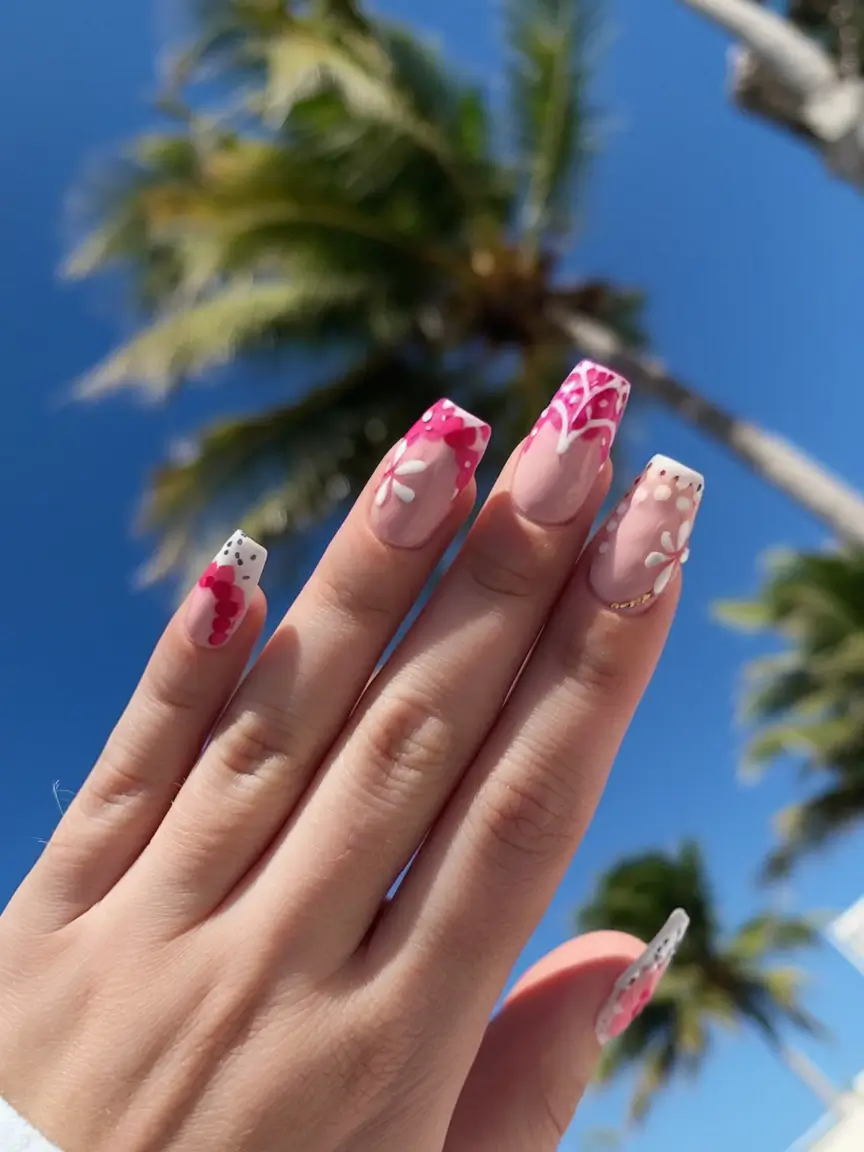
On the brighter pinks I would pick up OPI La Paz-itively Hot and Essie Cascade Cool to layer. The small white flowers could be done using a detail brush and a dotting tool with Gelish, Arctic Freeze. To replicate the graphic accents, feel free to freehand using a micro-liner brush or apply nail stickers created by Maniology or other brands to achieve additional precision.
When I create sets like this I adore working with a combination of methods; some freehand, some stickers, some dotting tools, as it gives it that imperfect, handmade appeal. Celebrity nail artist Mei Kawajiri often says: “When it comes to playful designs, don’t aim for perfection — aim for personality.”
I wore a slightly different one on a trip to the Bahamas and, frankly, my nails were receiving as many compliments as my swimsuit. It’s pure vacation energy bottled into nail art.
Ocean Breeze: Soft Waves & Floral Accents
This play set is as if the summer breeze was trapped on your fingers. The nude-pink base is nice and classy, but the layered blue waves and small pastel 3D flowers provide a touch of whimsy. It is feminine and completely wearable, even when you are lounging by the water or catching iced lattes on a boardwalk walk.
As a pink base, I would choose The GelBottle, “Nude Pink Builder Gel.” The waves can be achieved using a combination of OPI’s “Kanpai OPI!” and “It’s a Boy!” in thin layers. The flower decals are readily available in stores such as Daily Charme or summer nail art collections by Shein.
Start by applying the pink base and curing fully. The layered blue waves are made with a fine liner brush, alternating the shades to give depth. When dry, store the small flowers with builder gel and inter-cure between placements. Seal with a thick gel topcoat to make it last longer and protect further.
I love wearing designs like this when I want something playful but not overwhelming — it’s like carrying a little slice of the ocean with you all vacation long.
Minty Shell: Understated Mermaidcore
Want your vacation nails you will need in summer 2025 to be a bit more airy and dreamy? This mint gradient with shell and pearl touches is pure magic. The almond shape is sophisticated enough to look elegant but the dainty details are telling me sea goddess. It’s soft enough for lowkey resort days but special enough to turn heads at dinner.
To achieve this appearance I would suggest using Essie in “Mint Candy Apple” mixed with OPI in “Bubble Bath” to get that airy ombrre base. The shell charms and small pearls are available via Amazon or Daily Charme -both offer great high-quality 3D nail art assortment.
To apply, mix the colors on a makeup sponge to apply in one smooth ombr, then dry. Apply a builder gel and set the charms precisely with tweezers and fully cure between each layer. Seal it all with a glossy gel topcoat to make it even dimensional and shiny.
I, in fact, had a very similar mint ombr e design on my nails the last time I was on a coastal weekend getaway, and every time the sun would hit my nails, they would glitter like little gems – instant mood enhancer.
Sunny French: Daisy Fields Forever
Something is so happy and cute about this new interpretation of the French manicure. The pale pink base and neon yellow tips combine into the sensation of having tiny daisy fields on your fingertips. It is cheerful, lighthearted, and completely gives off that Pinterest-approved summer vibe. The small daisy decals are merely the icing on the cake.
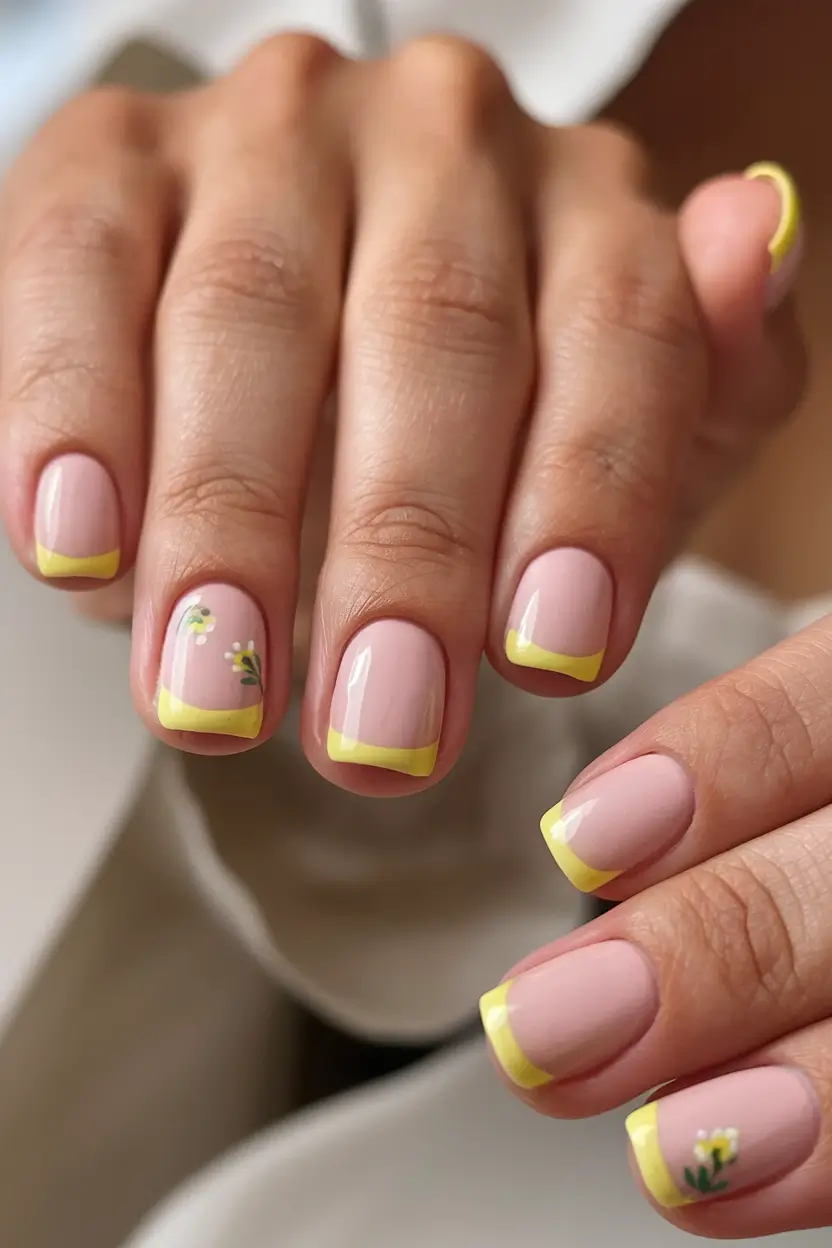
I would suggest OPI, “Put It In Neutral” as the pink base. Hay There by Essie can be used to do the yellow tips. The little daisies can be painted on by hand using a detail brush or you can apply daisy nail stickers to get that just-right tiny petal appearance Maniology has some excellent floral stickers.
The secret to this French is to apply striping tape or French tip guides to maintain your yellow edges clean and straight. Then just apply your florals and top coat with a glossy finish to give it the glassy look. According to nail artist Britney Tokyo, “Florals are an immediate mood-booster to any manicure and who doesn’t want happy nails on vacation?”
When I wore something similar last spring, I swear my nails made people smile at first glance — and honestly, isn’t that what summer nails are all about?
Amalfi Garden: Lemons & Blossoms
This collection is a holiday to the Amalfi Coast. The hand painted lemons and pink blossoms on a soft nude ground immediately bring to mind sun filled afternoons beneath lemon trees. The almond shape makes it dainty and the bright colors ensure that it is a complete head-turner. It’s cheerful, juicy, and feels like summer bottled right into your manicure.
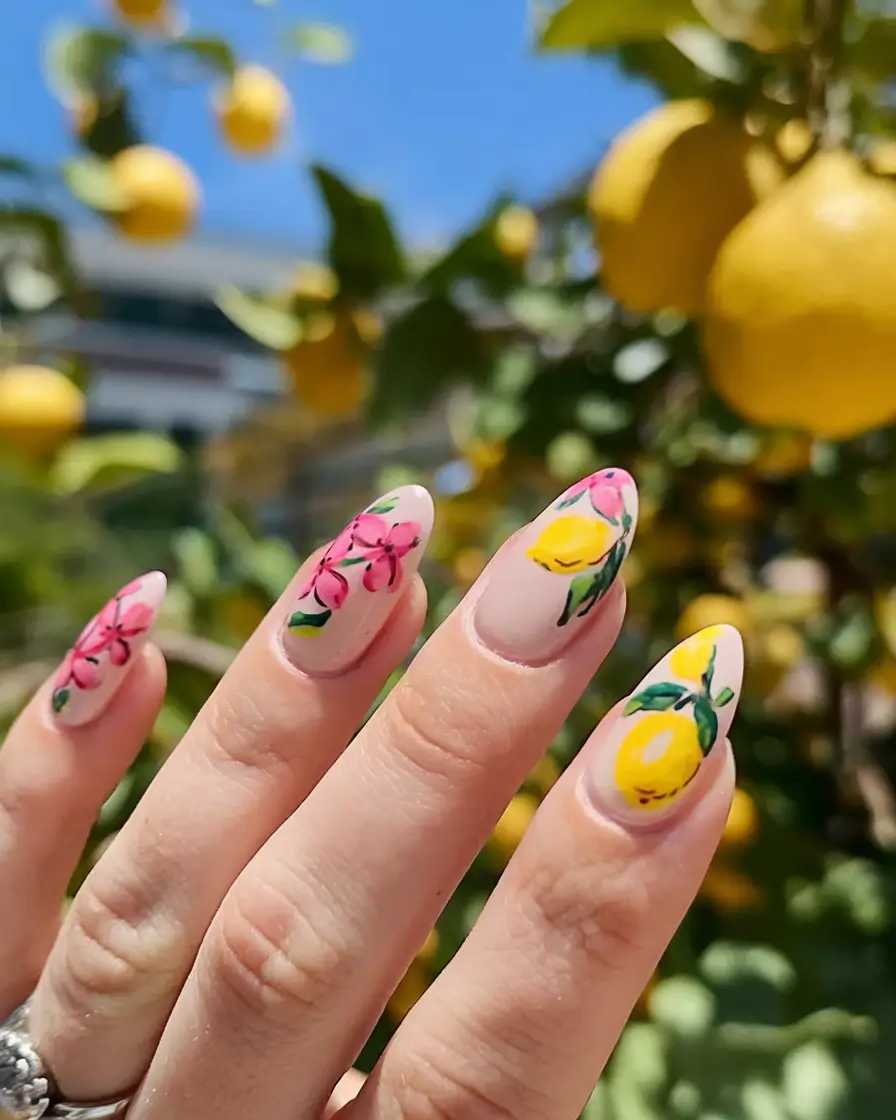
As a base, OPI Bubble Bath is just what I needed to have that neutral, soft background. The sunny lemon yellow is possible with Essie in “Hay There” and the flowers stand out with colors such as OPI in “La Paz-itively Hot” and “My Chihuahua Doesn’t Bite Anymore.” For the leaves, a deep green like OPI’s “Stay Off the Lawn!” does the trick.
I suggest extra-fine detailing brushes to make the citrus and floral patterns. Hang Nguyen, celebrity nail artist, always says to construct every design using small strokes -this will assist in avoiding any smudging or bleeding. Seal the deal with a shiny top coat and you are ready to go on vacation with the glassy look.
I wore a similar design on a summer wine tour in Napa, and I felt my nails were stealing the show almost more than my clothes – and that is saying something. This design is pure joy.
Floral Fantasy: 3D Blooms & Delicate Accents
There’s something incredibly feminine and romantic about this design. The nude base is softly translucent, the white and pink flowers are placed on the perfect canvas, finished with a hint of 3D pink bow and a small starfish charm. Think of it as a mini flower bouquet on your nails – cute, feminine and instantly vacation-appropriate.
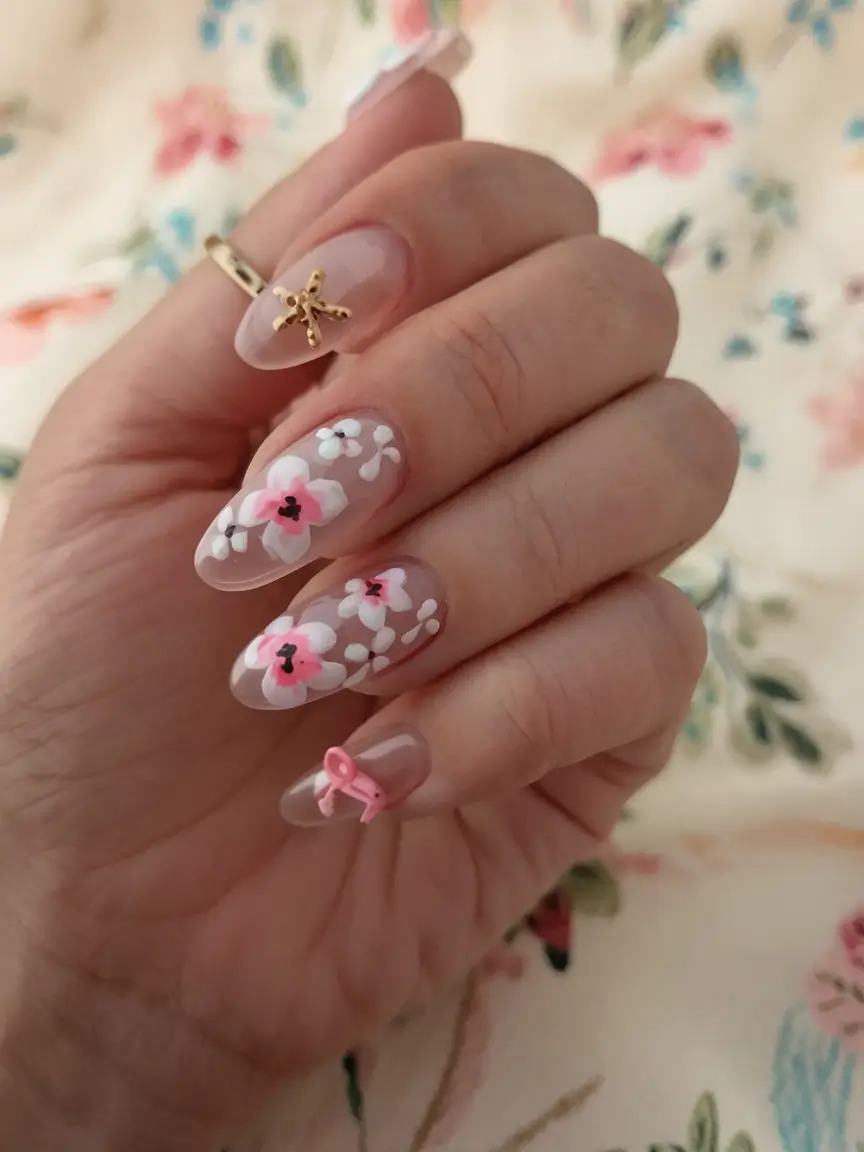
One can use The GelBottle Peach Daiquiri to do the nude base. On the flower part, Essie, Cascade Cool and Gelish Arctic Freeze are ideal on the light pink and white flowers. You can get the 3D bow supplied by nail art vendors such as Daily Charme so that you can easily apply it.
To place 3D elements at home, I would always suggest taking a dotting tool and builder gel to place them accurately. Make sure to cure completely between layers, and as celebrity nail artist Britney Tokyo usually says, “Allow your embellishments to dry fully before sealing with topcoat, otherwise they will slide.”
I had a version of this on a bridal shower weekend – every small detail was so whimsically appropriate to drink ros and take a million photos with my girlfriends. It’s that pretty-but-not-too-perfect vibe I love for summer escapes.
Neon Sunset: Glossy Tropical Fade
This design has the sensation of a colorful tropical sunset on the horizon. Bright pinks blend into deep oranges and yellows and gradient across square-shaped nails that add a touch of additional drama. It is daring, shiny and all but begs to be photographed with your drink of choice on the beach.
As the shades, I would apply OPI Hotter Than You Pink, Essie Tangerine Tease and Deborah Lippmann Yellow Brick Road. A cosmetic sponge that is latex-free is magic in blending these shades without having to draw harsh lines.
Just apply your polish right on the sponge and lightly dab it on your nails and voila, apply in thin layers to achieve that perfect gradient. Follow the advice of nail expert Julie Kandalec and blend with confidence, yet patience, as she says, slow layering is the key to buttery-smooth ombr e.
This outfit fully dominated my recent trip to Cancun – poolside, beachside, rooftop bar – and I did not regret at all becoming full neon. It photographs like a dream.
Starry Marble: Rose Gold Waves & Coastal Charms
This one is all about pure elegance — the marbling is soft rose gold, the gradients are milky, and the details are little golden starfish. It’s the ideal combination of beach and luxury, which appears equally impressive at a dinner by the sea or a chic pool party. The almond shape provides that long and polished look which is flattering on all.
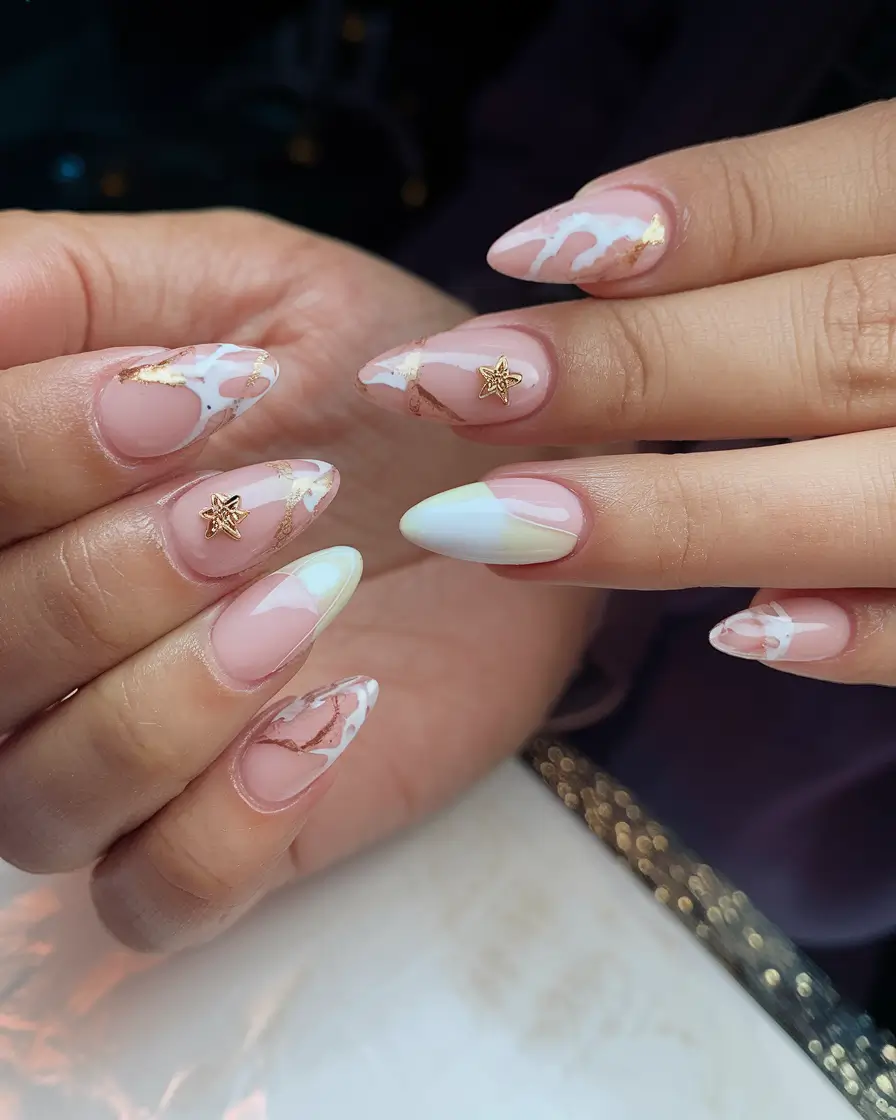
To achieve the marbled base, one can use OPI Funny Bunny, and thin swirls of rose gold chrome powder incorporated into topcoat gel. You can get the golden starfish charms by brands such as Daily Charme or Born Pretty to apply in 3D easily.
To get the marble looks, place a small dot of white, pink and gold polish on the nail and swirl gently with a toothpick prior to curing. Just as celebrity manicurist Tom Bachik frequently advises: “Less swirl is more – your marbling should be loose and organic.”
This look gives me serious yacht-club-chic energy. I had a set like that on at a rooftop party in Miami and they were practically jewelry on my fingertips.
Daisy Chain: Classic Floral Perfection
Single, happy, and entirely classic – the daisy pattern is never out of fashion in summer. A light pink ground with hand-painted white petals and yellow centers is girlish but sophisticated. The almond shape is slightly more grown up without any loss of sweetness.
Start with a pinky-nude base like Essie’s “Ballet Slippers.” In Gelish, Arctic Freeze, and OPI Never a Dulles Moment to do the daisies. A good dotting tool will make the perfect petals and small circles with not much strain.
The best tip I’ve learned for floral placement? Leave them a bit asymmetrical or closer to the cuticle to make them more modern and editorial – as seen in most nails by nail artist Park Eunkyung of Unistella. Seal in your blooms with a glassy topcoat to finish it off.
I actually wore this specific vibe to a summer baby shower of a friend of mine, and every time I looked down, my nails put a smile on my face, is that not what summer nails are supposed to do?
Blush Petals & Pearls: Soft Romantic Elegance
This design is what comes to mind when I consider the ultimate feminine vacation nails. The delicate mix of soft pinks, creamy whites, pearl embellishments, and a single 3D floral accent gives serious “romantic getaway” vibes. The almond shape makes it classy but still playful. It is the type of nail service that murmurs opulence when drinking mimosas at brunch.
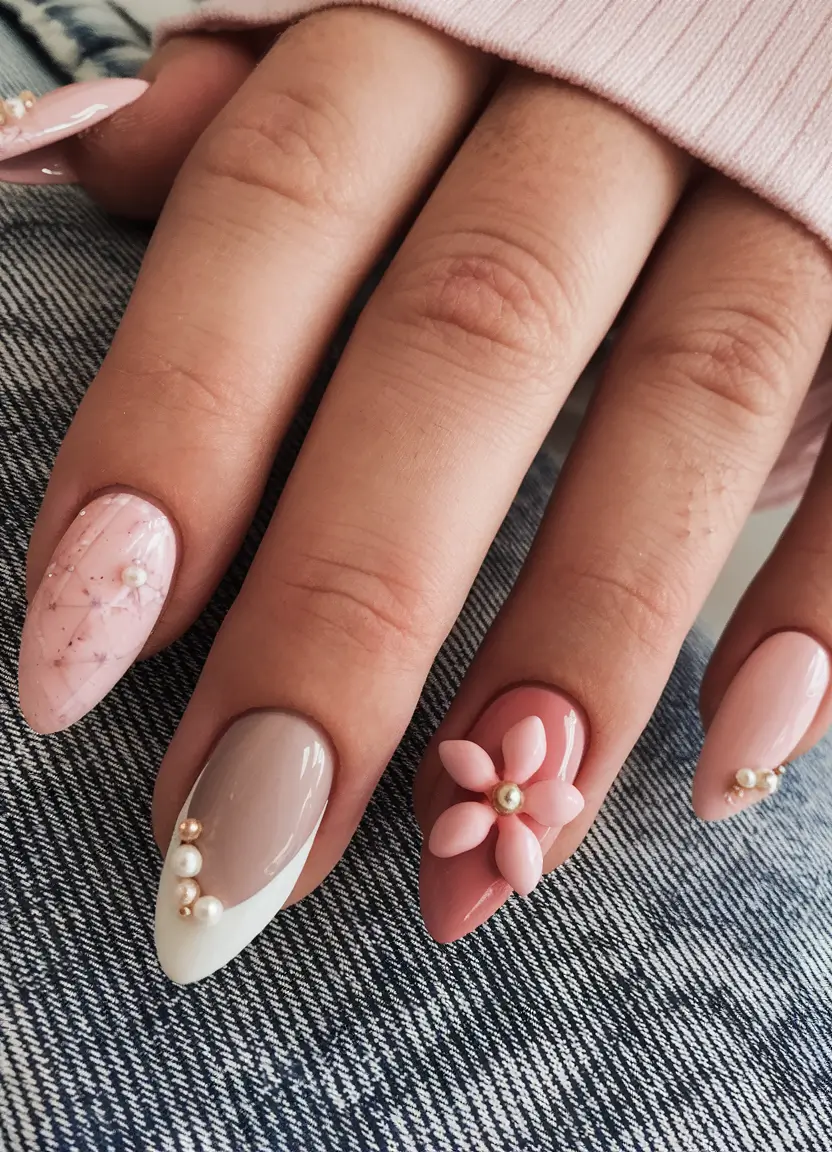
As a base I would apply OPI Bare My Soul with Essie Mademoiselle to get that just right neutral pink. The white French tip is possible to reach using Gelish in the color called “Arctic Freeze,” and the pearls and the floral elements can be easily found in Daily Charme or in the high-end nail art assortment of Amazon.
The secret in applying the 3D accents is to do one nail at a time with builder gel. According to nail artist Chaun Legend, builder gel allows you to have total control when it comes to the placement of embellishments. Allow full cure between each layer and then apply your topcoat final coat.
I have a slightly different one that I wore on a romantic weekend getaway to Charleston, and needless to say – the nails almost became an accessory on their own, pairing with every flowy summer dress in my suitcase.
Deep Sea Mosaic: Oceanic Marble & Gold Foil
Now we’re diving into full-on ocean glam. The design combines the daring teal colors with creamy white marbling and gold foil thin lines that are right out of a Mediterranean yachting fantasy. The tiny gold starbursts are the ideal final touch, providing texture and a dusting of drama to this statement appearance.
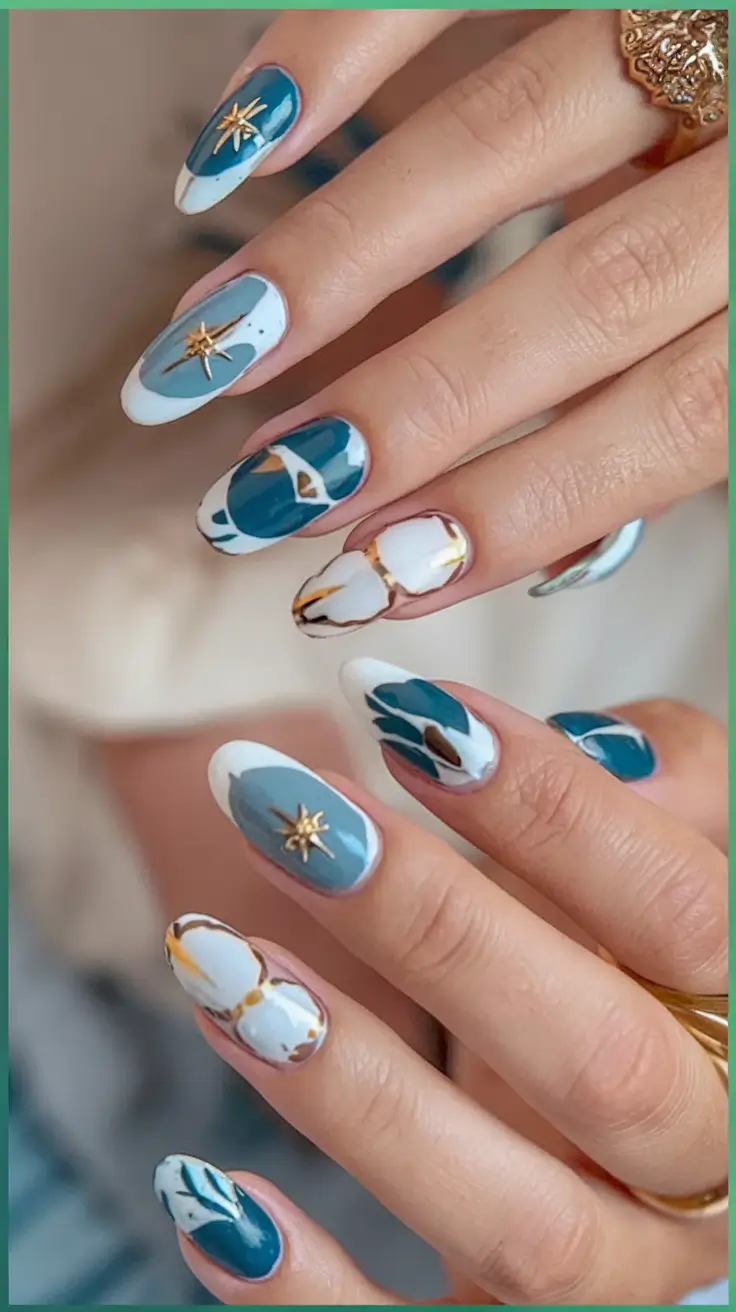
The GelBottle colors that I would suggest to use in the deep blue tones would be the “Blue Lagoon” and the “Sea Green.” The marble is possible to make with the help of OPI Funny Bunny swirled with metallic gold foil by Born Pretty or WhatsUp Nails. Daily Charme can be relied upon to supply the gold star embellishments to ensure high-quality finishing.
Swirl technique hint: pourpool a little puddles of color, then swirl using a fine liner brush or toothpick before curing. Nail artist Tom Bachik suggests that you should always keep your marble movement light- you can always create muddy lines when you overwork it.
I previously had a set like this one when I went on a coastal cruise, and every time I picked up a drink, someone would say something about my “vacation nails you need for summer 2025” — they are that noticeable.
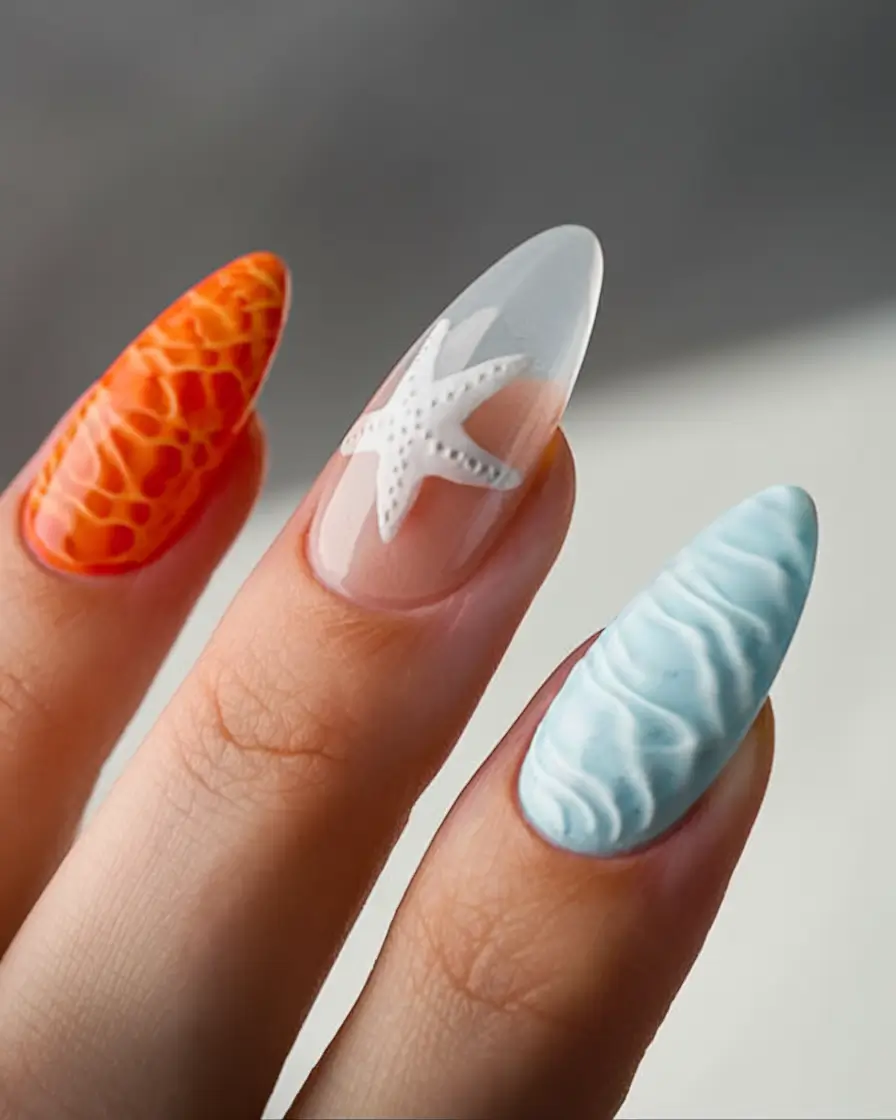
Coral Reef Play: Red Starfish & Blue Ombre
This design is playful, colorful, and absolutely screams “under-the-sea fantasy.” The ombr e blue gradient flows into the natural pink base, with bright red starfish accents to finish off that fun touch. Combined with small white bubbles and seaweed-like elements, it is as if you carry your own mini reef with you everywhere.
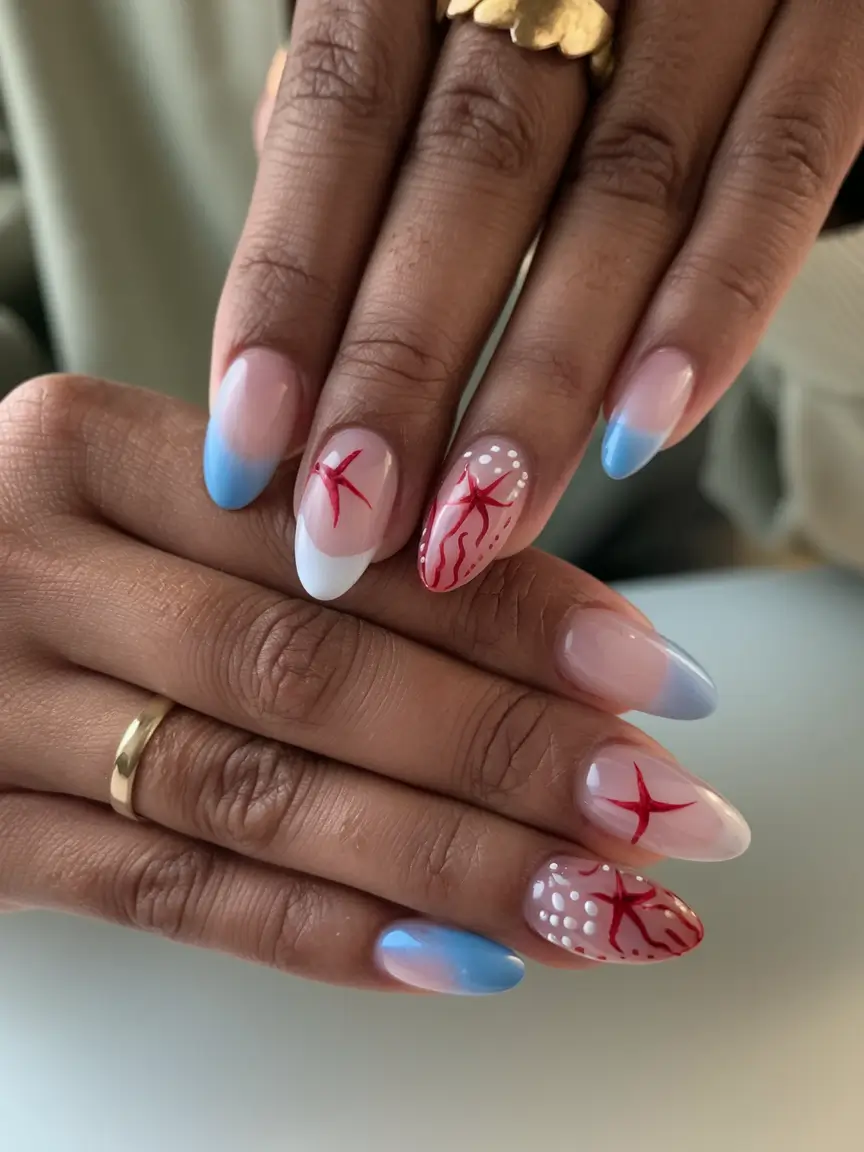
The base can start with OPI’s “Put It In Neutral,” then blend into “Kanpai OPI!” for that soft ocean blue. On the red starfish, apply Essie, Forever Yummy is perfect and to add bubble detailing apply Gelish, Arctic Freeze using a dotting tool.
Blend your base gradient with a sponge and in thin layers curing between blends. When dry, decorate your starfish by hand-painting and seal with a no-wipe topcoat. Hang Nguyen, the celebrity nail artist recommends creating coral-like patterns by placing thin lines of red and small dots on top of each other to create depth.
This playful reef vibe completely became my staple during my recent beach club trip – it is just playful enough to wear during the day parties but can also be dressed up for nice dinners.
Rosé Chrome: Metallic Mirror Shine
And now the ultra-modern set — these chrome nails give off light like molten metal. The ideal ros color yells sophistication, but the almond form maintains it cool and beach- suitable. The chrome finish will attract attention whether you are having brunch or dancing under the stars.
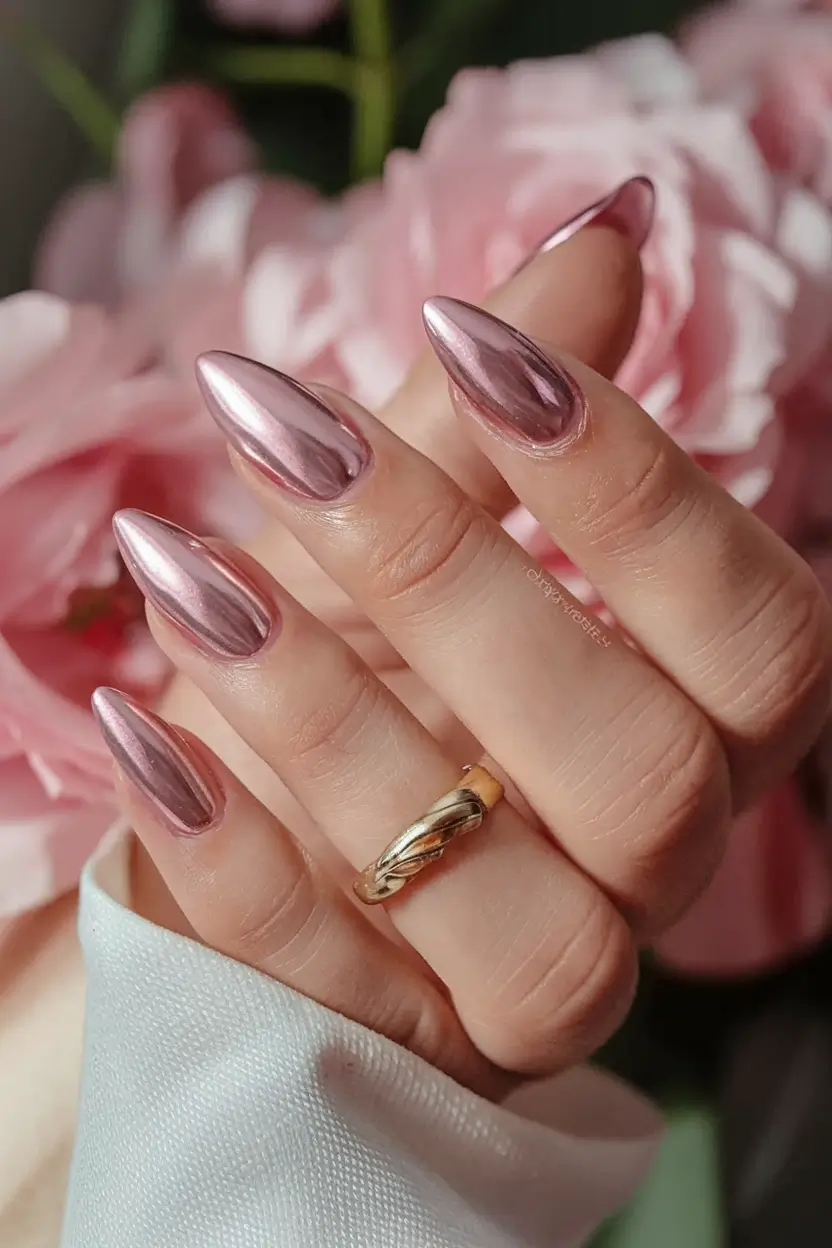
The key product here is your chrome pigment. Start with a pinky nude gel base (I like The GelBottle’s “Ballet”), apply your no-wipe topcoat, and then rub in Born Pretty’s rose gold chrome powder for that ultra-smooth mirror finish.
Be sure to seal your chrome pigment with another gel topcoat to trap the shine and seal out chipping. Nail pro Betina Goldstein always suggests giving the nail a light buff first to provide a smooth surface to apply the chrome to perfectly.
I actually wore this same outfit on a bachelorette weekend – every picture was taken with that ideal chrome reflection. These nails photograph like a dream.
3D Blossom Luxe: Dimensional Pink Florals
And last but not least – a complete floral fantasy in blush pinks using raised 3D petals, tiny pearls and gold leaf details. This is all about luxury — when your holiday involves a posh resort or a romantic break these are your nails. The hand-painted details and dimensional art make your manicure literally a jewelry.
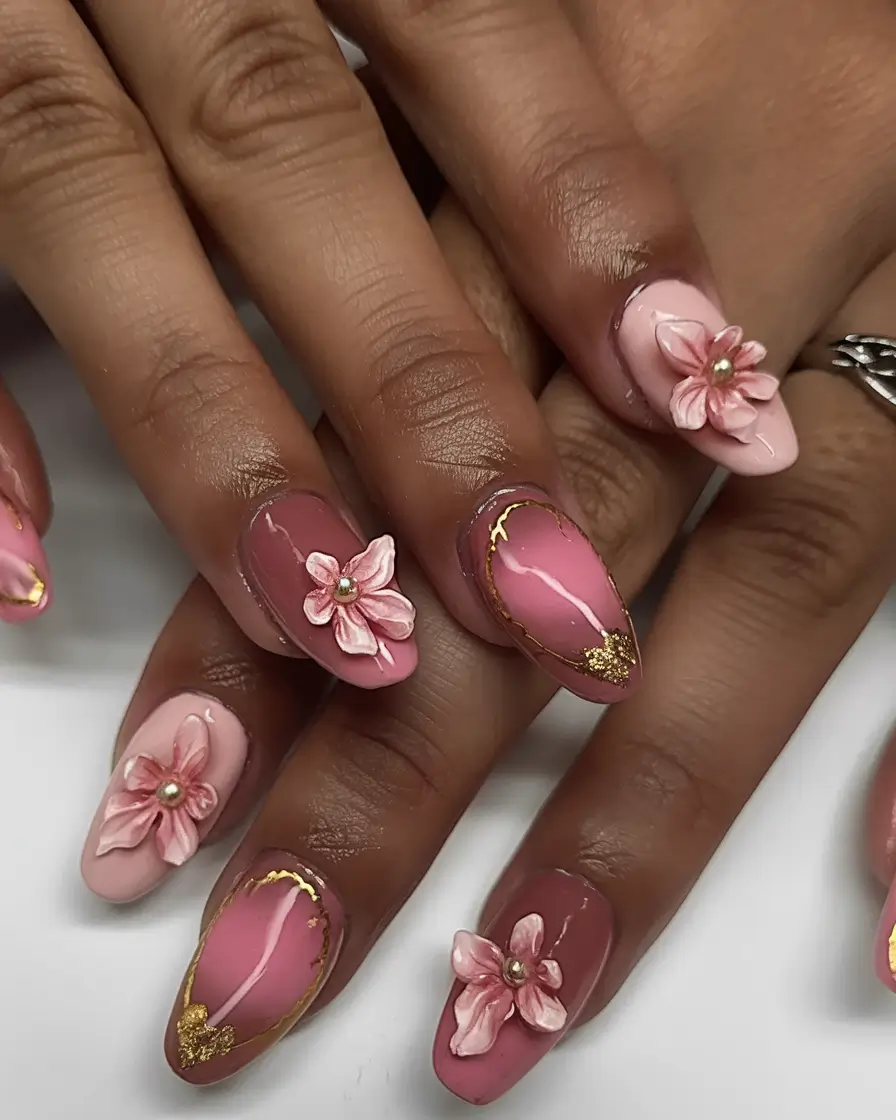
Begin with a base of Essie coated in the ballet slippers and add on different shades of pink such as OPI coated in suzi nails new orleans to add floral depth. The acrylic sculpting gel or ready-made charms by Daily Charme can be used to construct the 3D flowers. Add flecks of gold leaf for that luxe touch.
With the help of a small silicone tool, curve each petal as you proceed with curing. When it comes to sculpting 3D petals, patience and thin layers are important, as celebrity artist Britney Tokyo reveals. Finish the appearance with a tough gel topcoat to safeguard your art.
I had something very much like this on when I attended a luxury spa weekend in Palm Springs, and I can tell you: I felt like I had hands that belonged in a magazine ad all weekend.
Pearl Reef Fantasy: Bejeweled Sea Vibes
This design has the sensation of a treasure chest that has been washed ashore. Pearls, small beads, hand-drawn swirls, and slight beach motifs are a combination that provides nothing but mermaidcore luxury. The almond shape makes it wearable, and each nail has its own undersea tale. It is maximalist, but in the most appropriate way, as it is vacation season.
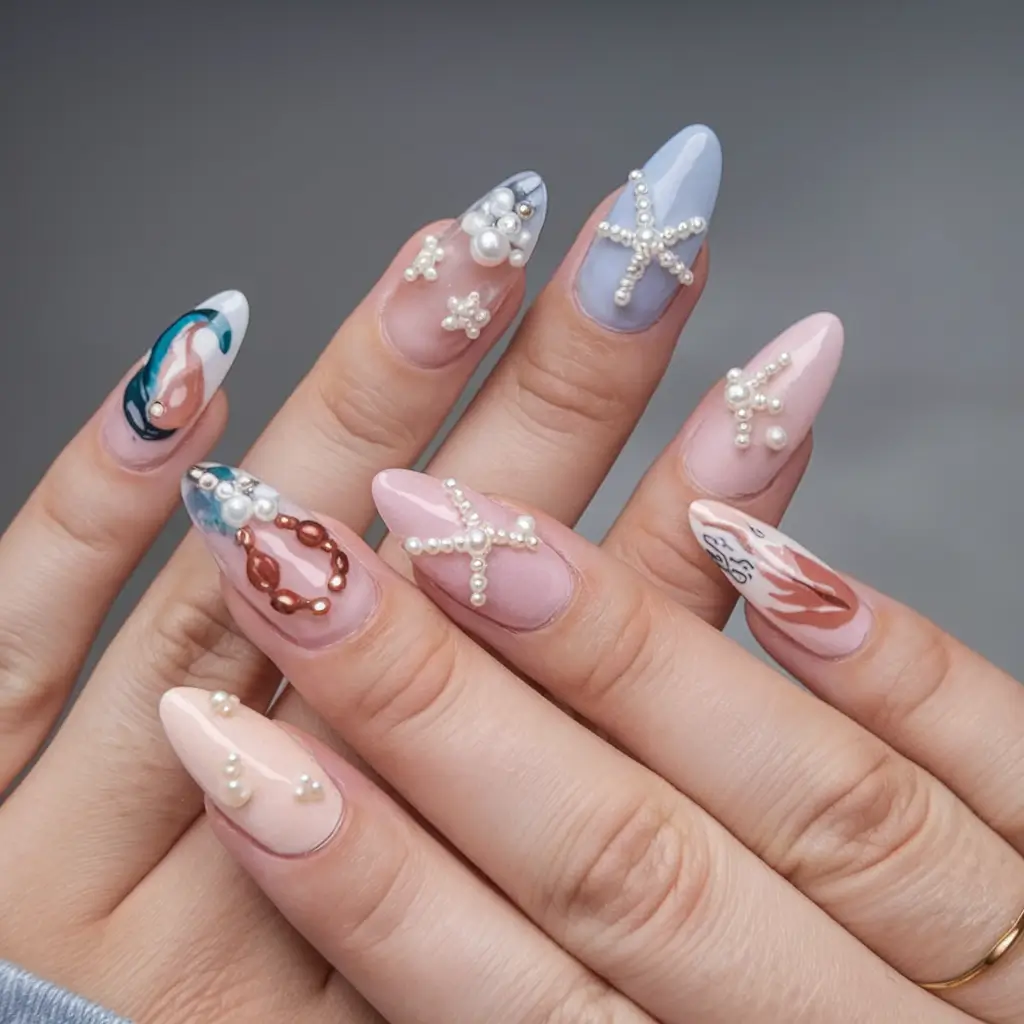
As a soft pink base, I adore OPI baby take a vow. The blue accents can be reached by using The GelBottle in the color of “Blue Hawaii,” and the pearls and gold studs can be easily found in the pearl nail art kits provided by Born Pretty.
Coat your base and leave to dry between layers completely. Set your 3D embellishments in place with builder gel and tweezers to help you be more accurate. As manicurator Mei Kawajiri will forever tell you: “Embellishments should be done with time: each one is a little jewel on its own.” Seal everything under a hard gel topcoat for durability.
I was wearing a more subdued variant of this on my recent Caribbean vacation, and I can tell you: these nails glitter even in the tropical sun rays. Pure mermaid energy.
Minimal French Bloom: Classic With a Twist
This is not your basic French manicure. The sharp white French tips are placed on top of the soft nude base, yet there is a show-stopper accent nail with a beautiful gold outline floral design. It is stylish, adult, and very suitable to be used on the beach weddings, romantic escapes, or even upscale dinner vacations.

For the base, Essie’s “Mademoiselle” works beautifully. Apply Gelish as the French tips in Arctic Freeze, and as far as the gold decorations are concerned, you can either apply leaf foil or nail art foil glue with Born Pretty gold metallic foil.
begins with French tip guides or striping tape to make the tips even. Use foil glue on your gold pattern and lightly press your foil into the glue then seal with a topcoat. As nail artist Betina Goldstein tends to mention, even the simplest patterns can be totally transformed by the smallest details in the form of foil accents.
I, personally, wore something very similar on a luxury resort last summer – I have felt so chic at each and every dinner. The gold shimmer under evening lights is magical.
Tropical Sunset Fade: Fiery Gradient Magic
Bright, bold, and totally tropical, this ombré set screams “golden hour glow.” Bright pinks and oranges blend into one another, providing serious beach sunset vibes. The almond shape is very elegant and thus it can be worn during the daytime when one wants to have fun as well as during the evening when one wants to be glamorous.

Apply the Hotter Than You Pink by OPI and Tangerine Tease by Essie to that daring gradient. Your newest best friend is a latex free sponge to blend these shades out.
Apply the sponge loaded with the polish directly on the nails, in layers until the gradient is smooth. One thing celebrity nail artist Julie Kandalec will always suggest is: “Patience with ombr e, equals payoff- add a little at a time to get that just right fade.”
I wore them to a rooftop party in Miami last August, and, frankly speaking, the nails were nearly more Instagrammable than the sunset itself. Total vacation mood.
Matte Seashell Chic: Soft Pink Meets White Detailing
Here’s a design that feels like elevated simplicity. The dusty pink ground is the ideal background to clean white decoration, shells, starfish and geometric shapes reminiscent of the beach. Its square form makes it fresh and modern yet soft and playful.
Essie’s “Ballet Slippers” works great for the base. The white patterns can be made with The GelBottle Daisy and a fine liner brush or stamping plates by Maniology.
To achieve the flawless matte finish, I seal it all the time with OPI Matte Top Coat. Because matte designs show detail especially well, as nail artist Hang Nguyen advises: “Be patient with the brush strokes.”
A similar design was what I sported last summer on a small beach getaway, and whenever I looked at my nails, they reminded me of little art works, so soothing, yet so minimal, yet so totally in trend.
French Blossom: Soft Romance With a Floral Twist
The classic French tip gets a romantic upgrade here. The soft pink bases are combined with the bright white French tips and dainty hand-painted white florals, so this design is both sophisticated and flirty at the same time. It’s versatile enough for every type of summer trip, from girls’ getaways to honeymoon escapes.
On the pink base, OPI has a Put It In Neutral which gives that romantic light tone. The tips are dealt with by Gelish in their Arctic Freeze, and the small floral details can be freehand painted using a small detailing brush and white gel polish.
A stable hand and a nice liner brush are the secrets. Nail specialist Park Eunkyung of Unistella suggests using small portions of product per petal to maintain them crunchy and airy.
I attended a beach wedding as a guest and this is the look I wore, and every single person commented on my nails before I even finished saying hello. It’s that kind of manicure—quietly stunning.