Summer is just a plain canvas to your nails, right? When the sun is out and it is time to go on vacation, there is nothing like a dose of bright colors, whimsical prints, and a touch of glitter to lift the spirits. But which of these styles are we to begin with, so many of them are floating around? Should you go full-on 3D art? Stick with pastel classics? Try something artsy but wearable? Today, we are talking about cute summer nails you will adore in 2025 – we are analyzing the new looks that seem to be ideal in relation to any type of summer mood. Let’s get into it.
Whimsical Chicks & Blossoms for Playful Vibes
The shape is sheer sunshine: a pale pink ground with creamy yellow tips that merrily dribble into each other like a melting ice cream on a boardwalk. Two of the nails have baby chicks painted by hand, with adorable orange beaks and little feet -so simple, yet you can not help but smile when you see them. Some hold beautiful white flowers, with a little crystal in the centre, just to add a bit of sparkle, but not too much to take away the limelight form the charming chicks. It is a mini summer picnic on your fingertips.
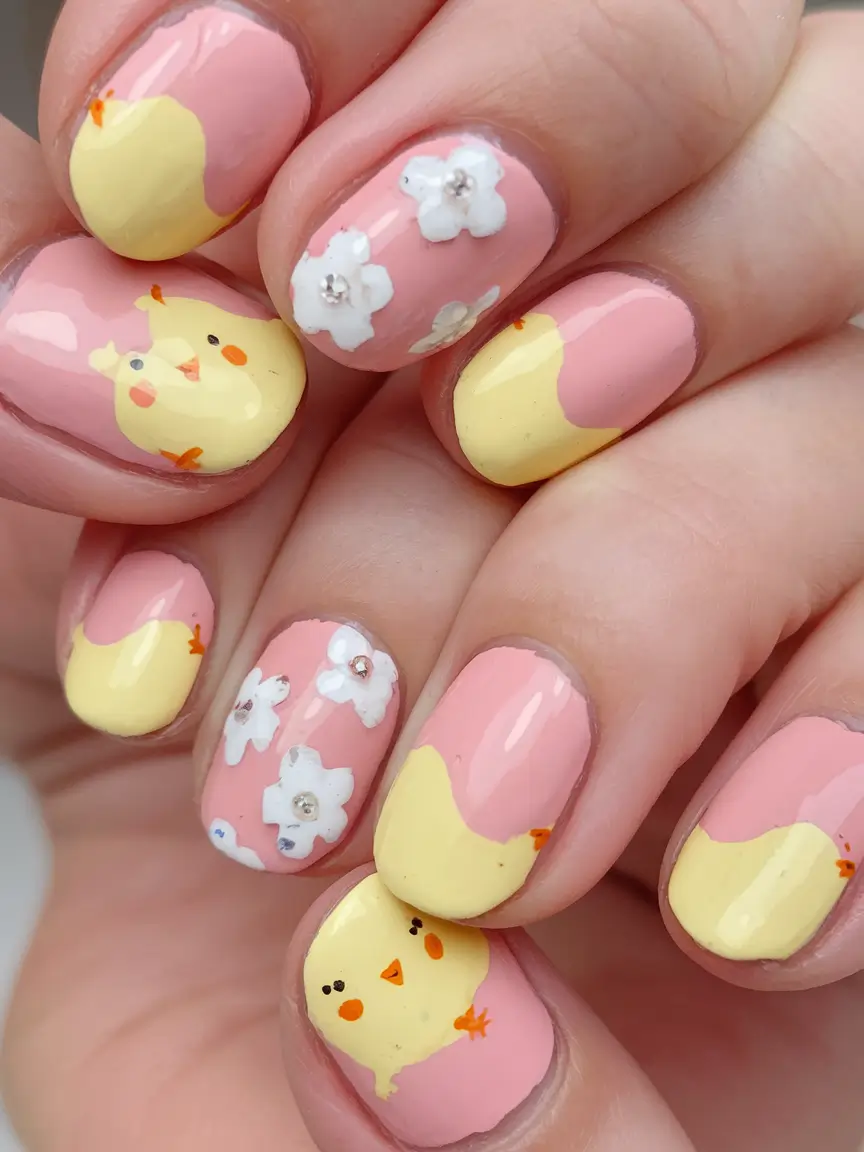
On the colors, I would use OPI Suzi Nails New Orleans as the ideal blush-pink base. The yellow? Essie in All Fun & Games is the one you can never go wrong with because it provides you with that warm, buttery feeling. A fine nail art brush will be used on the chicks and a dotting tool to make the flower petals and rhinestone centers.
And recreating this appearance at home is, in fact, more achievable than might appear. Start with shaping and buffing your nails. Paint on your base color and allow to dry completely before proceeding on to the swooped yellow tips. The chicks are freehand but do not be scared, draw lightly with a nail art pen and then fill in with polish. complete with flower decorations and fix the rhinestones with nail glue. Always finish the design with a shiny top coat to give it the professional look.
Honestly, this one feels like the ultimate mood-lifter. Each time I look at these nails, I promise myself that my morning coffee is getting sweeter. Such playful art actually brings me of what celebrity manicurist Mei Kawajiri told me: “Nail art does not have to be serious to be chic — whimsy is completely on trend.”
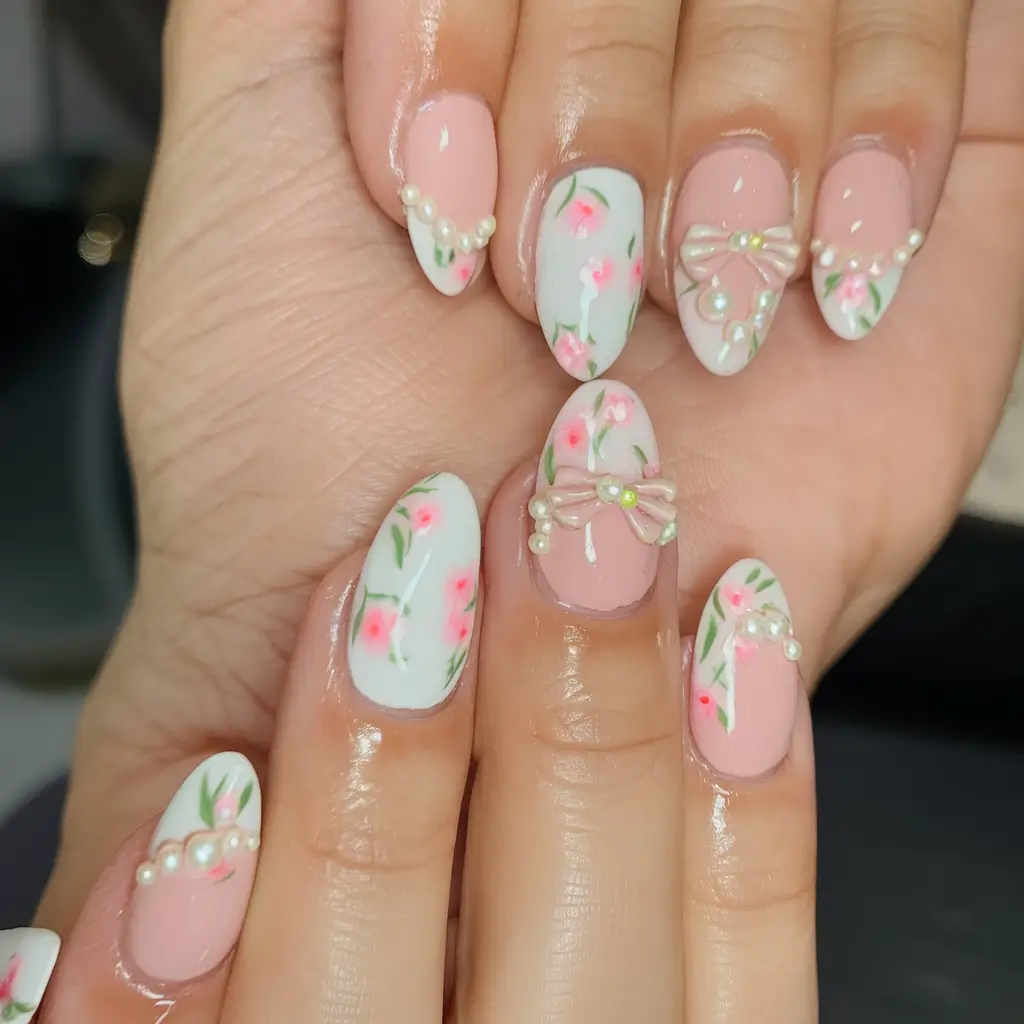
Bridal Pearls with a Summer Twist
This collection shrieks elegance yet maintains a level of funkiness that makes it wearable on a day-to-day basis during the summer. We are looking at long almond shaped nails with a sheer nude base, but with a lift of tiny pearl details at the cuticle and tips. The true show-stoppers however, are the 3D white bows – sculpted to perfection and worn on alternating fingers, they add dimension without going anywhere near unwearable. The shimmering nude is such a good match with the creamy white details that this would be a perfect choice as a beach wedding, summer party, or simply because you feel like it.
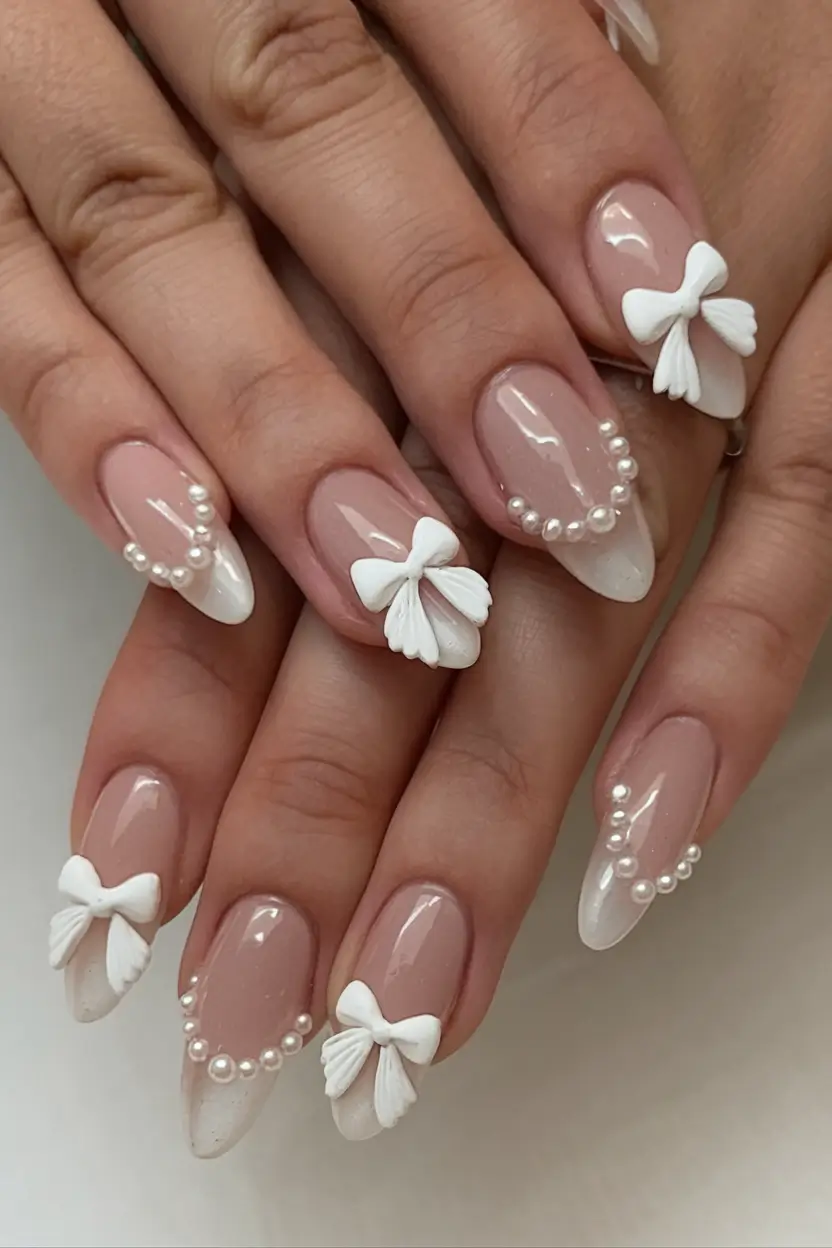
To get this luxe-but-delicate vibe, you’ll need a builder gel for structure (I personally like Aprés Gel-X for its flawless finish). The nude base can be achieved with Bio Seaweed Gel in “Sweet Pea”. Regarding the pearls and bows – you will need the flat-back pearl charms and the 3D bow embellishments that are ready-made, which you can get on Amazon or Etsy with ease.
The preparation is key in this case: make sure to sculpt your extensions, and then apply the nude base in two coats. When cured, you can now stick your bows and pearls at strategic positions using nail glue. Less is more — don’t overload every nail. Always seal with a non wipe top coat to fix the 3D elements.
When I wore a version of this to my cousin’s rooftop engagement party, I got more compliments on my nails than my dress — and trust me, I loved that dress. It is so magical the way pearls reflect the sunlight in summer, isn t it?
Yellow & Lace: The Unexpected Power Combo
This design feels like sunshine met high fashion. A couple of nails are commanded by vibrant canary yellow, others have delicate lace-like white floral patterns on a clear base. The combination of the completely solid yellow and the airy lace emits serious editorial vibes – the kind you would see backstage during Fashion Week. The floral designs are so meticulously hand-drawn, and the manner in which they graduate into the natural nail is so carefree chic.
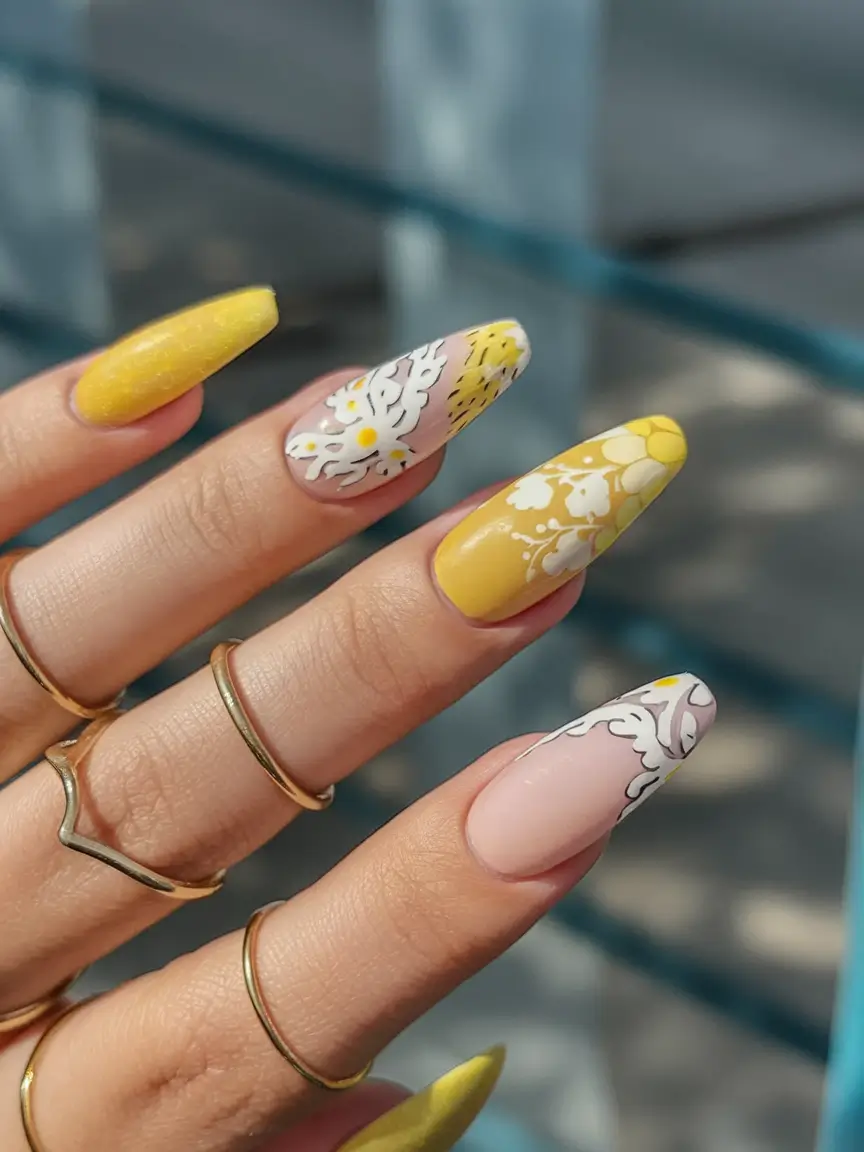
For the yellow, Lights Lacquer’s “Now & Later” gives that vibrant punch without looking too neon. To do the lace details, you will need a fine nail art brush and a good white gel polish such as Gelish arctic freeze.
Begin by giving the nail plate a good buff and clean and apply your nude sheer base on the lace nails. Allow them to dry thoroughly, and then over them apply your lace designs, with your small brush and a firm hand. For an even coverage, apply two coats on the solid yellow nails. Everything will be locked in place and the contrast of the design will be enhanced with a high-shine gel top coat.
Yellow can feel risky for some people, but trust me — once you get those first compliments, you’re hooked. It has the so-called main character energy, which completely transforms any outfit. Even Elle Magazine dubbed yellow, “the color of joyful rebellion” this year — and who does not want a bit of rebellion in their summer?
Pastel Swirls for Your Pinterest Board
A day at the beach rolled up in fluffy, swirling color is how this set feels. The nails are adorned with fluid waves of pastel pink, baby blue, lemon yellow, and soft mint all melting into each other just like those ideal sunset skies. The almond shape adds a long and graceful effect to the entire appearance, yet the flirtatious colors make it very down-to-earth and accessible to be worn on any summer event.
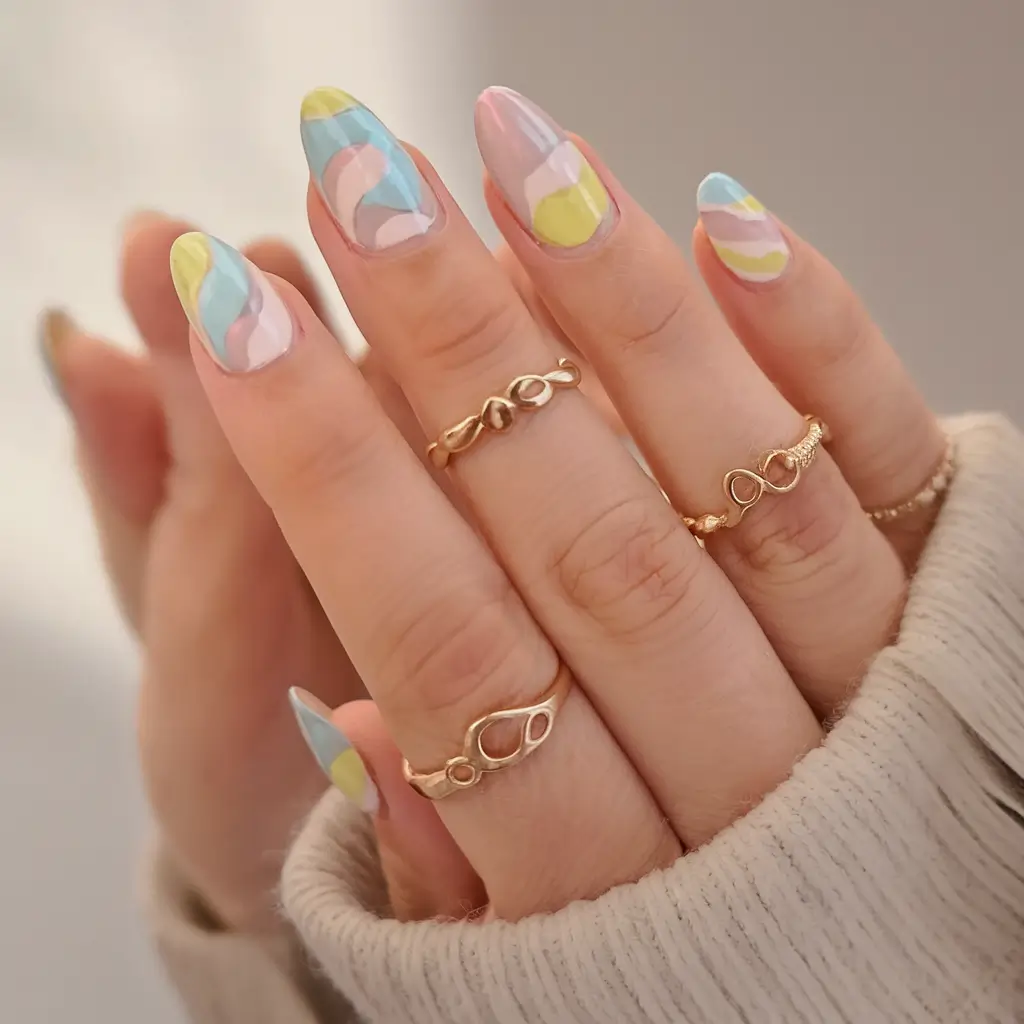
When it comes to colors, explore the Olive & June collection called “Sweet & Gracious” their creamy pastels are literally meant to be used in this type of swirled design. This will require a patience and several fine striping brushes to blend the shades smoothly.
Start by applying a sheer pink or nude base. next, with your striping brush, make the wavy lines alternating colors on the nail plate. The main point is not to think too much about it, just let the brush run. When using gel, cure separate colors at a time to prevent smudging. Seal it all with a very glossy top coat to give the design a fluid movement.
I adore the fact that these nails will look good with literally every single outfit: a pair of white linens or a loud summer print. The design provides serious Pinterest vibes and, frankly speaking, whenever I wear them, someone inquires me about where I had them done. Summer nail envy? Absolutely.
Garden Party Romance with Pearls & Florals
This set brings all the garden-party fantasy feels. Alternating nails are hand-painted with small pink roses on a minty-white background, whereas others remain basic with a light pink color. Subtle pearl accents sweep across the cuticle and provide depth, whereas small 3D bows situated in strategic positions on some fingers make the look romantic and almost vintage. It is light, girly, and completely swoon-worthy in the summertime weddings, brunches, or when you just want to feel extra pretty.
Beginning with the pale pink base, Zoya has a polish called “Dot”, and Essie has a cool mint shade, “Mint Candy Apple”. The rose details: use a fine nail art brush and a tiny dotting tool with OPI’s “Pompeii Purple” and OPI’s “Big Apple Red.” The 3D elements will be assisted by flat-back pearls and pre-made bows.
prepare your nails CND Shellac Prep as normal and apply two coats of each base colour and fully cure. In the case of the florals, you want to very lightly pencil in where your roses are going to be placed prior to painting. Attach pearls and bows using nail glue and do not forget to completely seal using a thicker gel top coat to avoid lifting.
Last July, when my best friend attended a garden wedding wearing this design, she was actually stopped by strangers who wanted to know who did her nails. These kinds of delicate details are total conversation starters — perfect for when you want your manicure to whisper “I’ve arrived.”
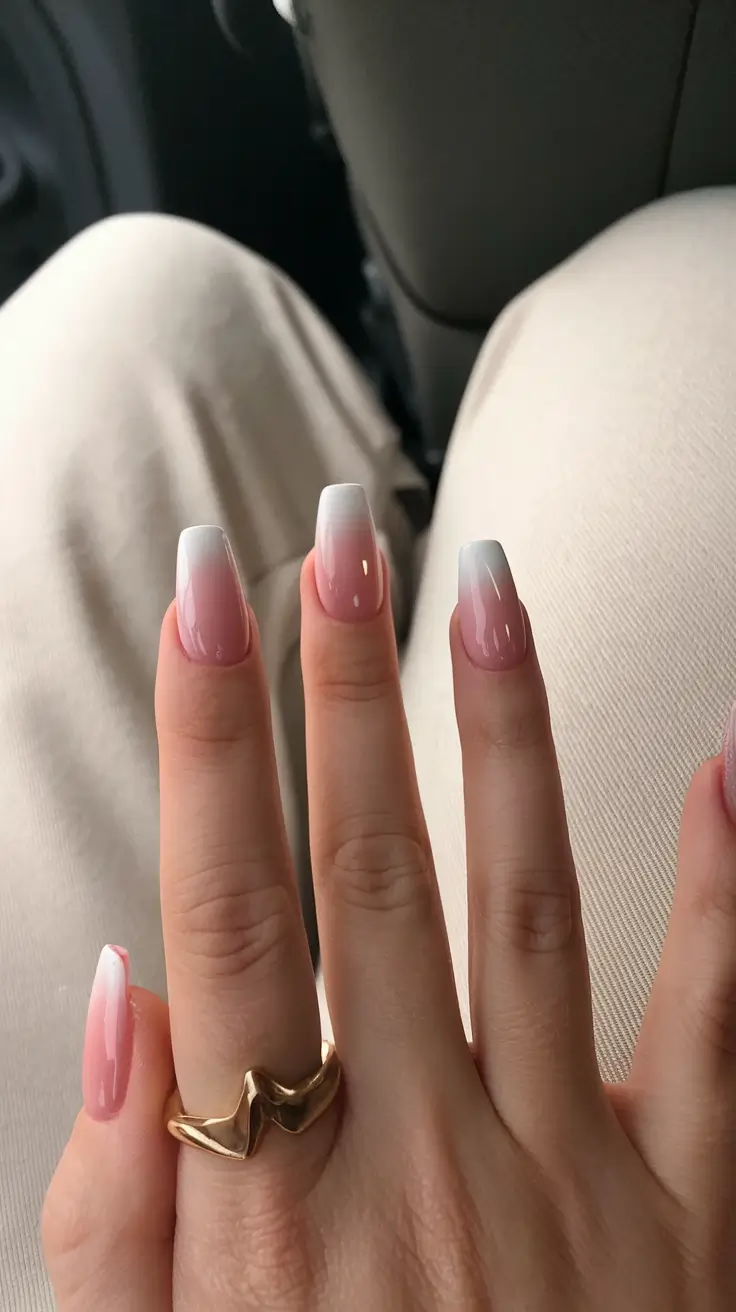
Blushed Gradient: Summer’s Fresh Take on Ombre
This design is like strawberry sorbet that is melting in the sun. The gradient goes smoothly in translucent nude at the cuticle and then becomes deeply, berry-pink at the tips. The thing is, the transition is perfectly blended, there are no harsh lines, just that ombr e glow, which makes it so modern. The almond shape adds to the sophisticate but maintains it wearable enough to run errands during the day and have rooftop nights out.
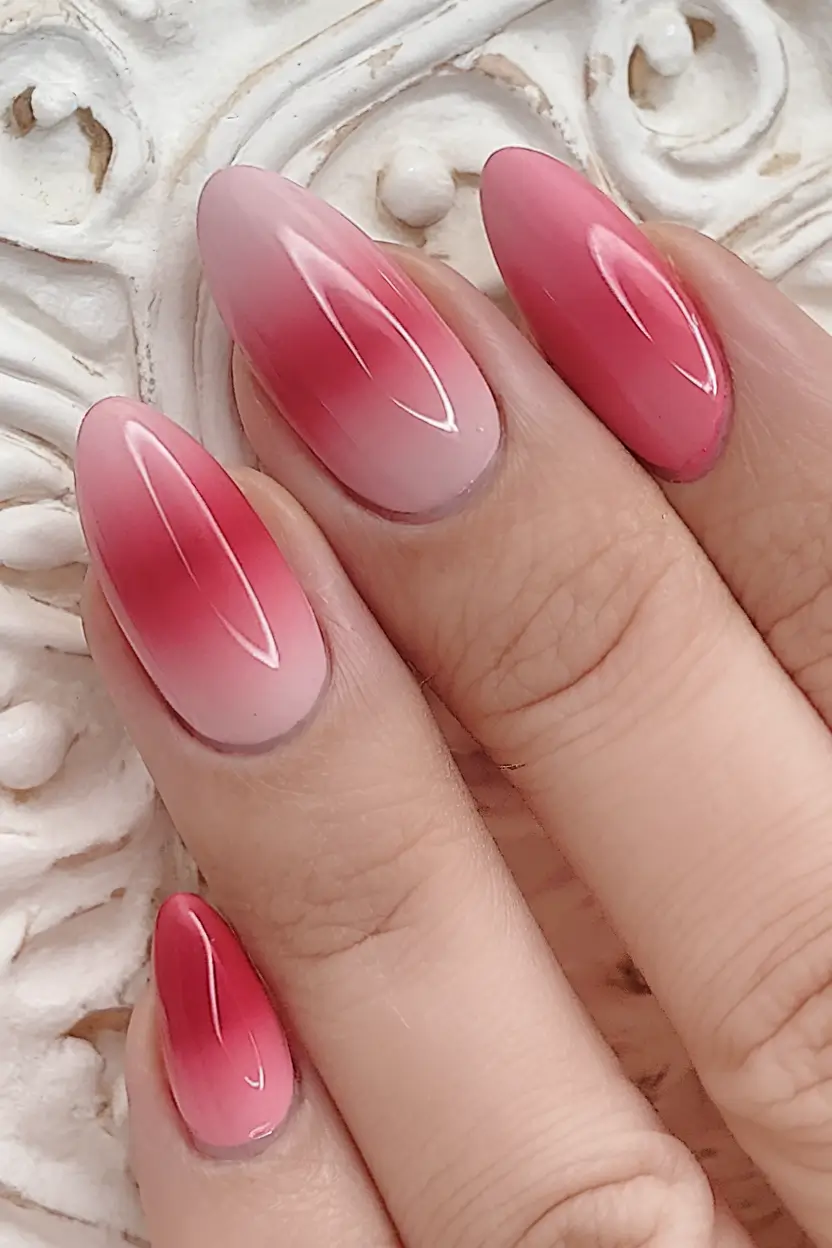
When it comes to colors, I would take The GelBottle Doll Face and mix it with Beetles Gel Polish in Romantic Pink. A quality sponge or an airbrush tool will also be required to create that buttery gradient.
My blending secret: once you prepare your nails, apply your nude base and make it cure completely. Then with your sponge apply very thin coats of pink starting at the mid-nail and fading out towards the top of the nail. Work in layers, curing between applications to avoid streaks. To give it a glass-like finish apply a super-gloss top coat such as Seche Vite Dry Fast Top Coat.
The time I attempted this at a garden brunch for a friend, everyone was wondering whether they were salon-done -and truthfully, it was all because of layering patience. Celebrity nail artist Tom Bachik always says, “Ombre is about movement, not perfection” — and I couldn’t agree more.
Minimalist Romance with Sweet 3D Bows
The vibe here? Think romantic but make it fresh. A long almond shape is a great base to showcase the dainty 3D bows, small rhinestones, and minimal hearts placed decently on each nail because of the soft, sheer nude nail color. The accessories are young and sophisticated at the same time – ideal for a summer date with a boy or an impromptu road trip with your girls.
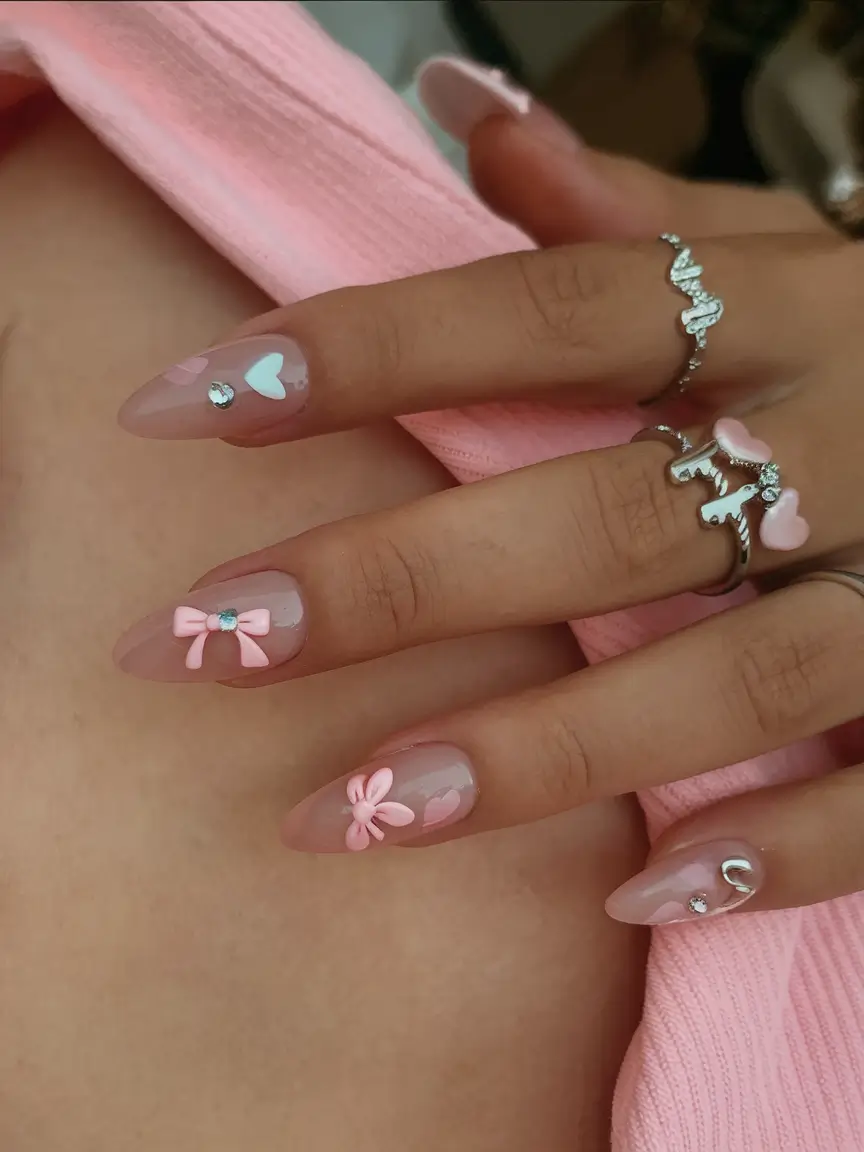
When it comes to the nude base, I always reach OPI, “Bubble Bath”. The bows and hearts are available as ready-made nail charms on Etsy or Amazon. You’ll also need flat-back rhinestones and nail glue.
begins with preparing your nails and painting them with two layers of the nude base. Allow to cure then very carefully attach your charms using a wax pencil tool. Apply a little builder gel and re-cure the 3D elements. Finish at all times with builders top coat to seal and lock.
It is such a jewelry to wear, subtle yet noticeable. It’s that perfect in-between where you’re not trying too hard, but still feel polished. This summer, I’m seeing more and more nail artists on TikTok embrace tiny 3D elements for a “coquette summer” vibe — and I’m totally here for it.
Textured Glam with Playful Hearts
These nails add some additional glitz to the romantic pink trend. It is a nude-pink base sprinkled with small rhinestones, mini metallic details, and 3D hearts and bows. The little details reflect the light in the most flattering manner and the result is a manicure that makes you feel like you sprinkled fairy dust on your fingertips — pretty enough to wear to a wedding but fun enough to sport on weekend brunches.
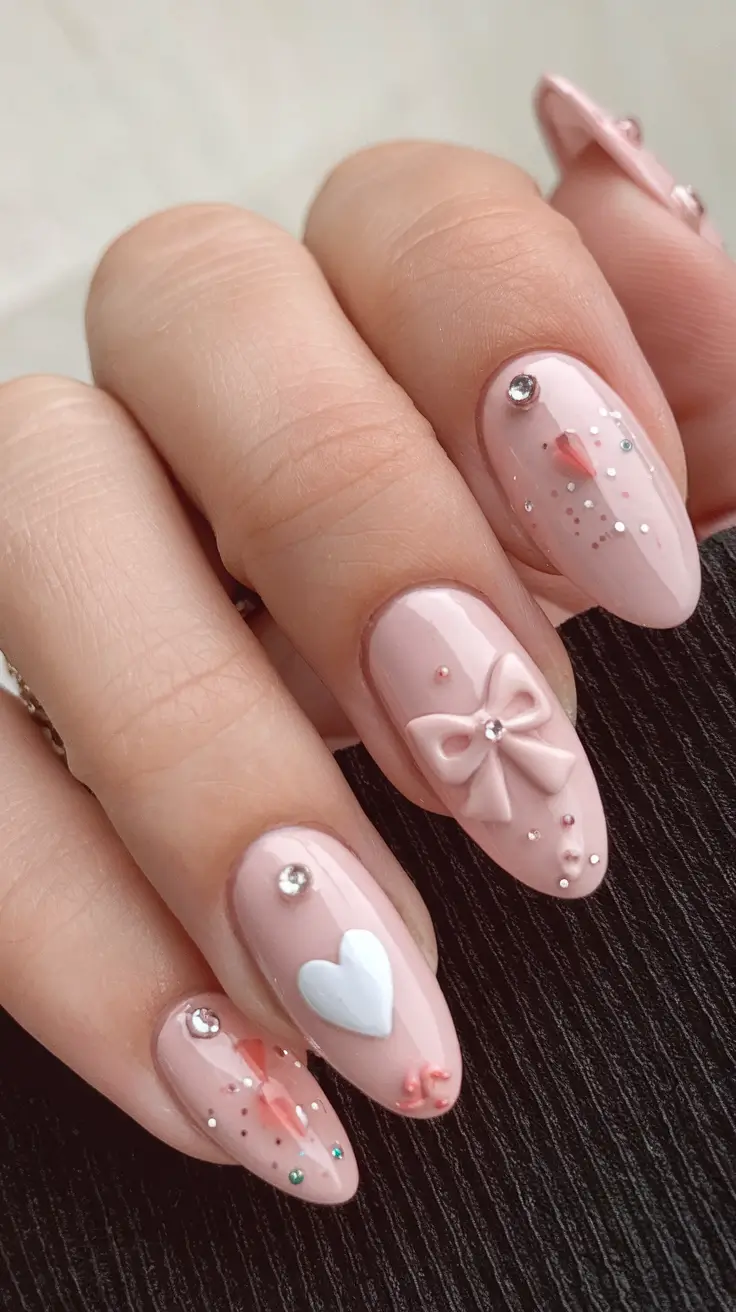
You’ll want Butter London’s “Piece of Cake” for that perfect blush base. The rhinestones, hearts and bows are available as nail art sets on Amazon or craft shops. A dotting tool and a wax pickup pen will help the placement to be much easier.
Apply your base color and fully cure. Start applying the embellishments one nail at a Time. More is less in this case – you want sprinkled glitz, not congested confusion. Apply builder gel to fasten and seal your pieces to make them last.
I had a variation of these nails out to a rooftop concert, and I will just tell you now – under string lights these suckers pick up every glimmer. They provide that magic, almost ethereal, feel which is so appropriate on a warm summer night. Honestly, these might be one of my favorite cute summer nails you’ll love in 2025 — they’re flirty but luxe.
Modern French with a Soft Summer Twist
This isn’t your basic French tip. It has a bit of a twist with each nail: one with perfectly curved white tips, another with inverted half-moons, and a statement heart outlined by soft pink and white lines. The mint blue accent nail provides that surprise summer punch that is refreshing – sort of like drinking iced matcha in the sun. Its squared-off form makes the design more sharp and modern, yet sweet.
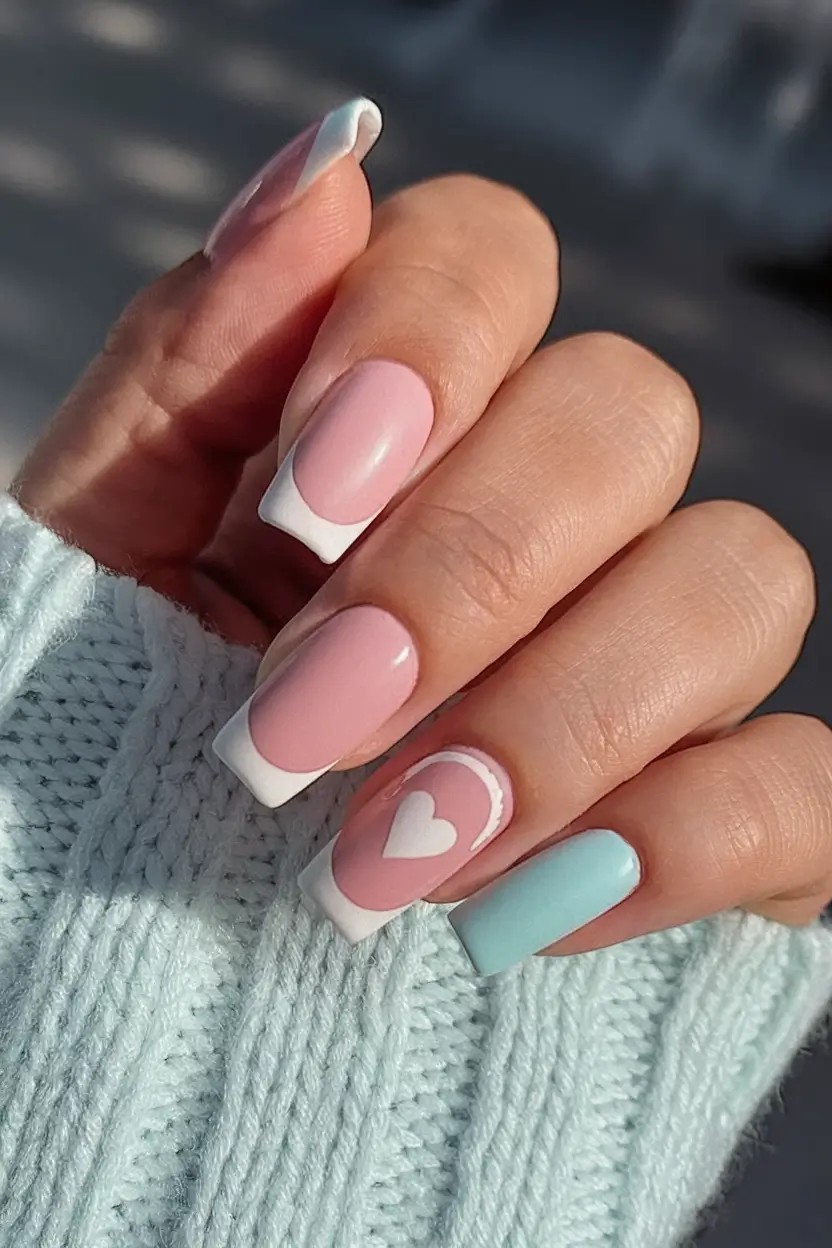
For the soft pink, Essie’s “Ballet Slippers” never fails. The crisp white can be achieved with OPI’s “Alpine Snow”, and the mint blue? Olive & June’s “JLR” is perfection.
Apply two coats of pink base. When completely dried, paint the French tips and half-moons by hand with a fine liner brush. A stamping plate makes the heart the easiest, but with practice it can be freehanded. Seal in with a top coat gel polish to make the shine last.
I tested this out when I was in the mood to be a little girly but not too sweet, and it completely passed the test both in work Zooms and weekend beach visits. The combination of gentle colors and abstract lines is simply awesome now.
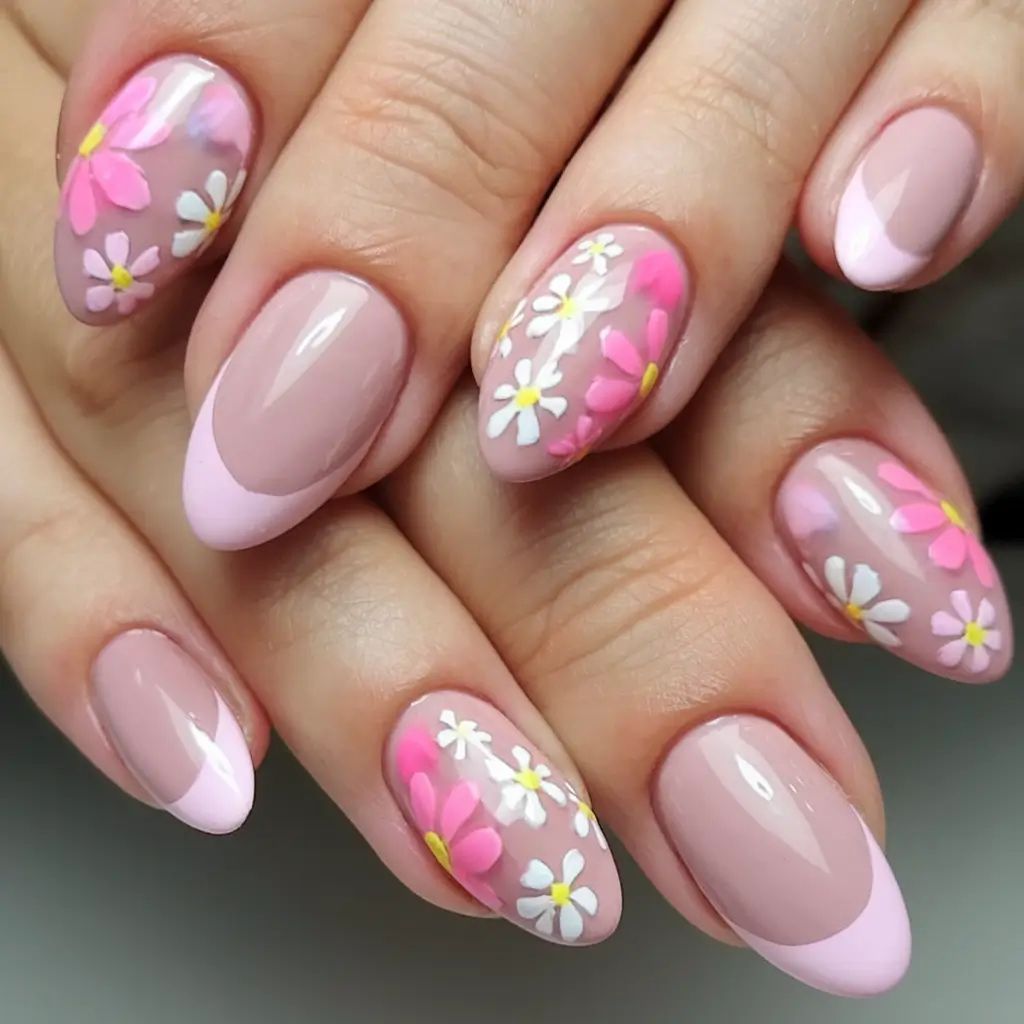
Daisy-Tipped Summer Florals
Nothing says summer quite like fresh florals. This design has soft pink tips that move into scattered daisies of white, yellow and a touch of mint green. The florals almost look like they are sprouting out of the cuticle, making it feel very fresh and garden-party, but with that mischievous touch we want in summer.
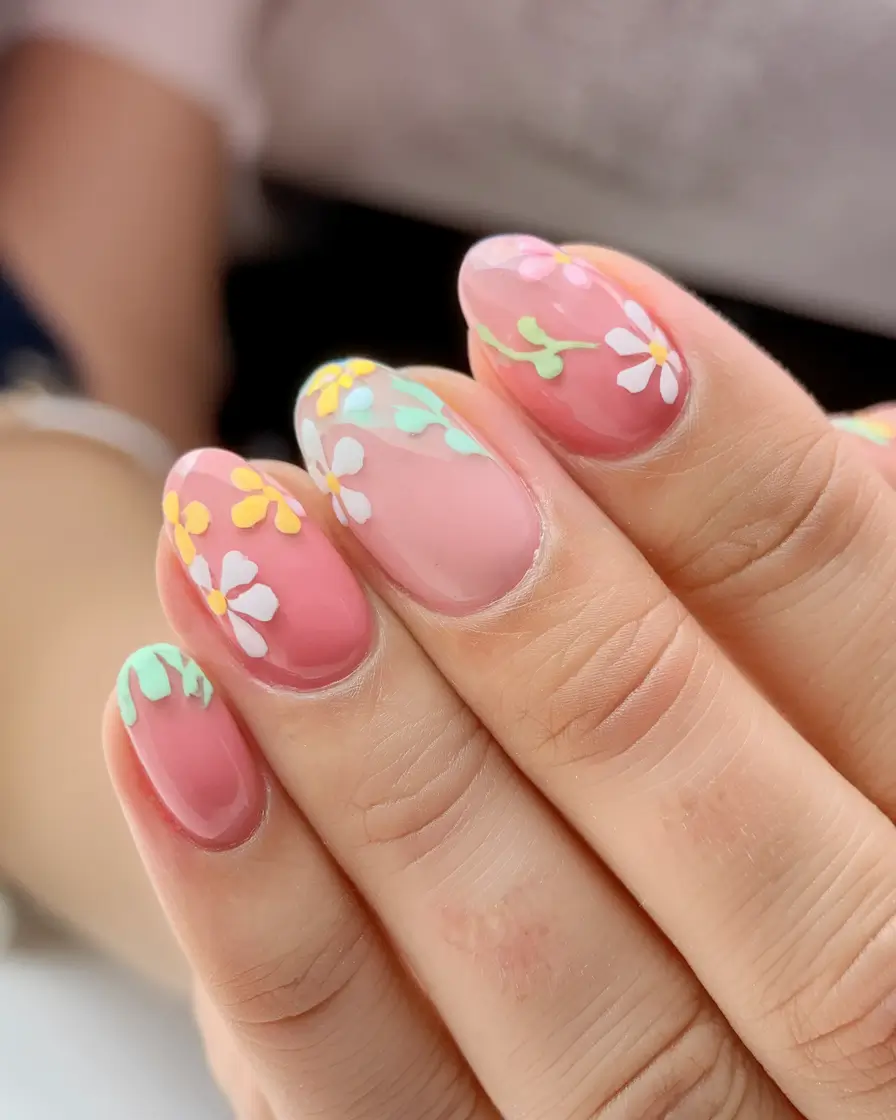
OPI’s “Bubble Bath” will work as your base, with Essie’s “Hay There” for the yellow and Zoya’s “Purity” for the daisies. To make the petals and greenery a fine dotting tool and small detail brush are a must.
Once your base coat is cured you can begin building each petal outward, using the detail brush. apply leaves lightly to give that airy effect. Let dry between applications of color, and finish with a gel top coat.
When I first put this look together last summer I swear I could not take my eyes off of my own hands. There’s something about florals that never gets old — and they instantly make any outfit feel more summery, even if you’re just in jeans and a white tee.
Retro French Meets Modern Hearts
A French tip is classic, somehow, so this design reverses it with a cute heart shape. The foundation is a sheer nude-pink that allows the white tips to curve inward just a bit to give these an old-fashioned glamour. What truly pops in this are the small white hearts that are perched beautifully on a few nails. It is romantic and fresh at the same time, which makes it ideal for brunch dates, pool selfies, or even a spontaneous summer engagement celebration.

For this, I usually reach for OPI’s “Bubble Bath” as the perfect sheer pink base. The white tips and hearts are best achieved with Gelish’s “Arctic Freeze” and a fine detail brush or heart-shaped nail stickers if you want a cheat.
Clean up your nails, put on two coats of your base and cure completely. This is done by hand-painting French tip with a thin liner brush; slow and steady wins this race. To do the hearts, put small dots in the shape of a V and join them up into a heart with your brush carefully. Seal it all in with a glossy top coat.
I literally had a very similar set to a summer baby shower of one of my friends, and it coordinated with so many of my soft pastel outfits that I brought. It is basic yet provides that added touch-whipped cream on your iced coffee.
Seashell Dreams with Beachy Ombre
This set is basically your vacation in nail form. The light pink graduates to a raspberry at the ends to give it a sunset-like ombre. However, the accent nail must be the one on the ring finger a small pearl starfish and coral-red sea star that cannot be ignored and is shouting about the beach vibes. Whether you’re physically on an island or mentally on one, this design feels like pure tropical escapism.
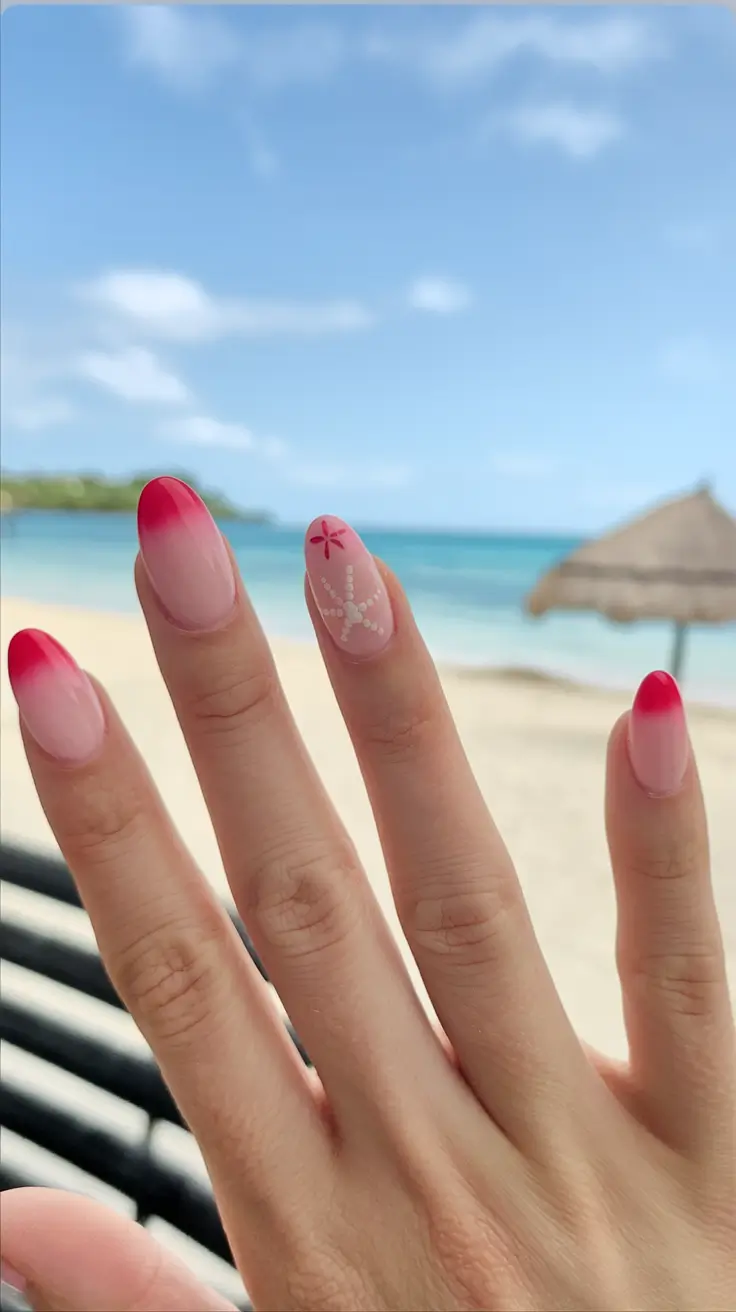
Use OPI’s “Rosy Future” for the pink base and Beetles “Cherry Blossom Red” for the deeper tips. Pearl nail beads and micro-nail art brushes will become your best friends when it comes to the starfish design.
Once your ombre mix is cured, take your pearls individually with a wax tool and nail glue and line the starfish shape. Stamp or paint the small red sea star with your brush or a stamping plate. Top off with a builder top coat to everything.
When I wore this on holiday last year, the beach staff actually commented on my nails as they served me cocktails. This is the sort of feeling we are going to be trying to achieve with these adorable summer nails you will adore in 2025, a tad bit flirty, a tad bit resort-chic.
Blue Blooms and Soft Petals
Such a cute combination of feminine and whimsical is this design. The majority of the nails have soft pink bases and small blue and white florals scattered over the nail beds with small bead centers providing texture. The alternating nails go all minimalist by adding a diagonal pastel blue tip that adds the much needed pop of color to the floral work, without overpowering it.
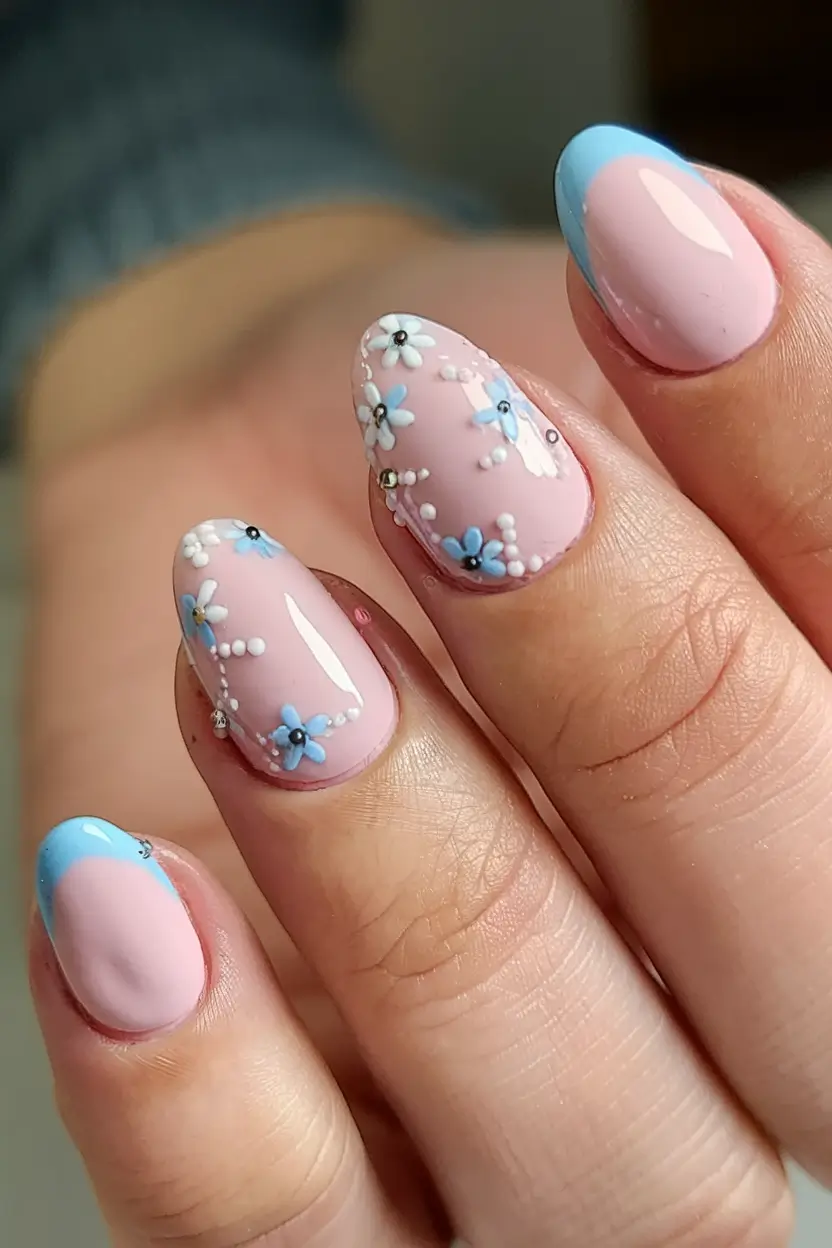
To achieve this appearance, you will need Zoya`s “Dot” as the pink color, Olive & June`s “OMG” as the light blue, and Essie`s “Blanc” as the small flowers. The only must-have in this situation is a fine dotting tool that will help your flowers remain petite and tidy.
Start with your pink base and fully cure it. Then alternate your diagonal tips with the blue polish. In the case of the flowers, plot them using your dotting tool beginning at the center. Put small beads in the centre to give a texture and hold them in place using a little builder gel.
I cannot stop receiving compliments each time I do floral nails, such as these: there is something undeniably adorable about micro-flowers that seem so quintessential picnic, baby shower, or Sunday farmer market lazy day.
Rainbow Dreams with Bold Summer Energy
This design is pure serotonin on your fingertips. The nail tips are each painted a various bold summer color – mint green, lavender, electric blue, coral, and sunny yellow – with the accent nail getting a swirl of the entire rainbow, which is grown-up enough to avoid being childish. The colors really pop off the matte nude base, as though it were a lineup of summer popsicles.

For the nude base, OPI’s “Samoan Sand” is perfect. To get the bright colors, I would use the Lights Lacquer Summer 2025 Collection, which has the best bold pastels to do this type of multi-tip look.
Apply your nude base, cure and then with a fine liner brush freehand each tip with color. The swirl of a rainbow requires a steady hand -I prefer to draw it lightly in pencil first. Top coat with a velvet matte top coat to make the colors really pop.
Last summer when I attended Pride events wearing this look it felt like I was walking around with my own personal rainbow flag. It is the simplest thing to spread positive energy even without uttering a single word.
Soft Marble Elegance with Golden Veins
There are occasions when all you need is to have your nails murmur class — and this design will do it. A beige-pink ground is enhanced by the ultra-fine gold marble veining on each nail in a diagonal direction. It is clean and modern with just the right amount of shimmer to reflect the sunlight and yet completely wearable to work or on the weekend.
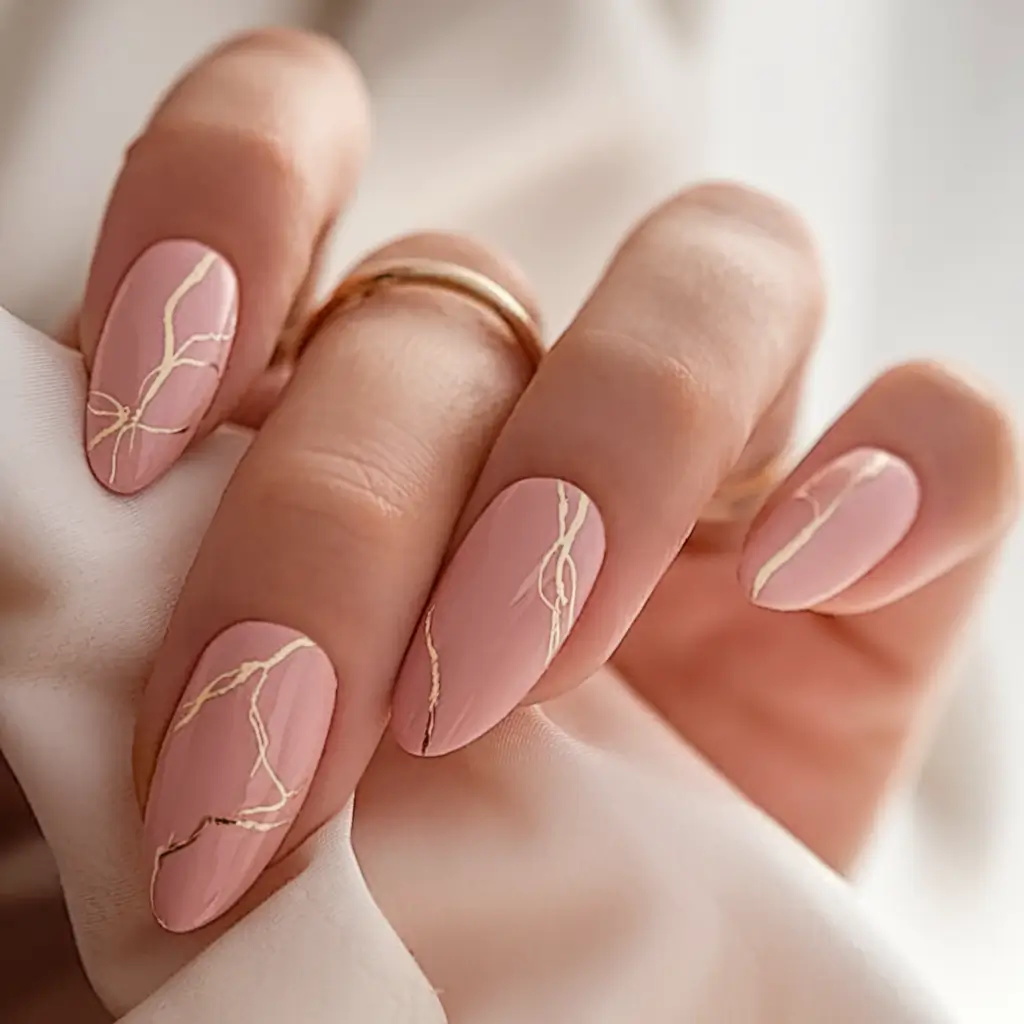
As a base I adore Essie Not Just a Pretty Face. gold veining Leaf Gel gold art gel or ultra-fine metallic nail tape can be used to create the gold veining.
beginning with two coats of your pink base, and allowing to cure thoroughly. With a striping brush, feather the gold gel into natural looking vein-like swirls. One nail at a time cure and top coat with high-gloss gel.
I adore that this design is compatible with literally any outfit. It can be a linen summer dress or a pair of jeans and a white T-shirt, but such nails always make me feel polished and chic without trying too much. According to celebrity manicurist Betina Goldstein, “Minimalist nails with small luxury details are having a huge moment in 2025″ — and she’s absolutely right.
Pink Daisy Delight with French Accents
These nails are pure sunshine bottled up. The nude canvas base is like a breathable fabric, and contrasting nails are sprouting hand-painted daisies in spring pink, pure white, and some yellow highlights. The rest of the nails are decorated with soft pink French tips, which makes the design balanced and suitable to wear to a garden party as well as an iced latte run.
For the base, Essie’s “Mademoiselle” creates that perfect sheer look. For the daisies, I love using Zoya’s “Purity” for white, OPI’s “Strawberry Margarita” for pink petals, and OPI’s “Sun, Sea, and Sand in My Pants” for the yellow centers.
Allow everything to cure completely after you have applied your base and French tips. Then using a fine dotting tool, construct your daisy petals and centres. The key here is spacing — don’t overcrowd. A thin glossy top coat pulls it all together.
I wore these to a family picnic last summer, and, frankly speaking, they immediately made my whole outfit seem more polished, even in a plain sundress and sandals. It’s that subtle way of saying “I’m summer-ready.”
Bold Mustard Abstracts for the Statement-Maker
This design is unapologetically bold. A full-coverage mustard yellow provides the background, and organic white abstract designs on each nail give the effect that is both current and slightly retro. It is artistic but not too overwhelming, so it is sure to please everyone who would prefer their nails to make the statement at every BBQ or rooftop party in the summer.
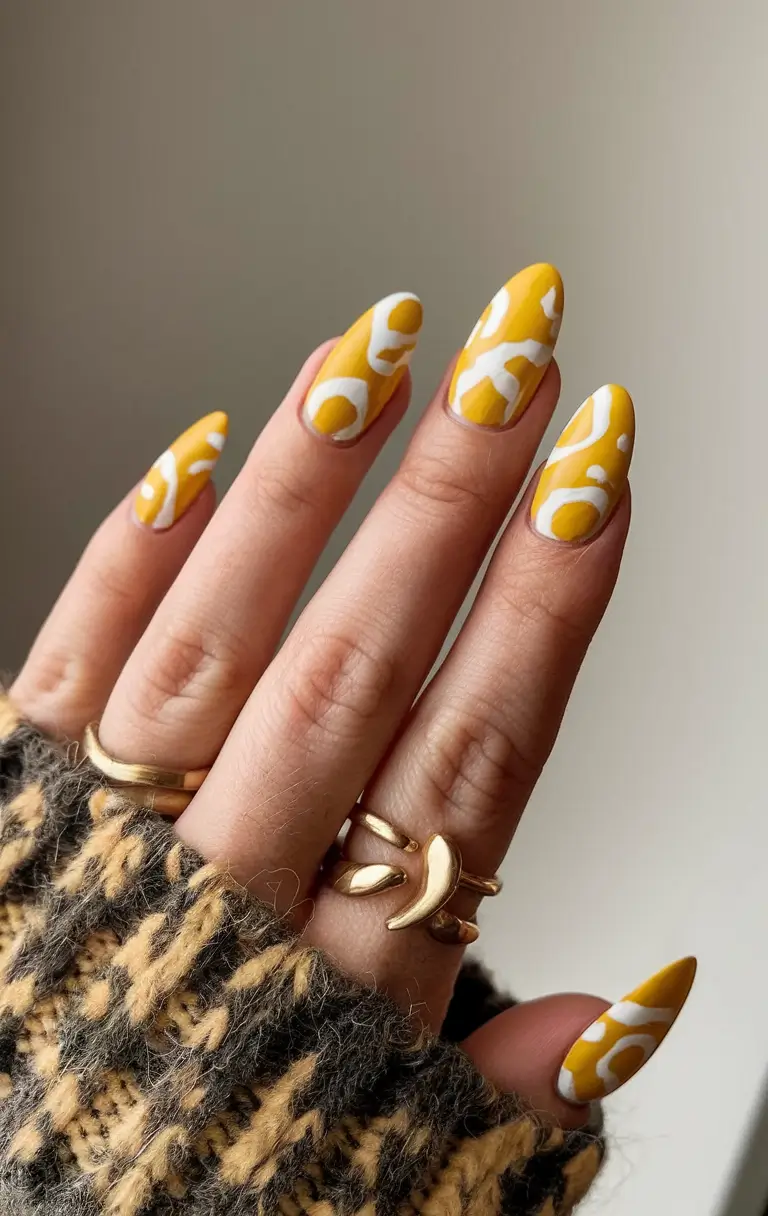
You’ll want Olive & June’s “Bright & Focused” for that gorgeous mustard tone and Gelish’s “Arctic Freeze” for the white. You will need a small detailing brush to make those freeform shapes a lot easier to do.
Apply two coats of mustard and cure fully. Using your liner brush, freestyle your white abstract designs. The beauty of this look? There’s no wrong way to do it. Finish with a high-gloss top coat for maximum shine.
I attended a small local art show in this design and everyone kept asking me where I had my nails done. It is contemporary art, however, on your fingertips -and frankly speaking, I felt like a walking Pinterest board.
Earthy Green Marble for Luxe Summer Nights
This set gives serious jewelry box energy. The rich green marble appearance swirls smoothly and organically on each nail and provides a sophisticated nearly mineral-like appearance. The sporadic small gold stud gives it the right amount of bling without overpowering the design. It is creamy, fancy and yet so un-summer like, which is why it is so good.

For the base, Zoya’s “Hunter” gives that lush green depth. To create the marble effect, use a fan brush and The GelBottle’s “White Daisy.” A toothpick or nail art needle will come in handy to swirl the colours just enough.
Start with your base and partially cure. Then just add small dots of white on each nail when the polish is still wet. The best marble effect is the one that feels natural – as a piece of stone. Stick the gold studs on using a small amount of nail glue and finish it off with a glossy top coat.
Last August I attended an outdoor evening wedding in these and they reflected every bit of candle light. They simply seem luxurious – -even when you make them at home.
Midnight Stars on Snowy White
There’s something effortlessly cool about this monochrome look. It has the clean fresh base of a bright white and the edgier more celestial look coming in the form of the jet-black stars placed haphazardly on the nails. It is also fashionable, but in a sensible way, almost as though your go-to graphic tee had been transformed into nail art.
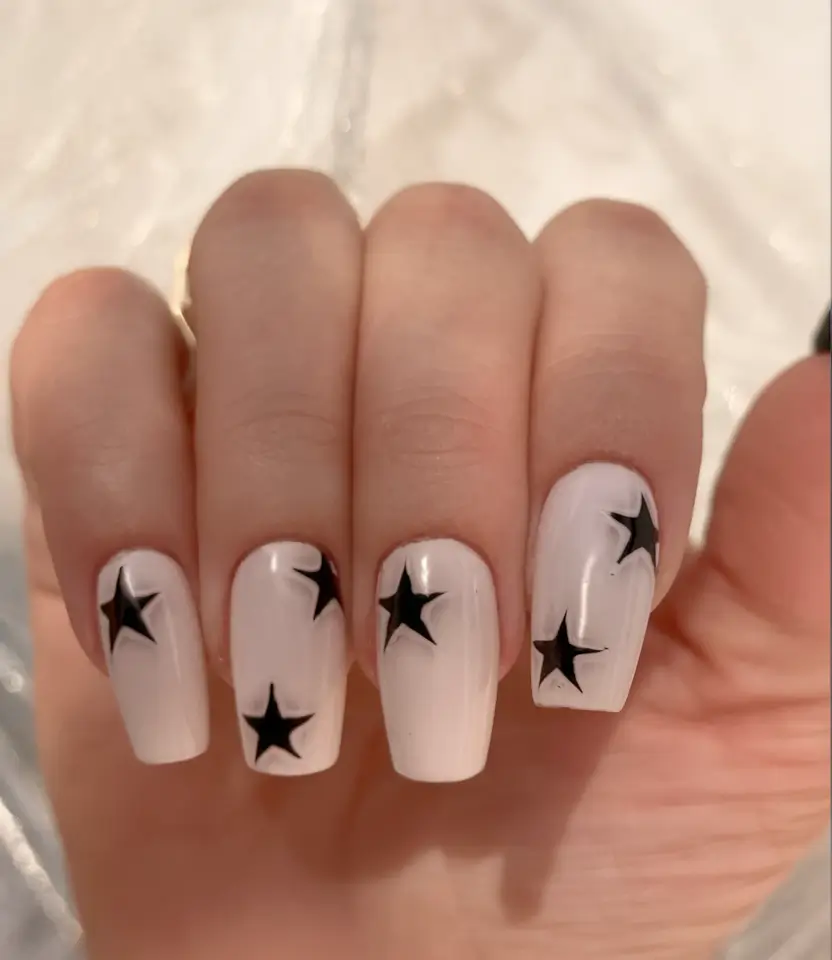
I suggest using OPI’s “Alpine Snow” for your base, and Orly’s “Liquid Vinyl” for the stars. draws the stars Free hands with a small brush or applied nail stickers in the shape of stars are allowed to those who are not precise.
Paint your base color in two coats, fully cure then using a fine tip sharpie, plot out your stars. The trick here is to maintain the placement so that it is not regular. Top coat it with a high glossy seal to set it in.
I tested this set just before a weekend music festival and really did feel like a complete cool girl. It looks just as good with a sundress or denim cut-offs and sneakers – so versatile, so fresh.
Soft Giraffe Prints for Subtle Animal Vibes
Animal print gets a softer, summer-friendly makeover here. The nude ground color changes to cheerful giraffe spots in dusty white and rose pink. The alternating nails provide a full-color coverage whereas the others allow the pattern to be the main character of the design, making the entire look well-balanced and quite unexpectedly sophisticated.
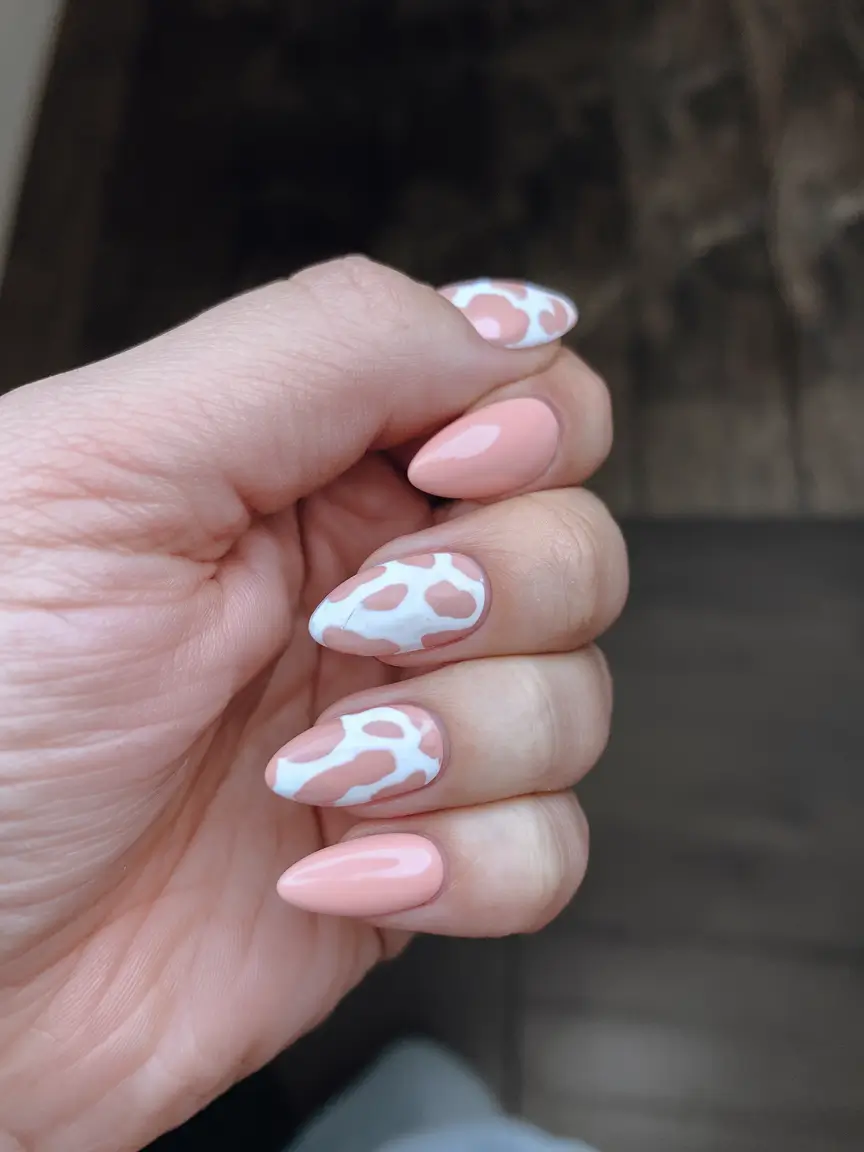
Essie’s “Bare With Me” gives that perfect muted base, and for the spots, I love Olive & June’s “Sweet & Gracious” combined with Zoya’s “Purity.” To add the irregular spot shapes you will need a small dotting tool or a detailing brush.
Start with your nude base and fully cure. Next make the irregular patches, and layer pink and white lightly on them to make a contrast. Seal it with glossy gel top coat to make the pattern pop.
When I wore this look for a winery tour last summer, it got the kind of attention you want — subtle compliments that sound like “Wait, your nails are adorable!” It’s chic, unexpected, and completely wearable.
Cherry Blossom French with Delicate Florals
This design combines traditional and modern in the most elegantly. The atmosphere is prepared with a soft nude base and the nails are alternated with a clean white French tip and hand-painted cherry blossom branches. The white and pink flowers cascade elegantly across the nails, offering a romantic, feminine vibe that’s perfect for any summer event, whether it’s a bridal shower or simply sipping rosé on a patio.
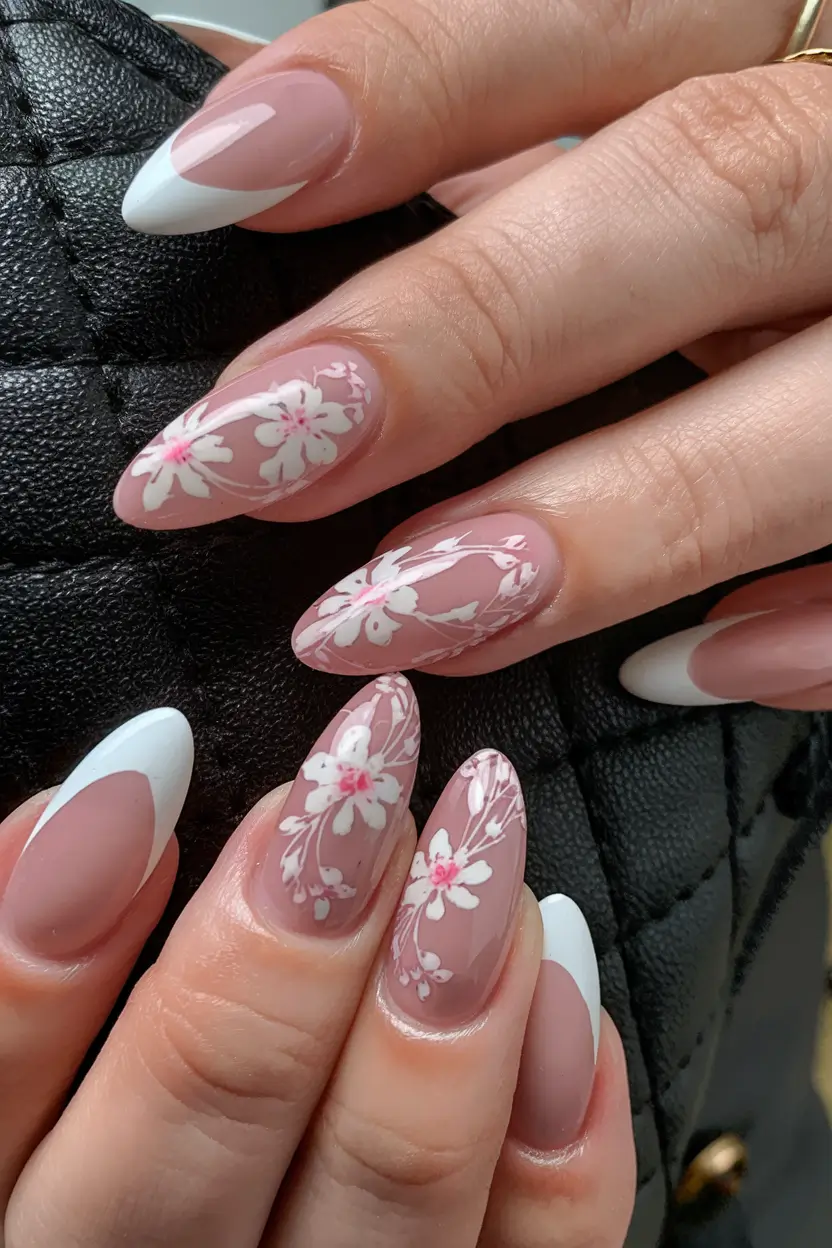
Use OPI’s “Put It In Neutral” as your base. For the floral art, I like Essie’s “Blanc” for the petals and OPI’s “Pink Flamenco” for those subtle pink flower centers. One should have a fine detail brush to make the detailed branches.
begin by applying and curing your base and French tips. and thence to the cherry-blossom patterns, constructing the flowers petal by petal. Take your time—these tiny details pay off big. Seal with a clear top coat of high gloss to make it elegant.
I attended a summer tea party organized by my friend and I wore this look, honestly, it felt like I had some little works of art on my nails. It’s romantic, polished, and effortlessly chic.
Pastel Geometry for a Soft Modern Look
If you’re someone who loves a minimalist vibe with just a dash of playfulness, this design nails it (pun totally intended). Muffled sage green, lavender, and nude shades alternate on each finger, and fine linework in white provides some slight graphic details, making it look trendy and fresh.
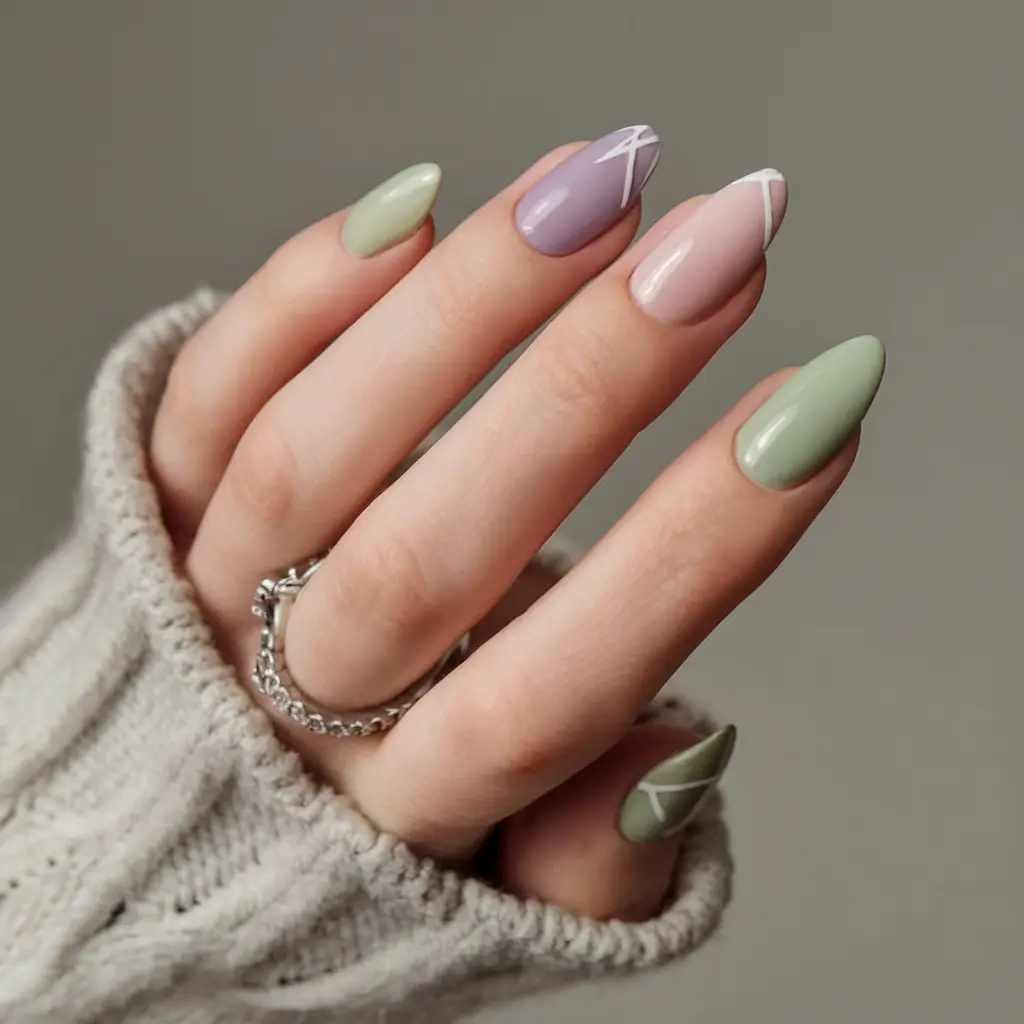
For this one, I’d use Olive & June’s “JLR” for the sage, OPI’s “Do You Lilac It?” for the lavender, and Essie’s “Bare With Me” for the nude. To get those clean white lines a striping brush is a must.
Now using your colors apply one color at a time, curing between coats. When dry, draw in your liner brush those thin, intersecting lines in white to minimalise that geometry. Finish with a high-gloss top coat.
The design is one that I would wear at the beginning of the summer when I am not quite in the mood to do bold brights yet I want something more than basic. It should be combined with large sunglasses and an iced oat latte in hand.
Chocolate Neutrals with a Hint of Leopard
As a neutral palette, this would be summer. Different hues of brown, creamy latte to deep mocha are alternating on the nails, whereas there is one eye-catching nail with a hint of leopard print on the tip. The combination of sheen and print comes together as sophisticated yet playfula grown-up version of animal print that nevertheless falls right in line with the more natural aesthetic of summer.
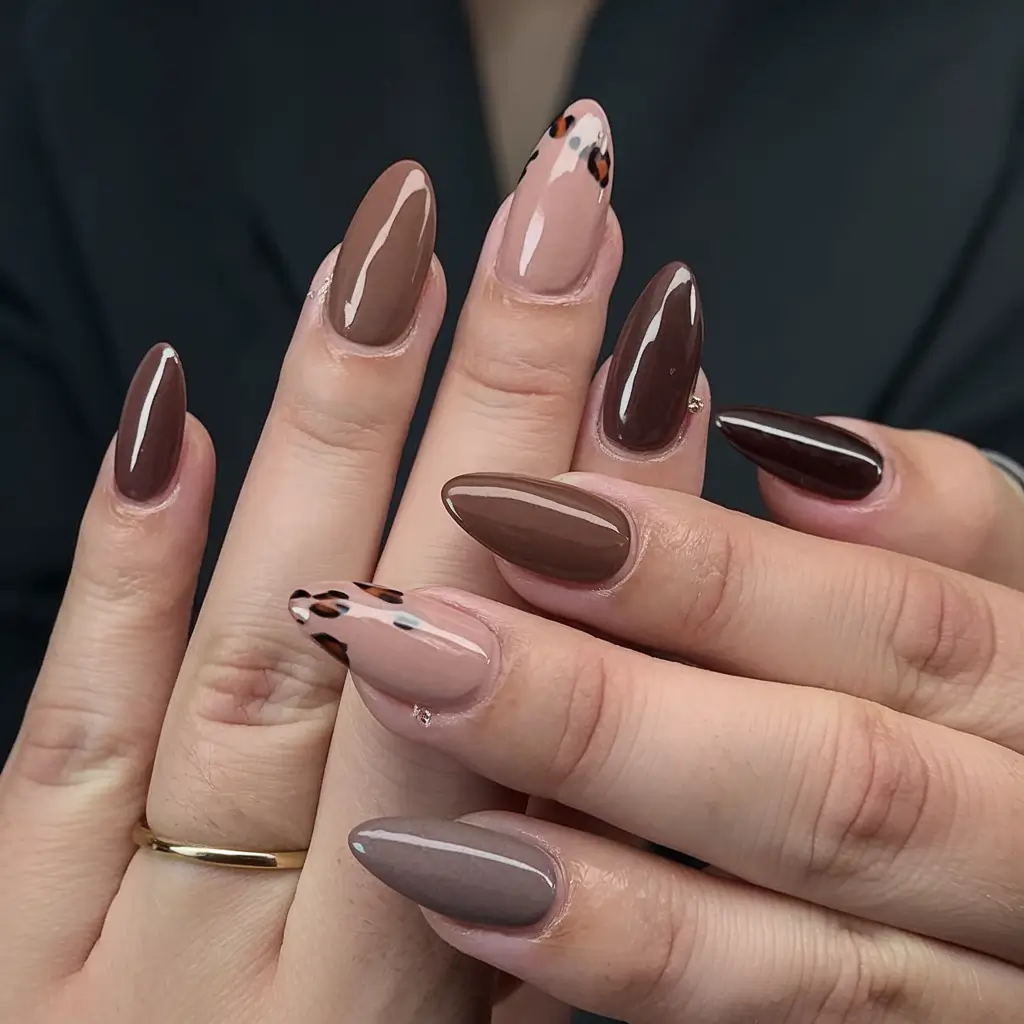
For the color palette, grab Zoya’s “Louise,” “Farah,” and “Emilia” to create that chocolatey gradient. For the leopard, use Orly’s “Liquid Vinyl” and a fine dotting tool.
Apply each shade across different nails and cure. In the leopard print, just apply random spots of black color on the lightest nude and define with brown to give it a blended appearance. Seal it with a super-glossy top coat.
I tested them on a summer coffee date, and immediately felt instantly put-together. Browns are no longer a color reserved only of fall – they add a touch of understated glamour that is perfectly suitable in warm weather.
Classic Baby Boomer Ombre
This one is truly timeless. The baby boomer ombre graduates very softly between pink at the base and milky white at the tips, making the ultra-smooth gradient that can be used literally on any occasion. It has a modern edge with the squared-off nail shape, and it can be worn to work or weekend brunch.
Use OPI’s “Bubble Bath” for your base pink, blending into OPI’s “Funny Bunny” at the tips. A blending sponge (soft) will assist in attaining that perfect gradient.
Apply your pink base and cure. Then very lightly daub white polish at the tips with your sponge, and blend upwards. Repeat in thin layers till you get the gradient effect that is seamless. Seal everything in with a glossy top coat.
Every time I wear this, people assume it’s salon-done. It’s just so clean, elegant, and wearable. If I am being honest, it is my default whenever I want my nails to have a fresh look but not too busy.
Glossy Bubblegum Pink Simplicity
Sometimes, less really is more. This shiny, bubblegum pink look is flirting with old-fashioned femininity, with no frills or accessories. The almond shape makes the fingers look longer, and the glass-like shimmer helps the color to stand out. It’s simple, fresh, and perfect for everyday summer wear.
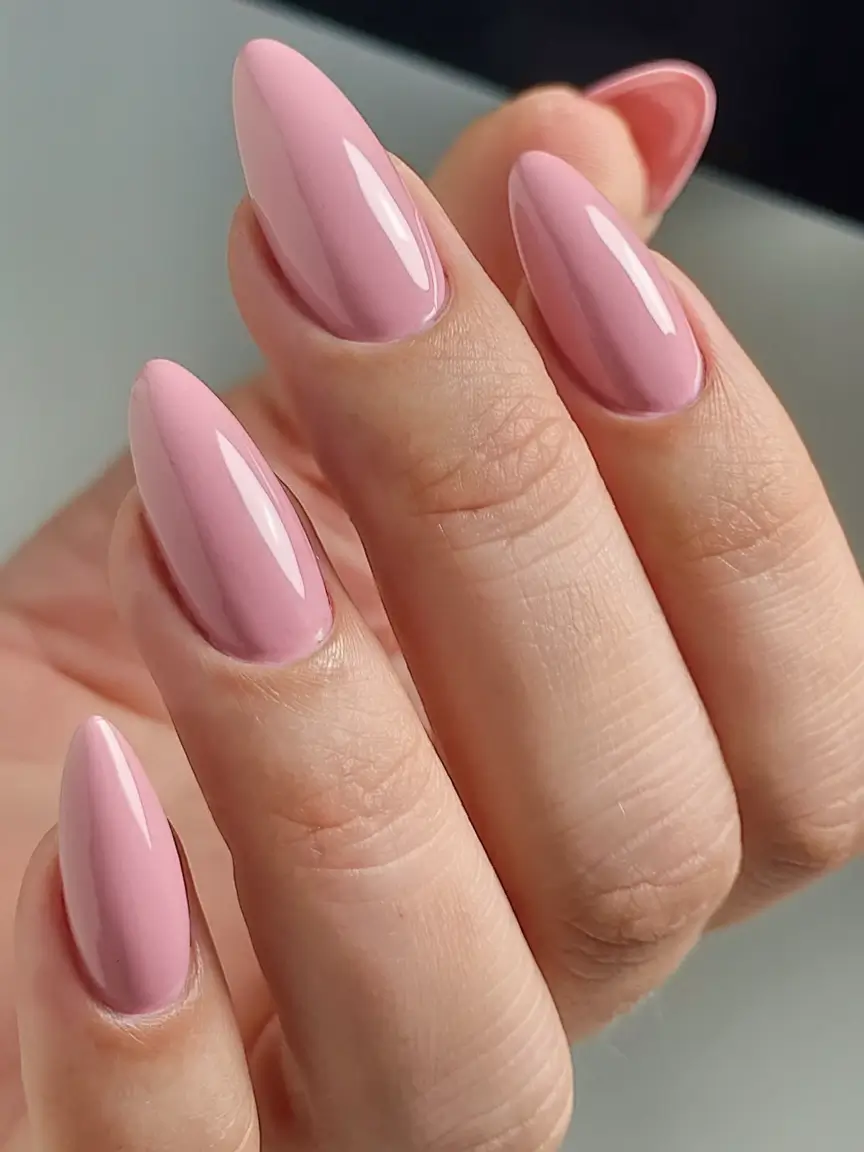
For this juicy pink, Essie’s “Mod About You” is my absolute favorite. This intensive shine can be achieved when matched with the Dry Fast Top Coat by Seche Vite.
Apply two thin coats of the colour, and allow each to dry or cure thoroughly before you put on your top coat. The key to this is a flawless preparation – smooth nail beds will make this high-gloss even more perfect.
The color always gives me the vibe of that easy, worry-free summer atmosphere, you know, the windows down, your favorite music playing kind of feeling. It’s effortless but still feels pulled together.
Mirror Glazed Iridescence for Summer Glow
And occasionally one desires to have nails which glitter like morning light. This is pure modern glamour: a light pink base with a chrome-like iridescent finish that flashes pearl, lilac and a bit of gold depending on the light. The almond shape is soft and the mirror finish is giving such a wow effect with no embellishment at all.
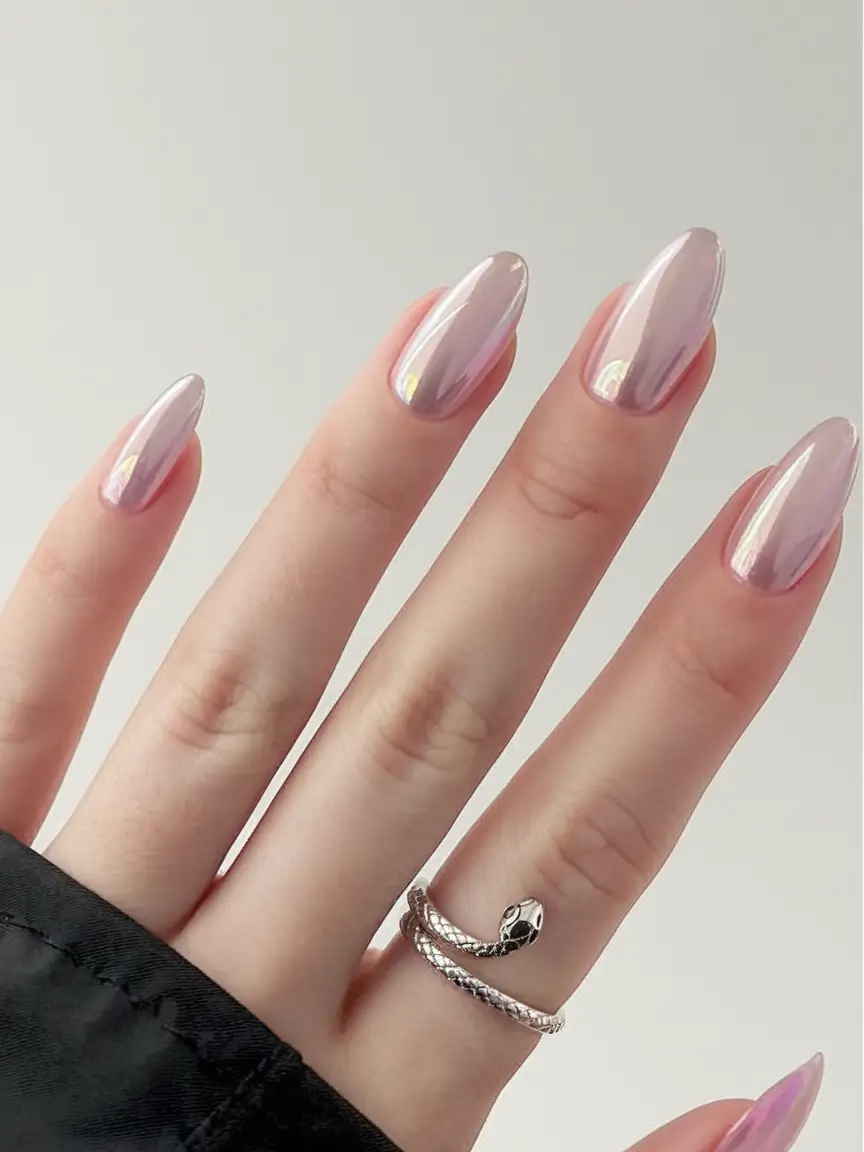
Start with OPI’s “Bare My Soul” as your base, then layer Daily Charme’s Chrome Unicorn Powder over it for that magical shimmer. To buff the powder into your cured topcoat you will require a soft silicone applicator.
Apply your base color, and when cured fully, rub in your top coat with chrome powder being very careful not to disturb the underlying color. After you have obtained complete coverage, lock it all in place using a non-wipe gel top coat to give it the glassy mirror-like finish.
When I wore these last August, I was stopped at least 3 times by random people who wanted to know where I had my nails done. It is the one that literally captures every last Ray of summer sun – ideal for poolside soirees and rooftop dinner dates.
Cherry Red Hearts for Playful Romance
This appearance adds a touch of Valentine Day in summer. It has a pale nude-pink base with mini cherry-red hearts and random dots to give your nails the most perfect, sweet, playful feel. It’s romantic but also surprisingly wearable for everyday, especially when you’re feeling flirty.
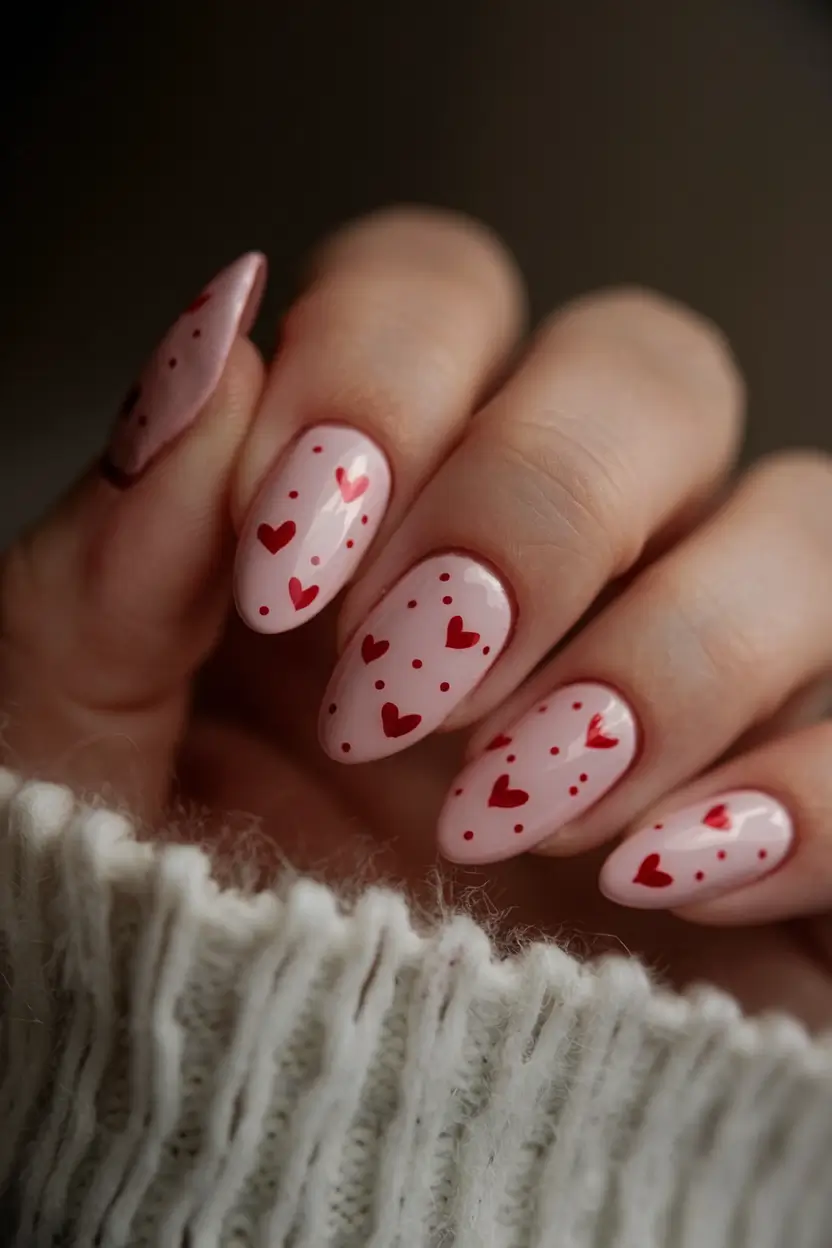
For the base, Essie’s “Ballet Slippers” works beautifully. The red hearts can be painted with OPI’s “Big Apple Red”, using a tiny dotting tool or a fine liner brush.
Once your base is completely cured, you will need to draw your hearts, make two dots near each other and draw a line joining the two at the bottom. throw a few small dots about to give that confetti-like look. Finish with a glossy top coat.
This design became a default when I had to attend an engagement party of my cousin last summer. It gives such a joyful mood without being too much, such as putting your heart on your sleeve, but make it nails.
Dusty Blue Simplicity for Understated Chic
Sometimes one single color says everything. This dusty blue design is calm, cool, and sophisticated. The subtle sheen and even tone give off major “quiet luxury” vibes — perfect for beach days, city strolls, or working remotely from your favorite café.
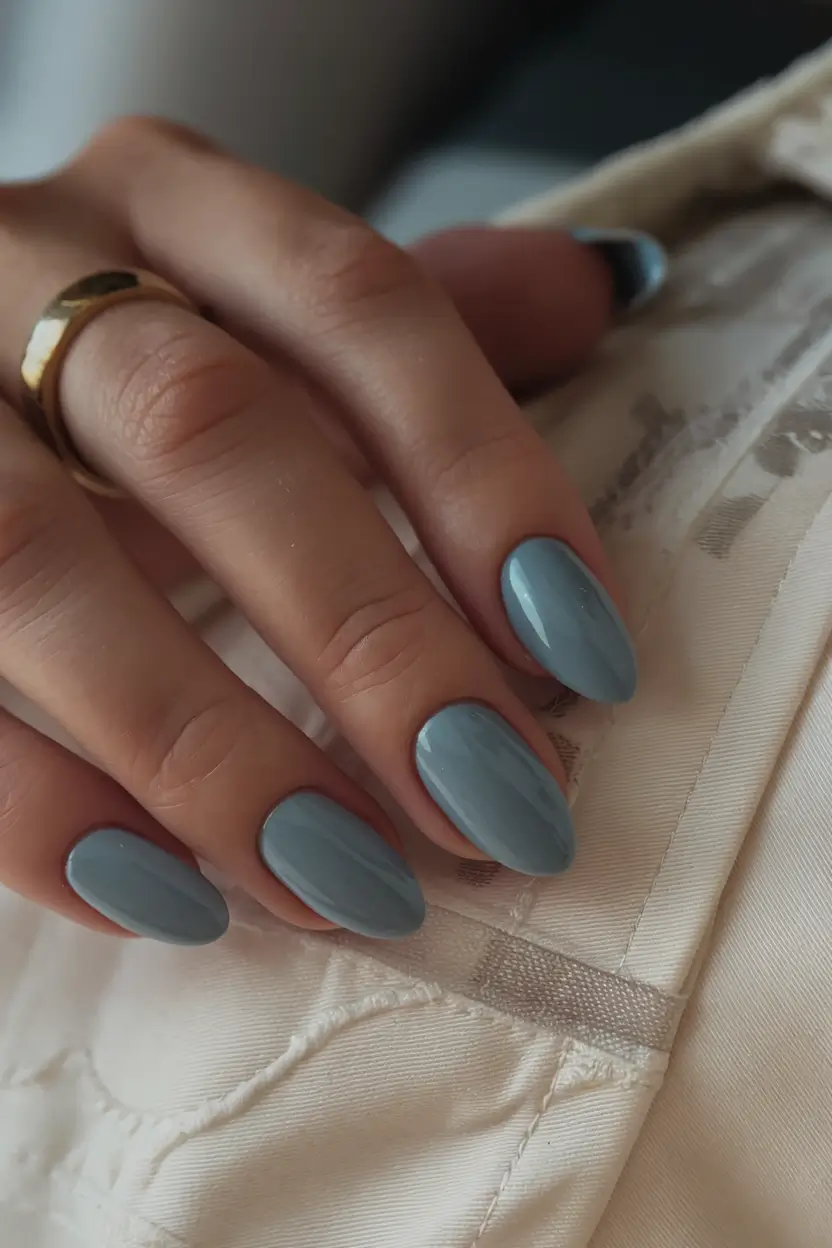
Olive & June’s “Yes Please” gives the perfect muted blue. Seche Vite Top Coat makes the color really pop by giving a glassy finish.
Apply a couple of smooth coats and leave each to dry completely before coating with your top coat. With such a flat, solid color it is all in the evenness of your application.
This color was actually my unexpected favorite of last summer – it is the perfect match to denim and is a really nice alternative to traditional nude shades when you need something neutral but a bit cooler.
Golden Tipped Elegance
Here’s your luxury take on minimal nail art. The effect of translucent nude base and ultra-fine golden metallic tips looks very classy and high-end. It is like jewelry on your fingertips, subtle yet you cannot miss it when the sun catches.
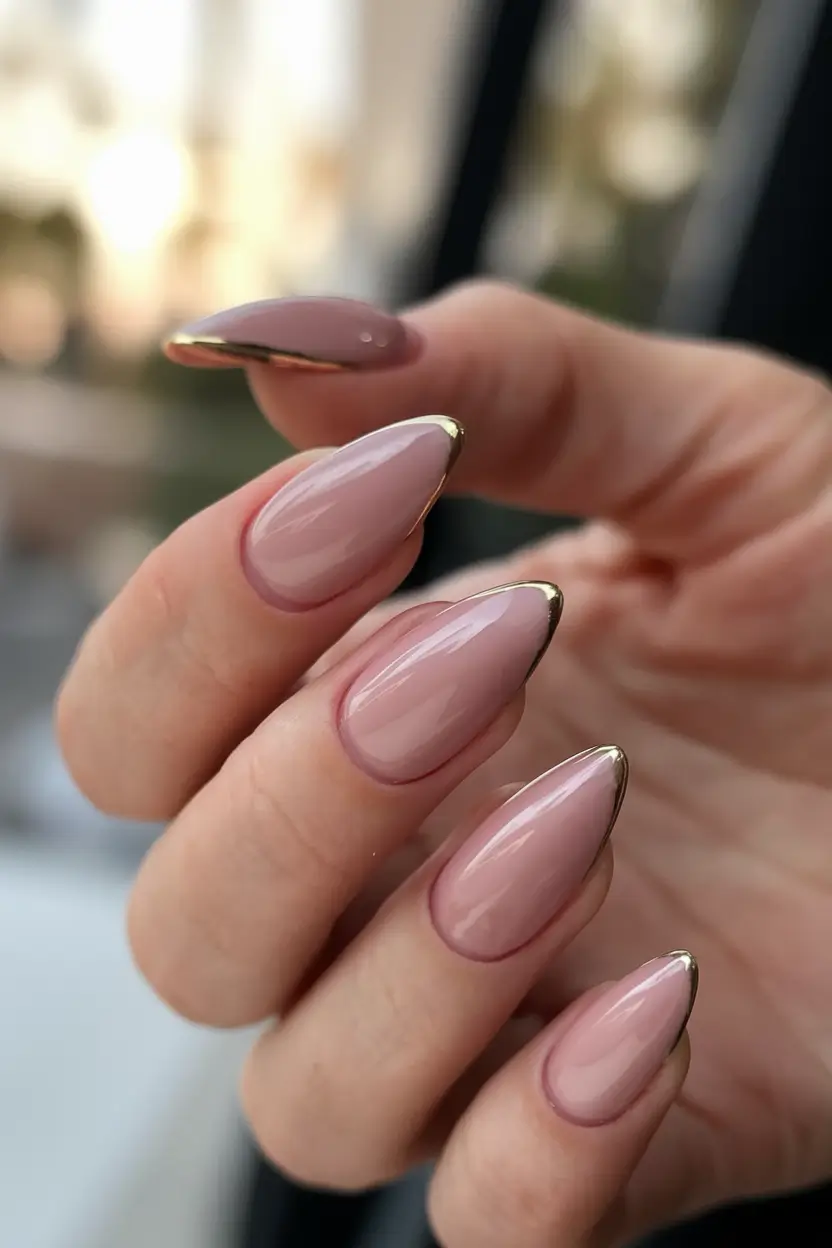
Use OPI’s “Bubble Bath” as your sheer nude. To obtain the gold, the gold art gel or ultra-fine gold nail tape may be used with Leaf Gel.
Apply your base, cure and then proceed to apply the gold tips carefully with a thin liner brush. Make sure the tips stay fine and even. Finish by coating with a long lasting gel top coat to seal the metallic coating.
I attended a summer wedding wearing this design and it looked and felt like I had jewelry on my nails without even having to wear any. Subtle but oh-so-chic — exactly what celebrity manicurist Betina Goldstein calls “luxury minimalism.”
Wine-Red Contrast with Artistic Swirls
This design screams sophistication. Varying deep burgundy nails with nude bases, which have abstract wine-red swirls, provide the perfect contrast of the bold and soft. It is adult, sophisticated, with just a bit of artsy roughness to make it very current.
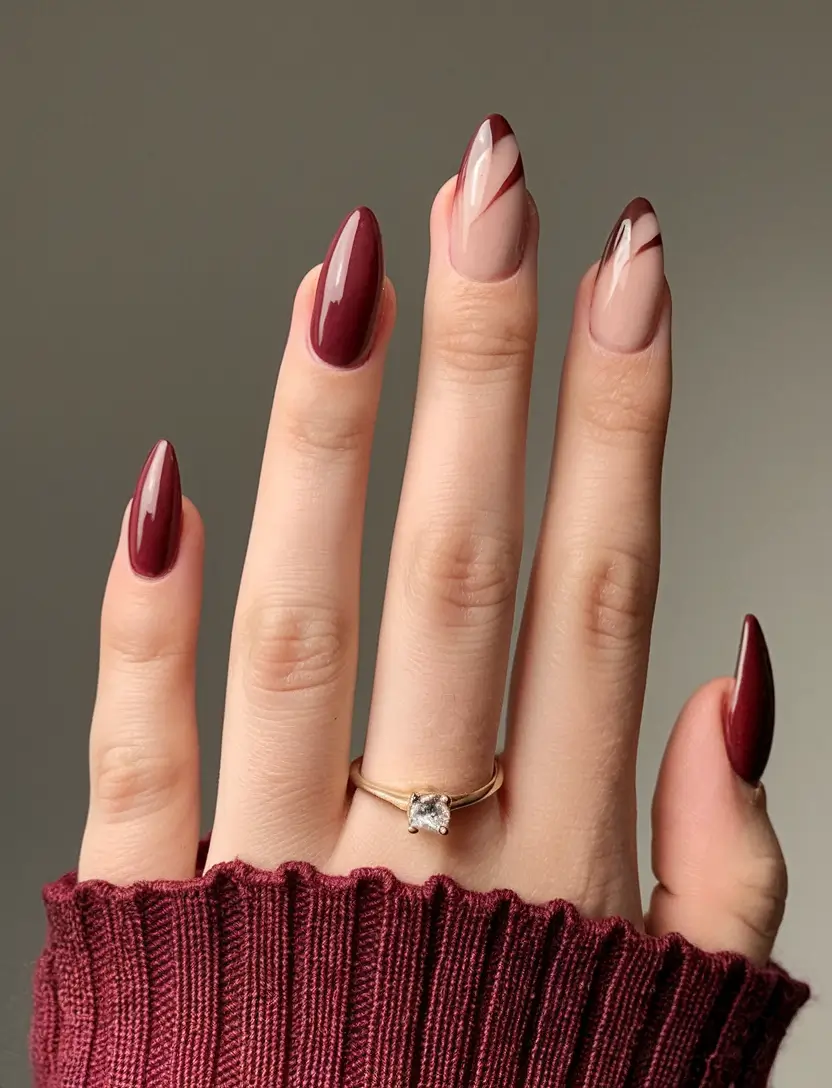
For the burgundy, OPI’s “Malaga Wine” is a cult favorite. Use Essie’s “Bare With Me” for the nude portions, and a fine liner brush to paint the swirls.
Apply your base colors first, curing after each. Let the wine-red swirls be freehanded and confidently -these organic forms are not supposed to be absolutely identical. Seal with a shiny top coat to give the depth.
I wore this design to an anniversary dinner and was complimented by complete strangers -which, frankly, never does get old. It’s that perfect marriage of elegance and art.